Lesson 15: Vantage Point

Today, we’re going to go back to basics and talk about vantage point.

By this, I mean from where you’re viewing your subject.  Vantage point is one of the ways that you can take an average photo and make it really interesting.

Sometimes, the difference between standing and kneeling makes all the difference.  Sometimes, moving a few feet left to right makes the difference between whether your best friend has a statue growing out of her head or looks like a normal human being.  And, let’s not forget the difference getting close to your subject can make when it comes to filling the frame.

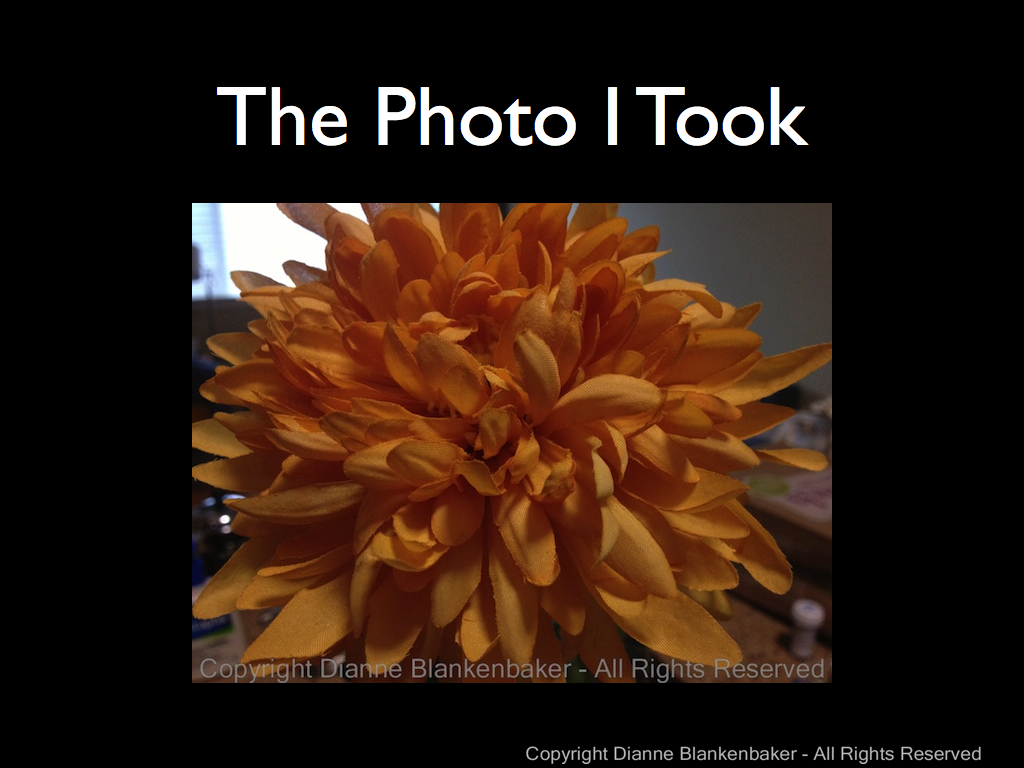
Let’s start with a simple example.  Since I don’t have a cooperative human model to work with and my dog is on strike, I’m going to choose a lamp.  Now, a lamp is not the most interesting subject, but we’re going to see what kind of difference the vantage point makes with a simple lamp.

I’ll start by standing back and taking a picture that’s what the average person who doesn’t read blogs about how to take better photos would take:

IMG_2911

Not exactly profound.  Even if you imagine this is a person, you can probably guess that it wouldn’t look particularly interesting.  Now let’s try from the floor looking up at the lamp from a much closer position:

IMG_2912

Notice how the lamp looks taller and skinnier?  Wouldn’t your friends love you if you made them look taller and skinnier?

But notice what’s behind the lamp.  It’s a pretty distracting background with all the stuff on the wall.  If I move around the lamp and shoot from the same angle but on the other side, I get a much cleaner background:

Notice how all you see is the lamp.  Now, let’s try getting very high and shooting down at the lamp.  I had to use a step ladder since I have the lamp sitting on a stool.  Notice how the lamp looks distorted with the area closest to the camera looking disproportionately large compared to the base?  This can be a really cool effect.  (Also notice what happens to the chins of human subjects.)

One of the fantastic things about digital photography is that you can try as many angles as you can think of without having to worry about wasting film or prints.  Just remember to delete what you don’t like.  If you have 20 photos of the same thing and 2 or 3 really stand out for you, those other 17 are just going to waste your time and energy if you keep them.

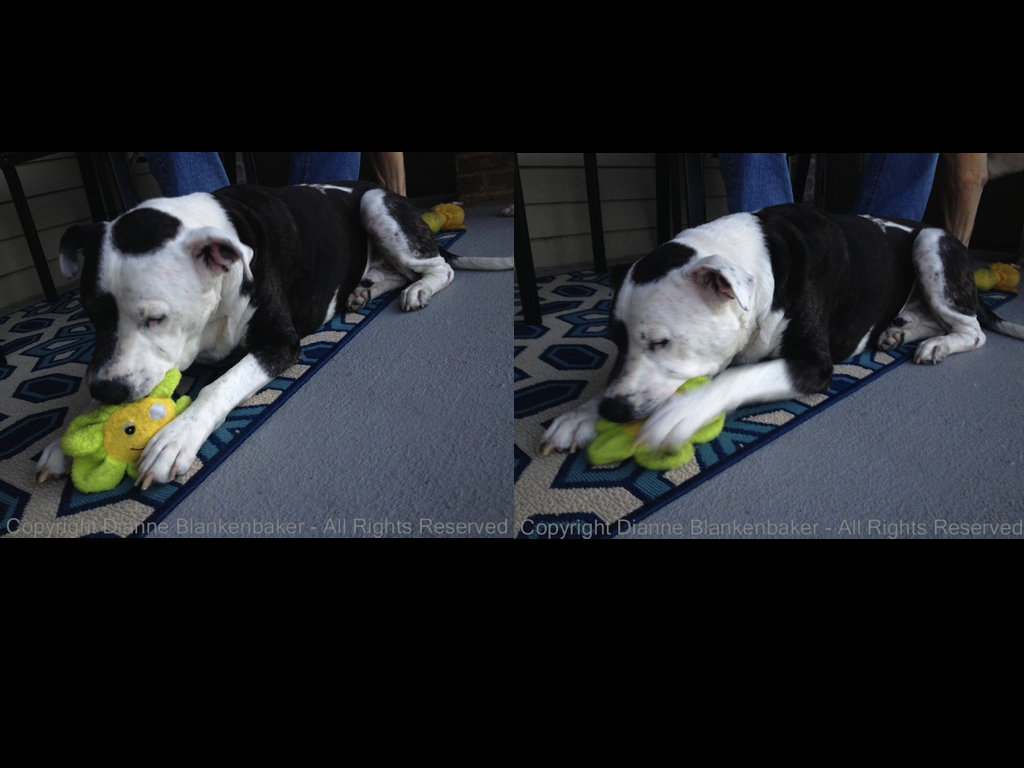
You’re assignment:  Pick a patient subject that will hold still.  This may be an inanimate object like a lamp or a person who lives to please you.  A dog may not be a good choice for this assignment.

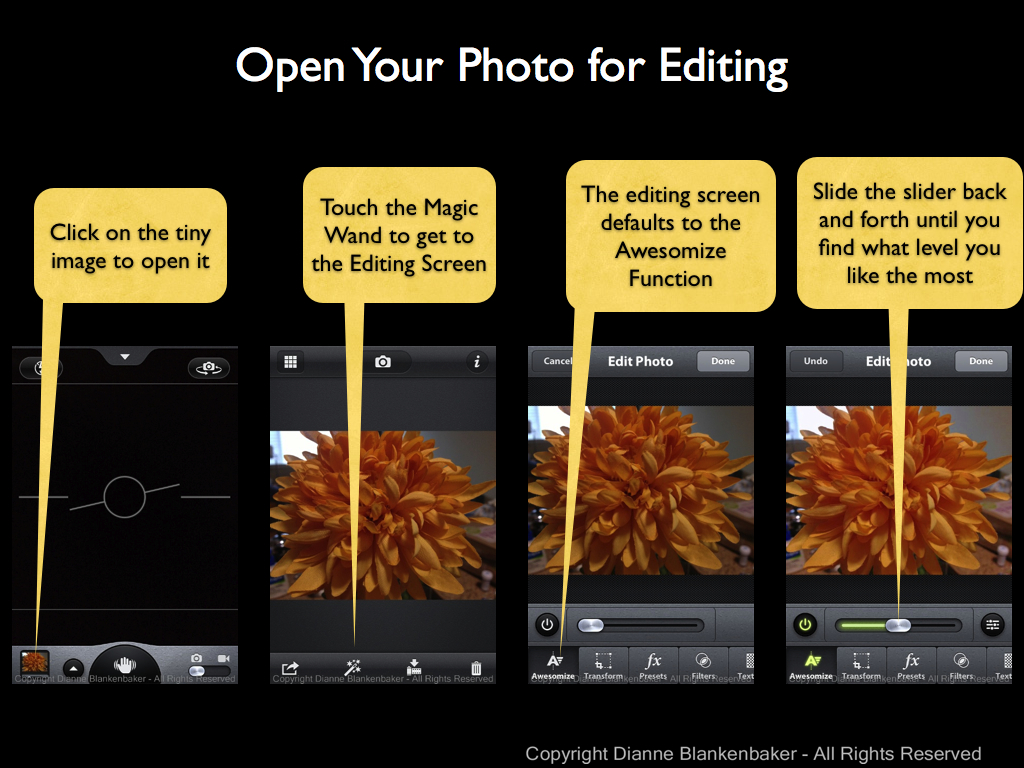
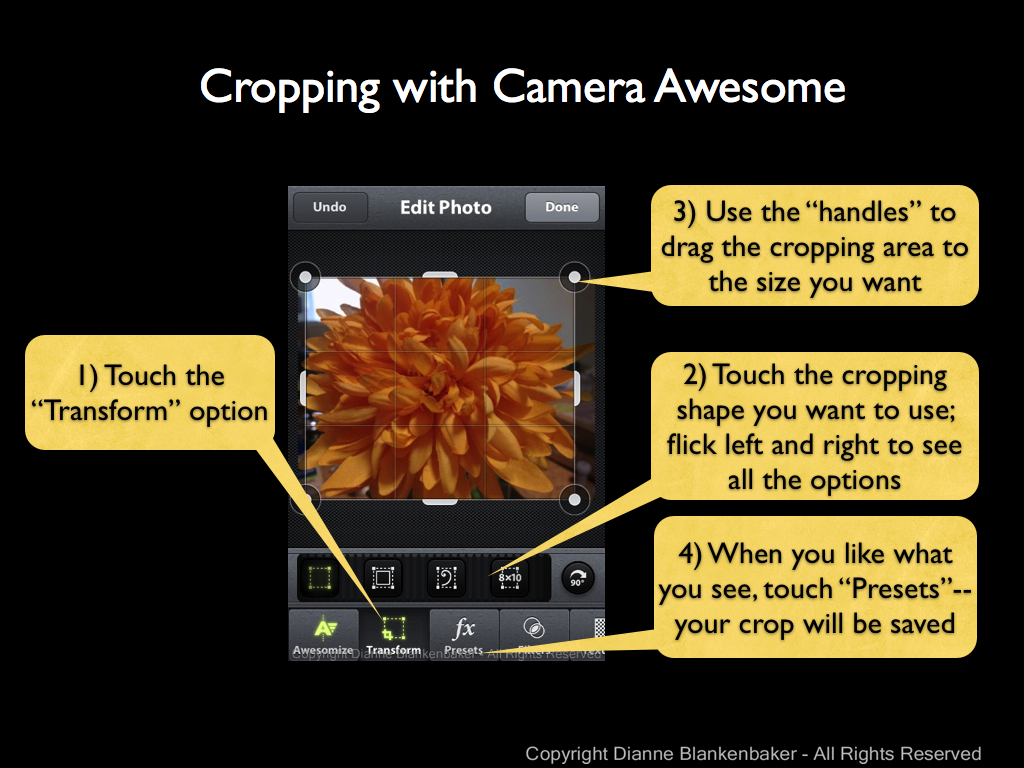
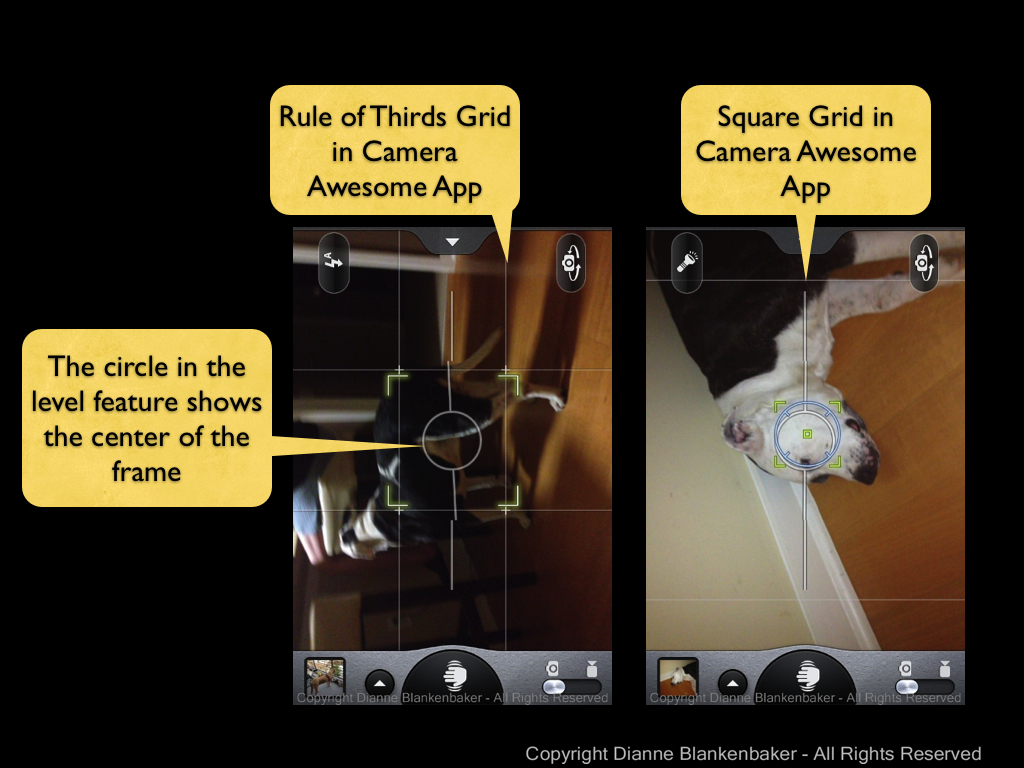
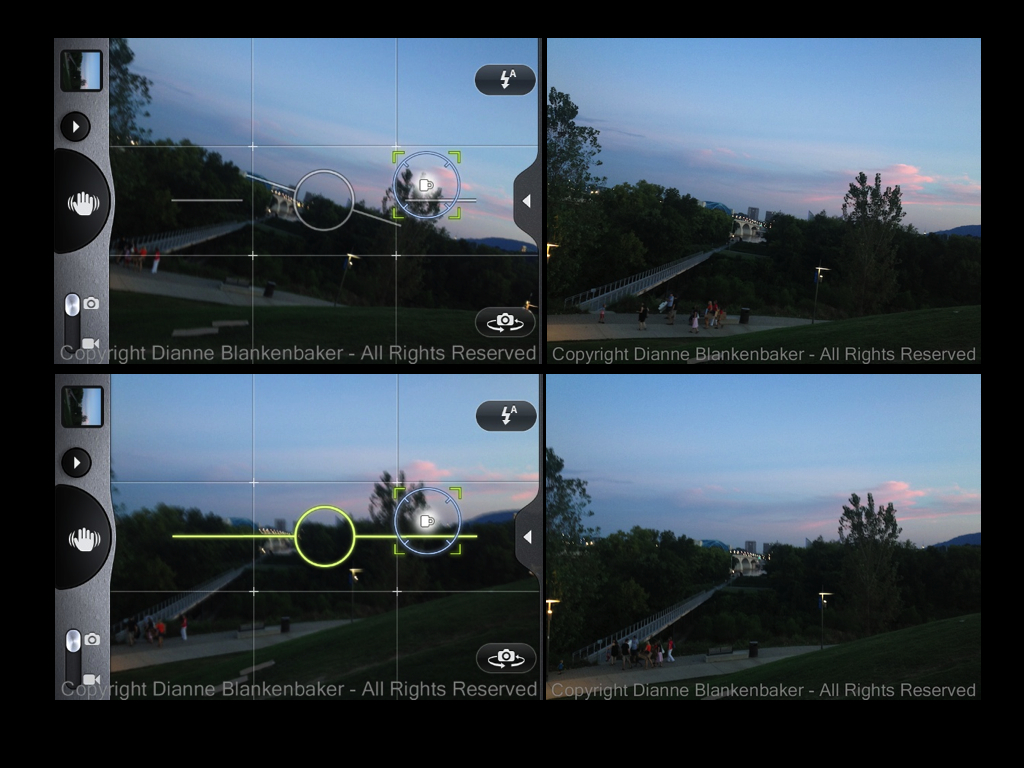
  1. Pull up your favorite app for shooting (I used Camera Awesome), stand back, and take a picture pretty much square to the subject.
  2. Take a few steps closer, get down on the floor and try taking a photo angled upwards (note:  human subjects really do not like to have their nose hair or double-chins revealed in photos, so be careful about how close and upwards you’re shooting.)
  3. Take a look at what’s in the background–is it distracting?  The eye is drawn to bright areas, sharply focused areas, and bright colors. Any of those things will make the background distracting.
  4. Look at the photo one more time–is there anything directly behind your subject that looks odd?  Any strange lines in the scene?
  5. Move around the subject and watch the background.  When you get a really clean background, try shooting again (turn your subject around as appropriate first).
  6. Now try getting up high and shooting downwards on your subject (for people, have your subject look up at you).

Which angles do you like best?

Lesson 14: Another Way to Be Hip

In yesterday’s lesson, we used an included “lens” and “film” in Hipstamatic to create some interesting effects in our photos. One of my personal favorite combinations in Hipstamatic is the combination of the Helga Viking lens and the D-type plate film, which creates a black and white, tintype effect.

However, that lens and film combination costs extra, so I thought today we would look at how to create a similar effect using the Camera Awesome app, downloaded in lesson 7 and further explored in lessons 8 and 12.

One of the differences between the two apps is that in Hipstamatic, you frame and shoot and you’re done. In Camera Awesome, you have more decisions to make while shooting and then you apply different edits to get the effects. The disadvantage is the time it takes. The advantage is that you have a “normal” photo to work with and you can always get back to the original to try something different. In Hipstamatic, you get what you get.

I often take photos with Hipstamatic and then take a similar photo using Camera Awesome or my DSLR so that I have both the Hipstamatic version and something I can control. I always have to laugh when I’m standing somewhere with my DSLR hanging around my neck while I’m taking a picture with my iPhone.

In any case, let’s take a look at what the tintype effect in Hipstamatic looks like compared to using edits in Camera Awesome.

This is what I got using the Helga Viking lens and D-type plate film in Hipstamatic of my dog taking possession of my husband’s shoes:

IMG_0012

I took a similar image using Camera Awesome and started with this:

IMG_2882

I tapped the magic wand to get into the edit screen, and then did the following (click to enlarge):

camera awesome vintage.001

Next, I added a preset and a filter. If you need detail instructions, you can look back at lesson 12, just choose the Lone Star preset and the Cyanotype filter.

camera awesome vintage.002

Finally, we’re going to add a frame to the photo–I didn’t show all the screens, but it’s basically a repeat of selecting a filter. The main difference is when you’re done, it’s time to tap the done button.

camera awesome vintage.003

Now, let’s compare the Hipstamatic to the Camera Awesome version:

I did this same exercise with a landscape photo of the fog in the hills this morning. I added a square crop to better emulate the Hipstamatic look, which is done using the “Transform” option from the editing choices. Here’s a comparison of the results:

Your Assignment: Find three types of subjects to photograph: a person or pet to photograph up close, a room or garden to photograph from a bit further back, and a large open area to photograph from far away (like up the length of your street). Using Camera Awesome, photograph all 3 of these subjects. Now try applying the editing instructions to see which of them you like best with this type of look. Which kind of subject do you like best?


Lesson 13: Getting Hip

OK, I was going to wait before introducing a new app.  Especially another one that costs money.  But, I can’t help myself.  Today, we’re going to look at Hipstamatic.  The good news is that it’s available for several types of phones; the bad news is that it’s $1.99.  And, there are so many add-on packs that you’ll probably want to spend several dollars before you’re done with this app–it’s a little addictive.

But, we’re going to start with some “included equipment” to keep the cost down.

Hipstamatic’s tag line is “digital photography never looked so analog.”  Essentially, through the magic of software, the app creates images with the characteristics of old, analog equipment.  The irony is wonderful.

If you look in my iPhonography Gallery, you will find many Hipstamatic images.  The vast majority of the ones I chose to share were created using an add-on pack that simulates a tin-type effect.  However, since that’s not included, I’ll save that one for later.

The way Hipstamatic works is that is allows you to change the “lens,” “film,” and “flash” to create the look of the historical equipment you choose.

Today, we’re going to select the film and lens, but let’s not use the flash.  To do this, click to enlarge the following instructions:

20130809 13 Getting Hip.001

Now that you’ve got the hang of switching lens, let’s choose the Buckhorst H1 lens (with the bright orange circles).  Next, we’ll choose the film.  Click to enlarge the instructions:

20130809 13 Getting Hip.002

Let’s choose the Kodak XGrizzled film for today’s lesson.

I have found it takes a while of shooting with a particular film and lens combination to figure out what effects they create.  I suggest not trying another combination until you feel like you know what that combination will do.  You can save the combination by tapping the star and creating a favorite.

Now, let’s try taking some photos.  Click to enlarge the instructions on how to get back to camera mode and enlarge the viewing area:

20130809 13 Getting Hip.003

Now it’s time to take photos.  Hipstamatic will create the effects and save the photos to your camera roll automatically.  Once you find a combination of film and lens you love, you’ll find it’s an incredibly fast way to get a really cool effect–very hip.

After you’ve taken some photos, here are instructions you can click to enlarge so you can see how to find your photos from inside the app:

20130809 13 Getting Hip.004

To get back to the camera mode, tap the image to see a frame with buttons and tap the bright yellow camera icon in the upper right corner.

One last pointer about Hipstamatic:  it creates square images.  This can have an amazing effect on how you view the world.  It also makes our earlier lesson on symmetry come in handy–symmetry works particularly well in square images.  Of course, asymmetry will also work if that’s what the subject calls for.

Your Assignment:  Go photograph everything!  Photograph small stuff up close, big stuff from far away, bright lights, indirect lights, skylines, dogs’ noses, and your key chain.  Photograph anything and everything that will hold still long enough for you to grab a shot.  It’s digital!  You can delete what you don’t like.  Take a look at what you got and decide the following:

  1. What kinds of subjects work really well with these effects?
  2. What kinds of subjects really don’t work well?
  3. Why do they work or not work?
  4. Can you take something that didn’t work and make it work by changing the angle or distance you’re shooting from?  Try moving your body up and down.

What do you think?  Is this a film/lens combo you can get addicted to?

Lesson 12: Awesomization

Today we’re going to do something really fun.  We’re going to take an ordinary photo and turn it into something complete unique from anything you’ve ever produced with an ordinary camera.  This lesson does require an iPhone.  We will be using the Camera Awesome app we downloaded back in Lesson 7.

I started by applying yesterday’s lesson on symmetry to taking a very close-up picture of a large, silk flower.  You can choose whatever you like for your subject and framing, but taking a close-up is probably a good idea for today’s lesson.  Use the Camera Awesome app to take your photo as a starting place.

20130808 A Little Fun.001

Now that you have a picture, you’re going to open it and perform several editing steps all inside the Camera Awesome app to create a completely different look.  Start by opening the photo in the app and getting into the editing screen as shown in the example below (click to enlarge).  Also try the Awesomize slider to see if it improves your image.

20130808 A Little Fun.002

Next, we’ll try the “Transform” option to apply cropping to really get rid of any distracting background we can.  You’ll notice in my example below (click to enlarge), I still have a distracting bright area in the upper left corner of the photo even after I crop.

20130808 A Little Fun.003

Now let’s get really creative!  Let’s try the presets available.  Now, Camera Awesome offers a bunch of presets if you keep scrolling through the categories (flick to the left to see more groups of presets).  However, only the first category is free.  You have to pay $5.99 to get the other options.

20130808 A Little Fun.004

In this case, I chose Road Trip because I liked that it both reduced the glare of the bright spot and brightened the flower in a nice way.

Next, I decided to apply a filter.  Again, only the first category of filters is free.  I picked the Cyanotype because, combined with the Road Trip preset, it did some pretty cool things to my photo.

Once you’ve picked the filter you like (click “Undo” if you don’t like any of them), it’s time to click the “Done” button.  This applies your changes and save the edited image.  But before you go anywhere, make sure you also export at least your edited image.  (You may also want to export the original image.  You can go back to the same photo to export the original after you export your edited version.)  See the following example (click to enlarge):

20130808 A Little Fun.005

Now your lovely new picture is in your Camera Roll.  You can open it up and view it full screen and share it at will.  This is what my final picture looked like:

Awesomized

And this is what the original and edited version look like side-by-side:

20130808 A Little Fun.007

You’re Assignment:  Pick a subject that’s interesting close up and has some texture or a pattern of some kind.  A big, silk mum is great because it has a very dimensional texture vs, say, carpet.  However, even carpet can be interesting up close.

Use Camera Awesome to take a picture–remember to focus and expose separately if that helps.  Make sure you’re far enough away that the iPhone can focus–if you’re pictures keep coming out blurry, you may be too close.

Now use the step-by-step instructions above to play with the editing capabilities of Camera Awesome until you get an image you like.  Don’t forget to export it!

Which image do you prefer?  The original or the modified picture you created?

Lesson 11: The Rule of Symmetry

Back in lesson 2, we talked about the rule of thirds.  I showed you how to turn on the rule of thirds grid in your iPhone and gave some examples of how images can be improved by applying this rule.  Today, we’re going to talk about another rule, the rule of symmetry.

The rule of symmetry can be stated as:  if what you’re shooting looks symmetrical, don’t mess with that.  Often, subjects like architectural structures, moons, subjects with reflections in water, and anything round look better when they are more or less centered in the frame.  Sometimes, people do things that make great symmetrical photos as well. 

I pulled out a few examples from photos I’ve shot in the past.  I added an example that used a DSLR just to make the point.

In this example, I lined up the moon right on the center vertical line of the image and allowed the shapes of the bridge to create a nearly symmetrical image.  It bugs me that the bridge elements are not identical on either side, but that’s because each section of the bridge is progressively larger.  To make it symmetrical, I’d have to shoot at an angle (which might be worth trying).   Click on the image to enlarge. 

symmetry.001

In the next example, this is a pretty classic way of doing symmetry.  I was on a business trip and took a quick photo of a road leading to an arched entrance to a large courtyard in Madrid.  This is an iPhone photo taken at the peak of the afternoon sun, creating some very bright areas in the photo, but it is nearly symmetrical.

symmetry.002

The next example shows a photo taken by laying back on some steps that lead up a fire tower in a park.  The outside frame of the structure is quite symmetrical, but the stairs add a slightly off-balancing element.

symmetry.003

Finally, in this image, I unconsciously applied a slightly revised rule of thirds and the rule of symmetry.  The bridge is at about the top grid line for the rule of thirds, but the entire subject is centered on the vertical center of the photo.  This helps capture the uphill climb to the bridge as well as draws the eye more effectively to the bridge itself.

symmetry.004

To frame a shot symmetrically, I just leave the rule of thirds grid on.  However, if you’re using the Camera Awesome app, you can also choose a square grid, which can be helpful if you’re planning to crop the image to a square later or if it just helps you predict whether you’re image will be symmetrical or not.  To select the guidelines you want to display, just tap the tab at the top of the screen.  A “drawer” of options slides out and you can choose what you want to use.  We’ll stick the rule of thirds and square options right now.

IMG_2811

If you also took lesson 7, you probably have your level turned on in the Camera Awesome app.  The center circle for the level also indicates the center of your frame, which is another way to determine symmetry.

symmetry.005

Now, I just want to show one example of what happens when you try to treat a non-symmetrical subject like it’s symmetrical.  My dog is not symmetrical (at least not a this angle).  When I try to create symmetry with his head by taking a picture with his head in the middle, I don’t actually get any symmetry in the image at all.  From this angle, he’s all rule of thirds.

symmetry.006

I wanted to show how my dog can look symmetrical if photographered from head on, but my dog wasn’t particularly enthusiastic about modeling for me tonight.


Your Assignment:  Look for symmetry around you. Taking a photograph up a flight of steps, head on to a person or pet, straight at a doorway, or centered on a round flower will all create symmetry.  Try different subjects that have their own symmetry to them and see which ones you particularly like shot symmetrically.  Try combining symmetry with the rule of thirds and see what you get.  What kinds of subjects did you come up with that work well symmetrically?

Lesson 10: Taking Stock

The inspiration for these lessons, my best friend Gina, reports that her photos are getting worse instead of better.  This is a common experience–there are many reasons for this phenomena:

  1. You are developing an eye and you are seeing more of the shortcomings of your photos than you did in the past.  A photo that you thought was the best photo ever suddenly looks flawed with new found knowledge that influences your taste.  You might look back at the photos you selected in Lesson 1 to see if you see flaws in them you didn’t notice when you selected them.
  2. You are learning new skills that take time to get comfortable with.  A certain amount of physical dexterity is required to hold an iPhone level and stable while you choose focus and exposure options and click the button to take the photo.  You may not have developed the fine motor skills required to do this well.  You are also learning new things to think about when you set up to take a photo.  It can be confusing to have to decide which app to choose, how to apply the rule of thirds, think about holding the iPhone with good form, and decide how to set exposure and focus.
  3. In Lesson 1, I told you there were no rules.  But in the subsequent lessons, I introduced a series of “rules.”  When we are young and learning our language for the first time, we lack the experience to know when a new rule doesn’t apply.  For example, children often add “-ed” to the end of words inappropriately when they first start acquiring the skill of forming the past tense in English:  “I goed to the store with Mommy.”  Similarly, when you are learning a new rule, it’s hard to judge when to make exceptions.
  4. If you are dutifully doing the assignments at the end of each exercise, you are probably photographing whatever is most convenient to complete the exercise.  How interesting photos are is largely dependent on the subject you’re photographing.  Although we will eventually learn how to make seemingly uninteresting things interesting, if you look back at the photos you picked in Lesson 1, you may find that they are of particularly interesting places or people.  It’s hard to make up for that with basic skills.
  5. The 9 lessons so far are not enough to take your photos from ordinary to extraordinary.  I suggest looking at the example photos I used in the lessons (included in this post for your convenience).  You might notice that none of them appear in my iPhonography Gallery page.  This is because I don’t like them.  They are not great photos–they are exercises.  We have not yet gotten to lessons that expose the power of using an iPhone as a camera.  That power is not in its ability to capture great details or strong contrasts.  The power of the iPhone is in the range of applications available to easily do really creative things with the photos you take.  Be patient–we’ll get to those lessons.
  6. In digital photography, the equivalent of developing film is called post-processing.  This means after the photo is taken, it’s adjusted using software to make it look better.  We haven’t gotten to using any of the tools available for adjusting photos, so you are looking at photos that are merely “negatives.”  We’ll get to post-processing–just know that your photos aren’t really done yet.

Your Assignment:  Take a look at the photos you created as part of each lesson.  Take stock of what you learned from each exercise.  Do you have better control of where you focus?  Are you framing your subjects in new ways?  Are you better able to control the exposure you get?  Congratulate yourself for what you’ve learned, no matter what the photos look like.

Lesson 9: Combining Two Exposures into One Photo

Yesterday we addressed how you can use Camera Awesome to set the exposure and focus separately in your iPhone.  The advantage is being able to get a better overall exposure while still keeping the photo sharp where you want it.

Today, we’re going to learn another technique for getting the exposure you want that’s particularly useful when photographing a landscape scene like yesterday’s where there is a bright sky over a dark landscape.

We’re also going to download a second app called Pro HDR.  Good news for non-iPhone users–it’s also available for Android!  The bad news for all is that it’s not a free app.  It costs $1.99, so you’ll have to decide if you want to spend the money to experiment with it for today’s lesson or not.  If not, you can try with the iPhone’s default camera app, which has an HDR setting in the Options menu.  I do not use this setting because I haven’t found it to work well for me, but perhaps you will have better luck.

At the risk of getting too technical, HDR stands for High Dynamic Range.  It is not related to High Definition technology.  What the Pro HDR app does is take one photo exposed for the darkest areas of the scene and a second photo for the lightest areas.  Then it automatically combines the two into one image, choosing the best exposure for the different areas in the photo from the two photos and sprinkling in a little magic to make the photo look really good.

Because it’s all automated, it’s very easy to use and doesn’t require knowing anything about how HDR works.  The only thing it requires is that you hold the phone very stable while it does some analysis and then takes the two photos–this can take a while, so make sure you’re using good form holding the phone and in a position you can maintain.

To start the process, you launch the app, frame the scene the way you want and then tap the screen (you can also push the volume up button, but the volume will annoyingly pop–it does still work) to start the process.  Then, you just hold still and watch it do its magic (click to enlarge):

HDR slides.001

When I used this app while at Snooper’s Rock yesterday, these are the two photos it took and the combined image that resulted (click to enlarge):

HDR slides.002

You’ll notice that the combined image has much better exposure for the sky than in the first image and a much better exposure of the trees in than in the second.  It works very nicely for these types of subjects.

Where this technology doesn’t work so well is when you have people walking in and out of your scene or if your subject is in motion.  Check out this example of my dog’s best bud (and my dog’s tail end):

HDR slides.003

This is always disappointing to me as my black-and-white dog would be much easier to expose using Pro HDR.  However, even though he stood very still in the next image, the motion of his panting was enough to cause his throat to get blurry in the combined image:

HDR slides.004

You’re assignment:  Download Pro HDR (or turn the HDR option on in the iPhone default app).  Choose a scene with both very bright and very dark areas.  Now take a picture with the default app, with the Camera Awesome app using the methods we explored yesterday and the day before, and, finally, using Pro HDR.  Compare the images.  Do you feel like you got your $1.99 worth from the Pro HDR app?

Here’s my example comparing the results from the 3 apps:

comparison of apps.005.005

Bonus Assignment:  See if you can create some really cool ghost images using Pro HDR.  Sometimes this can be a really fun effect.

Lesson 8: Separating Focus from Exposure

In yesterday’s lesson, we downloaded the app Camera Awesome.  If you missed yesterday’s lesson, you might want to download it now.  It’s a free app available from the Apple App Store.

One of the pains of using the default camera app that comes with the iPhone is that you can only pick one spot on your screen to set both the exposure and the focus.  The Camera Awesome app is one of several apps that allows you to pick one spot to set the focus and another spot to set the exposure.

Why is this awesome?  There are many times when the thing you want to be in focus is  darker or lighter than the overall scene and you have to choose between what you want in focus and how you want the image exposed (see lesson 5).  With Camera Awesome, you can focus in one spot and adjust the exposure in another spot so you get a better exposure and still get the focusing point you want.

For example, when shooting landscape scenes like the one in the example below (click to enlarge), with the default camera app, if I choose the rock for the focus point, the sky turns white.  If I choose the sky to get a better exposure, the rock is not longer sharp.  I don’t want a blurry foreground and I don’t want a white sky.

Separate Focus and Exposure.001

Using the Camera Awesome app, I can touch the screen with one finger and, while keeping that finger still, tap the screen with a second finger to get a green square for focusing and a blue circle for setting exposure. I can move each around with a fingertip to find the best focus point and best exposure point separately.

Separate Focus and Exposure.002

By separating the two functions, I have more choices about how the photo will look.

Separate Focus and Exposure.003

One note I didn’t mention in yesterday’s lesson:  With the Camera Awesome app, the photo is stored inside the app until you tell it to save it to your Camera Roll.  It’s best to choose the images you want to keep and save them to your Camera Roll for future use as soon as you’re done shooting.  That way you won’t end up with hundreds of photos in the app.

Here’s one last example of when separating focus and exposure are important.  I focused on my dog is in the foreground, but found an exposure that keeps details visible in both the dark spot on his face and the sky.

IMG_1956

Your Assignment:  Choose a scene that has some brighter and darker areas where you want to focus on something in the foreground.  Using the default camera app that comes with the iPhone, choose the focus point and take a picture.

Next, open up the Camera Awesome app and practice touching with one finger and tapping with a second finger to get the separated exposure and focus settings to appear.

Focus on the same point you focused on using the default app.  Now slide the exposure around until you get the best exposure for your image.  Take a picture.  Save it to your Camera Roll.  Compare the two images.  Which one do you like better?

Lesson 7: Keep It Level

Today, we’re downloading our first new app!  While there are quite a few iPhone apps to choose from, one of my particular favorites is the SmugMug app formerly called Camera! and currently called Camera Awesome.  I’m sorry to say that it’s not available for other smart phones for those of you without iPhones.

You might want to pause and download the app before you continue.

While we talked about holding the iPhone firmly and square, we didn’t talk about holding  it level.  Sometimes having a crooked photo can really ruin a great image.  This is especially true when shooting skylines, water scenes, and architecture.  Anything the eye expects to be level will usually look pretty off when it’s not–even if you can’t tell when you take the photo.

The iPhone is not easy to hold level.  I seem to come home with crooked photos all the time.  For today’s lesson, we’re going to look at using the level feature in Camera Awesome to help us find level even when it’s hard to tell by eye.

If you open up the Camera Awesome app, there is a little tab at the top of the screen that will slide open like a drawer when you tap it.  In the upper right corner, you’ll see a button to tap that toggles the level on and off on the screen.  Turn the level on so your screen looks like this:

turning on the level.003 (1)

Tap the tab again to close the drawer and now you’re ready to shoot level.  The level will turn green like in the image above when you’re holding the phone perfectly level.

In the example below, I was standing on the side of a hill looking down a slope to a sidewalk at angle to me that leads to a river.  There are lines and curves intersecting everywhere and it was impossible to tell when I was level except for the handy level feature in the Camera Awesome app:

level examples.001

As you can see (click image to enlarge), the scene looks odd when shot at an angle even though I couldn’t tell what was level when I was standing on the hillside.  Sometimes, shooting level isn’t important–and can even be a detriment.  Take a look at the following example (ignoring the fact that my dog wouldn’t hold still):

level examples.002

Your Assignment:  Can you tell which of the two images above was shot level?  I’ll give you a hint–I was surprised when I saw them side-by-side and realized which one was which.  Which one do you like better?

Now, take a walk where you can get a view of the sky or a body of water or really any open landscape view.  Try taking quite a few photos of what you see both level and not level.  Now, turn off the level feature and see if you can shoot level without it.  How’d you do?

Lesson 6: Hold the Phone

One of the things we don’t always think about when we are taking photos is how we’re holding the phone.  Using an iPhone or any small-bodied camera, especially smart phones, creates a challenge around holding the phone straight and still.  This can both create blur and distortion as well as change the framing.  Click image to enlarge:

stability and angle of phone.001 (1)

The “rule of phone” here is to hold the phone as much like a camera as physically possible.  That means holding all 4 corners of the phone firmly.  Use your thumbs on the bottom side.  On the top side, use your left index finger and your right middle finger.  Assuming you have an iPhone 4S or later, keep your right index finger free to press the volume up button to take the photo.  Your finger placement will look like this (click to enlarge):

finger placement.002 (1)

If you turn your phone vertically, you may find it easier to keep your fingers in these positions, but open your unused fingers on your right hand to keep them out of the frame.

Now that you have a good grasp on your phone, look at the screen of your iPhone to frame the subject, use your free index finger to tap the screen to set focus/exposure, and then take a moment to make sure you’re stable and you haven’t messed up your framing in the process.  Then, click the volume-up button to take the photo.

Bonus tip:  if you have a place to set your phone that gives you the framing you want, you can use the volume up button on a headset to take the image, too.  This will ensure your phone is perfectly still and perfectly perpendicular.

Another thing to be aware of is the angle you are holding your phone at.  I sometimes find that I am not quite able to fit my subject in the frame.  When I look at how I am holding my iPhone, I discover I am holding it at an angle to the subject, which makes the space I have to work with vertically more condensed.  Compare these two images (click to enlarge):

stability and angle of phone.002 (1)

I held the phone at the same spot but at two different angles.  Holding the phone straight gave me more vertical space in the frame.  Keeping the phone straight can also help when you are taking photos of objects that are square and you want them to look straight.  As is true with any “rule,” sometimes an angled phone works great.

Your Assignment:  Practice holding your phone like a camera.  Start with the instructions above and try sliding your thumbs closer together or further apart.  Try using different fingers.  Practice setting focus/exposure and clicking the button to see if you can find a comfortable grip that helps you keep the phone steady while you move your free finger around.  You might even try turning the iPhone around so the volume-up button is under your left thumb–especially if you’re left-handed–some people find this easier.

Now take a few images with the phone at a right-angle to the ground.  Without moving, try tilting it forward and taking a photo and then back.  See how it changes what fits in the frame.  Notice if it affects the way the subject looks.