Lesson 13: Getting Hip

OK, I was going to wait before introducing a new app.  Especially another one that costs money.  But, I can’t help myself.  Today, we’re going to look at Hipstamatic.  The good news is that it’s available for several types of phones; the bad news is that it’s $1.99.  And, there are so many add-on packs that you’ll probably want to spend several dollars before you’re done with this app–it’s a little addictive.

But, we’re going to start with some “included equipment” to keep the cost down.

Hipstamatic’s tag line is “digital photography never looked so analog.”  Essentially, through the magic of software, the app creates images with the characteristics of old, analog equipment.  The irony is wonderful.

If you look in my iPhonography Gallery, you will find many Hipstamatic images.  The vast majority of the ones I chose to share were created using an add-on pack that simulates a tin-type effect.  However, since that’s not included, I’ll save that one for later.

The way Hipstamatic works is that is allows you to change the “lens,” “film,” and “flash” to create the look of the historical equipment you choose.

Today, we’re going to select the film and lens, but let’s not use the flash.  To do this, click to enlarge the following instructions:

20130809 13 Getting Hip.001

Now that you’ve got the hang of switching lens, let’s choose the Buckhorst H1 lens (with the bright orange circles).  Next, we’ll choose the film.  Click to enlarge the instructions:

20130809 13 Getting Hip.002

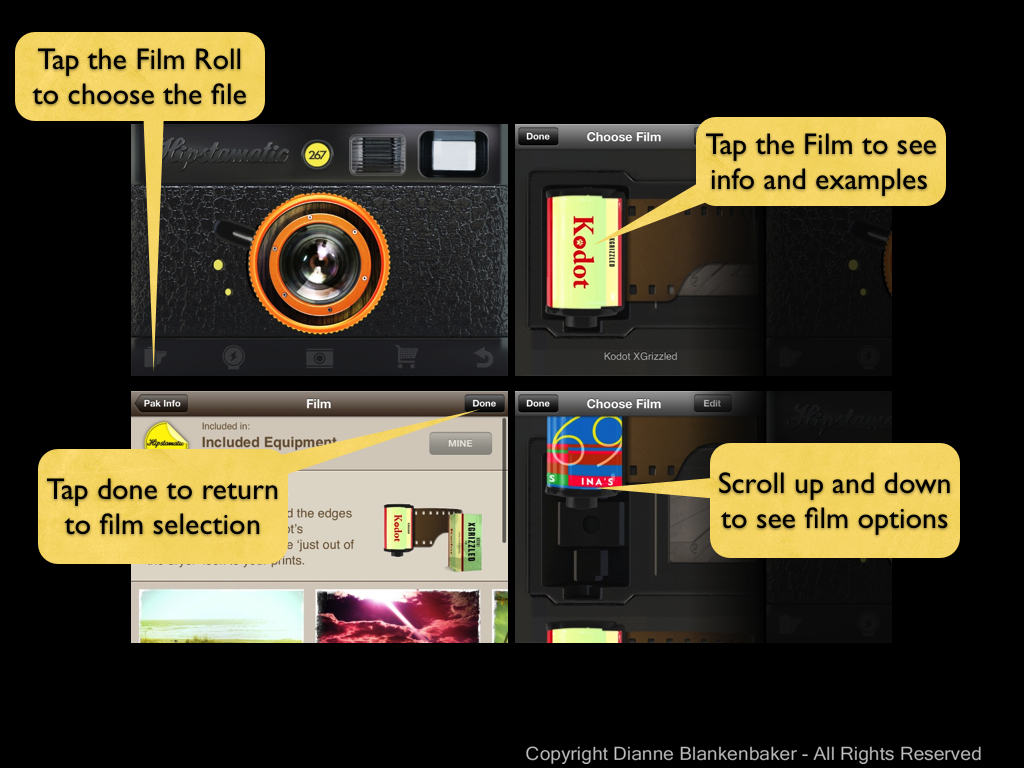
Let’s choose the Kodak XGrizzled film for today’s lesson.

I have found it takes a while of shooting with a particular film and lens combination to figure out what effects they create.  I suggest not trying another combination until you feel like you know what that combination will do.  You can save the combination by tapping the star and creating a favorite.

Now, let’s try taking some photos.  Click to enlarge the instructions on how to get back to camera mode and enlarge the viewing area:

20130809 13 Getting Hip.003

Now it’s time to take photos.  Hipstamatic will create the effects and save the photos to your camera roll automatically.  Once you find a combination of film and lens you love, you’ll find it’s an incredibly fast way to get a really cool effect–very hip.

After you’ve taken some photos, here are instructions you can click to enlarge so you can see how to find your photos from inside the app:

20130809 13 Getting Hip.004

To get back to the camera mode, tap the image to see a frame with buttons and tap the bright yellow camera icon in the upper right corner.

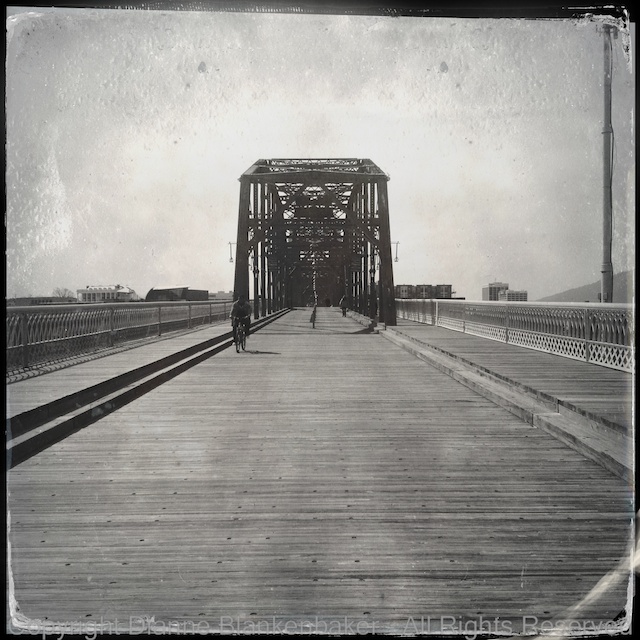
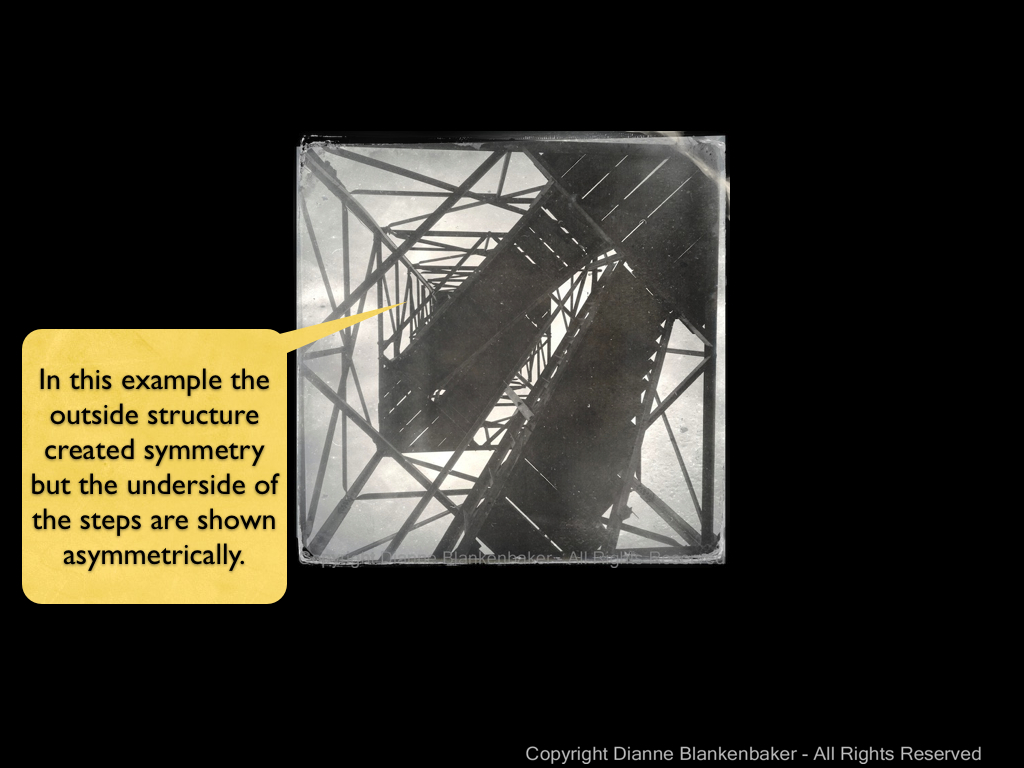
One last pointer about Hipstamatic:  it creates square images.  This can have an amazing effect on how you view the world.  It also makes our earlier lesson on symmetry come in handy–symmetry works particularly well in square images.  Of course, asymmetry will also work if that’s what the subject calls for.

Your Assignment:  Go photograph everything!  Photograph small stuff up close, big stuff from far away, bright lights, indirect lights, skylines, dogs’ noses, and your key chain.  Photograph anything and everything that will hold still long enough for you to grab a shot.  It’s digital!  You can delete what you don’t like.  Take a look at what you got and decide the following:

  1. What kinds of subjects work really well with these effects?
  2. What kinds of subjects really don’t work well?
  3. Why do they work or not work?
  4. Can you take something that didn’t work and make it work by changing the angle or distance you’re shooting from?  Try moving your body up and down.

What do you think?  Is this a film/lens combo you can get addicted to?

Lesson 11: The Rule of Symmetry

Back in lesson 2, we talked about the rule of thirds.  I showed you how to turn on the rule of thirds grid in your iPhone and gave some examples of how images can be improved by applying this rule.  Today, we’re going to talk about another rule, the rule of symmetry.

The rule of symmetry can be stated as:  if what you’re shooting looks symmetrical, don’t mess with that.  Often, subjects like architectural structures, moons, subjects with reflections in water, and anything round look better when they are more or less centered in the frame.  Sometimes, people do things that make great symmetrical photos as well. 

I pulled out a few examples from photos I’ve shot in the past.  I added an example that used a DSLR just to make the point.

In this example, I lined up the moon right on the center vertical line of the image and allowed the shapes of the bridge to create a nearly symmetrical image.  It bugs me that the bridge elements are not identical on either side, but that’s because each section of the bridge is progressively larger.  To make it symmetrical, I’d have to shoot at an angle (which might be worth trying).   Click on the image to enlarge. 

symmetry.001

In the next example, this is a pretty classic way of doing symmetry.  I was on a business trip and took a quick photo of a road leading to an arched entrance to a large courtyard in Madrid.  This is an iPhone photo taken at the peak of the afternoon sun, creating some very bright areas in the photo, but it is nearly symmetrical.

symmetry.002

The next example shows a photo taken by laying back on some steps that lead up a fire tower in a park.  The outside frame of the structure is quite symmetrical, but the stairs add a slightly off-balancing element.

symmetry.003

Finally, in this image, I unconsciously applied a slightly revised rule of thirds and the rule of symmetry.  The bridge is at about the top grid line for the rule of thirds, but the entire subject is centered on the vertical center of the photo.  This helps capture the uphill climb to the bridge as well as draws the eye more effectively to the bridge itself.

symmetry.004

To frame a shot symmetrically, I just leave the rule of thirds grid on.  However, if you’re using the Camera Awesome app, you can also choose a square grid, which can be helpful if you’re planning to crop the image to a square later or if it just helps you predict whether you’re image will be symmetrical or not.  To select the guidelines you want to display, just tap the tab at the top of the screen.  A “drawer” of options slides out and you can choose what you want to use.  We’ll stick the rule of thirds and square options right now.

IMG_2811

If you also took lesson 7, you probably have your level turned on in the Camera Awesome app.  The center circle for the level also indicates the center of your frame, which is another way to determine symmetry.

symmetry.005

Now, I just want to show one example of what happens when you try to treat a non-symmetrical subject like it’s symmetrical.  My dog is not symmetrical (at least not a this angle).  When I try to create symmetry with his head by taking a picture with his head in the middle, I don’t actually get any symmetry in the image at all.  From this angle, he’s all rule of thirds.

symmetry.006

I wanted to show how my dog can look symmetrical if photographered from head on, but my dog wasn’t particularly enthusiastic about modeling for me tonight.


Your Assignment:  Look for symmetry around you. Taking a photograph up a flight of steps, head on to a person or pet, straight at a doorway, or centered on a round flower will all create symmetry.  Try different subjects that have their own symmetry to them and see which ones you particularly like shot symmetrically.  Try combining symmetry with the rule of thirds and see what you get.  What kinds of subjects did you come up with that work well symmetrically?

Lesson 1: There are no rules

I am going to share a lot of “rules” with you as we go through some basics that will help you grab photos with more impact using your iPhone.  Before I do that, I just want to be clear that rules aren’t really rules.  You aren’t a bad person or even a bad photographer if you break the rules.  In fact, many of the most iconic photos break several “rules,” so it’s a good thing.  The trick is knowing that you broke the rules and knowing why.  Knowing what choices you can make gives you the power to make them.  That’s what “rules” are really for–helping you get a handle on all the choices.  So, the first lesson in photography is that rules are only rules when they’re helpful.

Your assignment:  pick a handful of favorite photos and take a look at them.  Imagine they were taken by someone else.  Imagine you didn’t know anything about the people, places, or things in the images.  Would you want to hang them on the wall?  Why or why not?