Out of the Dark

Number one question from beginning photographers who just shot an outdoor event on a bright sunny day on an automatic setting: why are my photos so dark?

Having just shot a big paddle boarding event here in Chattanooga (Chattajack 31), this question came up quite a bit with paddle boarders against the bright water and/or bright sky.

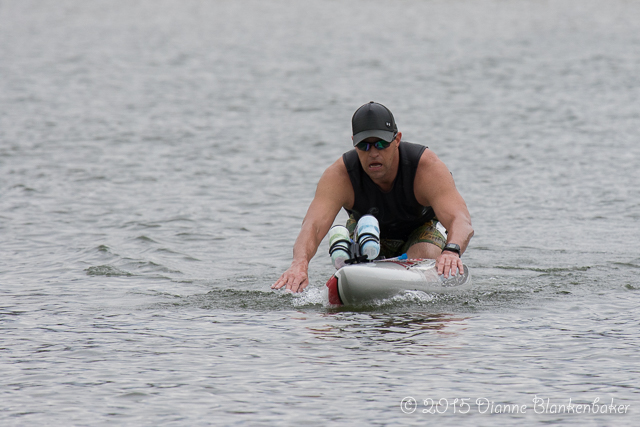
Let’s compare. If I had my camera on any automatic or semi-automatic (like Aperture Priority (AV) or Shutter Priority (TV)) without doing anything else (like using exposure compensation and spot metering), this is what this photo would have looked like:

While this might not look horrific, notice how deeply shadowed the subject's face is and how muddy his skin looks. Even the water looks overly gray.
While this might not look horrific, notice how deeply shadowed the subject’s face is and how muddy his skin looks. Even the water looks overly gray.

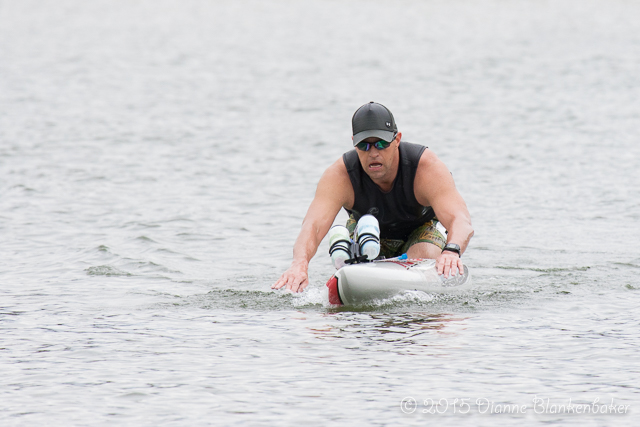
Because I used manual exposure controls and set the exposure to correctly expose the person, this photo looks like this:

20151024-exposure bright background
This is an exposure I can live with. The skin is brighter and clearer, the facial expression more obvious. The water may look almost white, but you still see the details of the texture.

If you are a novice photographer who really doesn’t want to understand why this is, all I can say is that you might want to look into one of the point-and-shoot cameras that claims to be smart enough to compensate for bright backgrounds—cameras are getting smarter and smarter.

If you are a photographer who really does want to understand why this is (and you don’t already), let’s talk about how metering with the camera’s built-in exposure meter works. I will not attempt to explain all aspects of metering in this post—there is always more to learn.

I am amazed by the number of folks who show up in some of my not-quite-beginner classes who do not know that their camera has a meter and do not know how to read it. So, let’s start with that.

Your camera measures the amount of light reaching the sensor and the meter tells you if the exposure settings you have (shutter, aperture, ISO) will yield what the camera thinks is a good exposure. A “good” exposure to a camera means that the amount of “brightness” or luminance of the image will average out to be the same as the luminance of 18% gray (or 12% gray as some argue). Whether it’s 18% gray or 12% gray, it’s a fairly dull gray color.

This is supposed to be a good average of the range of luminance in various subjects and will result in great exposure when your subject has the same luminance as 18% (or 12%) gray.

However, when your camera meters a very bright subject, it thinks it’s over-exposed because it is brighter than the gray it’s measuring against. So, in automatic settings, it under-exposes the images to make them average out to the same luminance as the gray standard.

I have had my students do a fun exercise that I learned when I was starting out. You put your camera on fully automatic with no flash, put a white piece of paper in even light and take a shot such that only white paper is in the frame. Then you do the same with black paper. Finally, take a picture where half is black and half is white. The first two pictures come out nearly identical—18 (or 12)% gray! The half and half comes out with correct exposure. If you’re thinking “oh, yeah, of course it would do that!” then you get how the built-in meter works and why the automatic settings the camera picks will make this happen.

If you don’t get it yet (and it’s OK if you don’t–it takes people some time to get their heads around this), you might want to try this: http://photography.tutsplus.com/articles/quick-tip-exposure-a-black-and-white-solution–photo-9480

You can also do this exercise on manual. Just make sure that your meter reads “0” with your exposure settings (change your shutter speed, aperture size, and/or ISO values until your meter reads 0). You will get the same results.

The camera thinks perfect exposure = 0 on your meter. So when you’re exposure settings allow the area the meter is metering to average out to the same amount of light 18 (or 12)% gray would meter at, the meter reads 0.

The trick here is to know that sometimes your camera is wrong. If you have a very small subject (like a bird) with a very big, bright sky behind it, you are going to have to set your exposure such that your camera thinks the image will be over exposed by maybe as much as 3+ stops (or 8x the light) to get that bird exposed properly—depending on how bright the sky is and how much light is falling on the front of the bird. For many cameras, the meter only reads up to 2 stops over, so you will see a flashing arrow or some other indicator that you’re off the meter. (The numbers on the meter refer to how many stops the camera thinks you are over or under exposed, btw. +1 means you have 2x as much light as the camera thinks you need; -1 means  you have 1/2 the light the camera thinks you need—one stop either doubles or halves the amount of light that’s reaching the sensor).

So, the secret to getting people exposed so they don’t look gray is to override your camera’s meter by using manual controls or exposure compensation in semi-automatic settings. I do not often use semi-automatic settings because the amount of compensation you need will vary depending on how much of the frame is occupied by your subject vs bright background or if your subject moves from having a bright background to a dark background.

That said, I don’t like it when rapid action is unfolding and I don’t have time to adjust the exposure between shots manually when the sun is moving in and out from behind clouds or the light on the subject is changing for other reasons.

You pick your poison when you decide between semi-automatic and manual exposure control. For me, I will use shutter priority from time to time, but I do not use aperture priority. The reason I don’t like aperture priority is only because it changes which dial controls the aperture, which messes up my muscle memory and causes frustration for me on the next shoot.

Whether you use manual controls or aperture priority or shutter priority, you will need to remember to adjust either the exposure settings or the exposure compensation. In the first case, you would need to adjust only when the amount of light on the subject changes (without having to worry about the brightness or darkness of the background). In the second and third cases, you would need to adjust when the brightness or darkness of the background changes or when there is a significant change to the % of the image that is background vs subject.

So, using a semi-automatic setting might make more sense on a windy day with clouds blowing across the sun, a course where the subject goes in and out of shadows quickly and frequently, and/or if the brightness of the background is likely to be constant and/or if the subjects you shoot will be the same size in the frame more often than not.

Why? Because semi-automatic shooting modes will automatically adjust the exposure and if the light on the subject changes, you want the exposure to adjust in this case.

Using fully manual controls would make more sense if it’s more likely that the subject will have the same light falling on it but the background will frequently change. Or if you are rapidly getting closer or further from a subject such that how much of the frame they occupy changes a lot.

Why? Because it will NOT automatically adjust the exposure and if the light on the subject doesn’t change, you don’t want the exposure to adjust. In comparison, semi-automatic shooting modes are going to adjust to make the meter read 0 plus or minus the exposure compensation you’ve set. So, the changing brightness of the background will trick the meter and cause the semi-automatic settings to adjust the exposure when they shouldn’t.

In the case of the subject getting larger in the frame, the metering will be more accurate meaning that you won’t need as much exposure compensation as when there is a very bright background and a small subject, so if you’re exposure compensation results in correct exposure with a small subject and a big bright background, it will result in over exposure if you zoom in and fill the frame with the subject because the meter will not be getting as much light from the background and will get closer to the correct exposure for the subject.

If you’re shooting in circumstances like the Chattajack—it was a bright day with a lot of clouds that were causing the light to change, the subjects were occupying vastly different % of the frame throughout the day, the background brightness changed dramatically and quickly all the time, and subjects were moving in and out of shadows continuously—you’re going to go home with some poorly exposed shots regardless of which shooting mode you choose. 🙂

Remembering to keep checking the meter and readjusting will help reduce the number of bad exposures, but sometimes you just can’t change fast enough. This is why I recommend that for a situation like the Chattajack, you go with the setting you’re most comfortable with. This will avoid panic. If fully automatic is the setting you’re comfortable in, the Chattajack is not the day to decide to become an expert manually setting your exposure.

Will Back-Button Focusing Make Me a Better Photographer?

All right, DSLR owners. I’ve had so many people ask me this summer about back-button focus and how and why to use it that I thought it would make a good post. Since this is (as usual) a long post, let me just summarize by saying if you don’t understand “focus-and-recompose,” focusing modes, focus selection points, critical focus, the focal plane, depth of field, and how to control all of these things, you probably should worry about those before you worry about using the back button to find focus. Back-button focusing is a great tool to achieve better control over autofocusing, but if you don’t understand how to control focus and what settings and techniques allow you to do that with autofocus now, it’s really not going to make a big difference for you.

That said, here goes my explanation of what back-button focusing is, why I use it, and some pointers on how to enable it on your camera if you want to give it a whirl.

First, what the heck are people talking about?

Back button focus means using a button on the back of your camera body to autofocus instead of autofocusing when you half-press/press the shutter button.

Why would you want to do that?

By separating autofocus from the button that also releases the shutter, you gain complete control over when your camera is focusing and when it isn’t, you can stop switching between autofocus modes and leave your camera in continuous focusing mode, and you make it easier to avoid releasing the shutter when you don’t mean to.

Why wouldn’t you want to do that?

Well, personally, I think back-button focusing is the bomb and I’ve been using it for so many years that it’s the first setting I adjust when I buy a new camera body because I can’t handle focusing via the shutter button.

That said, I have one big caution for you when it comes to switching to back-button focusing: choose when to make the switch cautiously. Your brain is programed to believe that the shutter button autofocuses right now. If you switch to back button, you will need to practice daily for about 2 weeks (depending on the neuroplasticity of your particular brain) to retrain yourself to go for the back button to find focus before you press the shutter. You would not want to make the switch and then go on the once-in-a-lifetime trip and/or to a once-in-a-lifetime event without having taught yourself this new habit before you get there–you will forget to focus and make a bunch of blurry photos at first.

Also, because of this need to create an unconscious habit, you don’t want to switch back and forth between using the back button technique vs the shutter button–you will get yourself very confused.

I Don’t Get It–Why is Back-Button Better?

In spite of all the hype about back-button focusing, a lot of students don’t get it at first. They look at me puzzled and try to understand why they would care which button causes the camera to focus.

So, let me tell you a little story about why I was so enthused when I learned about back-button focusing.

Back when DSLR screens weren’t so big or bright, I was doing a lot of landscape photography on a tripod. I found manual focus to be extremely difficult because the viewfinder focusing screen was terrible and I hadn’t yet invested in a loupe for my LCD screen, so I couldn’t see if I was in focus in daylight. So, I would put my camera on the tripod, compose my image, and then decide where I should focus based on DOF and hyperfocal distance. Then, I would begin the struggle of turning the camera to point at the place where I wanted to focus, hold the shutter button halfway, and then try to recompose the image back to what I wanted without releasing the shutter. I invariably either took the shot while still adjusting or lifted my finger and my focus unlocked. When you lose focus lock and then press the shutter button again, the camera re-focuses on whatever it picks to focus on instead of where you want to focus.

I then discovered there is a little focus lock button on Canon’s that if you press it, focus will remained locked “for a few seconds” giving you an unspecified amount of time to reset and shoot before it turns off. This little button just stressed me out because I was racing against a clock and I didn’t know how much time I actually had before the focus would unlock.

Then, I learned about back button focus. And, ahhhh, breathed a sigh of relief. I could still autofocus, but once I found focus with the back button, I was free to move the camera with both hands for as long as I wanted until I was ready and could get the shot I wanted. And so my love of back-button focusing was born.

If you’re not using autofocus on a tripod a lot (Manual focus avoids this problem), you will not have the same appreciation for this struggle. That doesn’t mean back-button focusing doesn’t still have many advantages.

By the way, even though I now have the tools to manually focus on a tripod, my lenses allow full time manual focus, meaning I can manually focus even when the lens is set to AF. By using back-button focus, I can leave my lenses on AF at all times and I don’t have to worry about undoing my manual focus when I press the shutter button.

I’m Not Autofocusing on a Tripod–Why Would I Care?

A big reason it can be hard to grasp why back-button focusing is so powerful is if you haven’t spent much time working on gaining control over focus in general. If you’re going around autofocusing with all your selection points turned on in single focus/one-shot focus mode (or if this sounds like gibberish to you), you actually have no idea where you are focusing. If you have no idea where you are focusing, back-button focusing probably isn’t the first step you need to take to get control of focus.

Personally, I have 3 bodies that have 61 focus selection points. Those 61 focus selection points are handy when I’m trying to get a shot of, say, a Cliff Swallow in flight. It’s a tiny bird that swoops and dives erratically and I cannot pan with it well enough to keep it in focus using my normal technique. As such, those 61 focus points become very handy when the bird is against a sky or other background that doesn’t fool my camera into focusing on the background (and I’m in continuous focusing mode and I have tracking set properly for such a subject).

The rest of the time, I use either 1 or 9 focus selection points. If I’m shooting landscape, portraits, etc, I use 1 focus selection point. If I am shooting moving subjects like birds that aren’t as erratic or small as swallows but are likely to fly, I turn on focus point expansion that allows me to find focus using the center point, but will activate the surrounding 8 points if the subject moves to help keep the subject in focus.

Now, this is about when students ask, “But I want more than one thing in focus. How am I supposed to get multiple people in focus if I only find focus in one place?” Well, I have news for you: critical focus only occurs at one distance from the camera. If 4 focus points light up when you press the button, it’s because the camera thinks all four of those things are the same distance away. If you want multiple people in focus, you need to understand DOF. This is the diagram I use to explain the relationship between where you find focus and how DOF keeps more than that distance sharp to students:

DOF and Focal Plane Diagram.001

So, first understand how focus works and how DOF helps you get what you want sharp, then worry about whether you should be using the back button to find focus or not.

Once you are very clear on what the focal plane is (which is technically where your camera sensor is positioned in your camera body, but is also often used to mean the plane of critical focus in the scene/subject you are shooting) and how to control DOF, you will realize the advantage of using one focus selection point whenever possible: it let’s you decide what should be sharpest in your image instead of your camera.

All of the Images in this Gallery Used the Focus-and-Recompose Technique (All of my Images are Made Using Back-Button Focusing)

Once you make the switch to using only one focus selection point, you then will want to make a lot of use of “focus-and-recompose,” which is what I was doing in the tripod example. However, focus-and-recompose is a fundamental technique  whether you’re on a tripod or hand-holding. It allows you to get both the focus you want and the composition you want without being dependent on a focus selection point being in the right place (if you are in one shot/single focusing mode). It means that, for example, you can use the center focus selection point (which always has the greatest ability to focus the most precisely in all cameras) to autofocus on a subject’s eyes and then lock focus and recompose so that your subject is artistically framed in your image. It gives you the ability to control critical focus without losing control over composition. The key is to ensure that when you recompose, you don’t change your distance from the subject as this will cause focus to shift forward or backward based on your movement.

The other key is that if you recompose, you must hold the focus. And this is where back-button focus becomes a life saver. If you have to half-press the shutter and hold it while you shift, you may either accidentally press the shutter all the way or let go of the shutter all together. Then you have to start over. With the back button, you can simply press the back button to find focus, release, and then concentrate on recomposing. When you press the shutter, because you have turned off focusing on the shutter button, your focus does not change and, as long as you also haven’t changed the distance from you to the subject, their eyes will be the sharpest thing in the image even though the focus selection point is no where near their eyes when you eventually do press the shutter button.

There are also advantages to using back button focusing when you are continuously focusing (AF-C on Nikon, AI Servo on Canon). As you track a subject in motion, you hold the back button and it keeps focusing, giving you more control on when you focus vs fire (it can be challenging to pan while holding the shutter button half way without firing). If the subject stops, you can release the back button, locking focus as if you were in one-shot/single mode and fire away. Essentially, you gain total control over when the camera is autofocusing and when it is not. It’s a beautiful thing once it clicks in your head how much easier it is to control focus this way.

This also means you never have to switch between one-shot/single focusing mode and continuous focusing mode–if you’re not pressing the back button, your focus is locked regardless of which focusing mode you’re in. By comparison, when you use the half-press of the shutter to focus, if you’re in continuous focusing, it keeps refocusing until the shutter releases, meaning it’s not possible to focus-and-recompose.

To summarize, back-button focusing is an advantage in all situations. There are fewer settings you have to use to control focus when you back-button focus and you gain greater control with less coordination. I honestly cannot think of any reason not to switch to back-button focusing other than ensuring you have the time to develop the habit before you make the switch.

You Convinced Me–Now What?

Remember, if you make the switch, you will forget to focus at first. Do not, say, decide you are going to make the switch because you are shooting a wedding tomorrow and you want to give it a try. Make the switch and really pay attention to whether you are finding focus when and where you want until you find yourself automatically pushing the back button without thinking about it and getting the results you want. Then, you can go shoot a wedding with back-button focus. 🙂

Now, the remaining question is, how do you turn it on/disable the shutter button focus? This requires finding the setting in your manual (which is usually different for each camera) that will allow you to assign functions to your buttons. You will, unfortunately, not find anything called “back-button focusing” in your manual.

In Canons, these settings are in the custom function menus and are pretty obtuse. Once you find a setting for the shutter button in custom controls, set it for “Metering Start” (or another setting that doesn’t include anything with AF in it) which will disable focusing with the shutter button. Find the settings for the AF-On button (the button is in upper right corner of camera back and furthest to the left of those 3 buttons—very convenient to find with your thumb once you get used to it). Make sure the AF-On button is set to “Metering and AF Start.”

In Nikons, it’s even more obtuse, but I don’t look at Nikons every day, so maybe it makes more sense to a Nikon shooter. In any case, you also need to go to the custom setting menu, to controls, and then go to assign AE-L/AF-L button. Choose AF-On from that menu. If the shutter button is also in that menu, check to make sure it isn’t enabled for AF-On as well. I’ve been told that in many Nikons you also need to set the camera so that the camera will still fire if it hasn’t been focused in order to get it to fire when it doesn’t know that you don’t want to refocus. That setting is also in the Custom Setting Menus under Autofocus and you want to set AF-C and AF-S priority selection to “release.”

Now, go practice, practice, practice! 🙂


Just When You Think You Understand Depth of Field

Depth of Field is one  of those concepts that most budding photographers come at in a series of stages.

First, there’s just getting your head around what Depth of Field means. To keep it simple, if you don’t know what depth of field is, we generally think about it as the distance in front of and behind where we focused that remains acceptably sharp. Close-up portraits with blurry backgrounds usually have very little Depth of Field. Wide landscape scenes are often acceptably sharp from the closest object in the frame all the way to infinity.

Second, most beginning photographers learn to gain some control over depth of field (DOF) by changing the aperture of their lens manually (in Manual or Aperture Priority mode on your DSLR). The wider you open your aperture, the less DOF you get.

Third, it eventually dawns on photographers who concentrate on controlling DOF that you don’t always get the same DOF with the same aperture and you begin to understand the other variables in play that give you more or less DOF (sensor size, focal length, distance to subject).

Fourth, you may get really technical and look up the mathematical formulas to calculate DOF and realize that it’s all kind of a guess because how much DOF you get ultimately depends on the size the image is displayed at, how far away you are viewing it from, and how good your eye sight is.

At this point, you may fall into the trap of believing you fully understand DOF and you have all the knowledge you need to get as much control as possible over DOF in your photography.

Then, perhaps one day you discover the mysterious Tilt-Shift lens, which throws everything you know about DOF completely, well, tilted.

Here’s an example. With a normal lens, we expect the focal plane to be perpendicular to the camera sensor. Therefore, everything that is the same distance from the camera should be equally sharp. Take a look at this image:

What is acceptably sharp forms a wedge that runs roughly parallel to the ground rather than a plane that spans the entire angle of view and runs parallel to the camera sensor.
What is acceptably sharp forms a wedge that runs roughly parallel to the ground rather than a plane that spans the entire field of view and runs parallel to the camera sensor.

This image is straight out of the camera with no editing (it was also in a bracketed set of multiple exposures for the purpose of doing a composite; I just happen to like the slightly darker exposure the best for an example).

Notice the plane of critical focus doesn’t seem to be a plane at all. It’s more like a wedge shape that runs parallel to the ground. And the area above and below the wedge that is acceptably sharp is thicker closer to the camera than further away—check out the closest tree trunk and how much of it is acceptably sharp. As you go back into the image, less and less vertical distance is sharp.

Notice that the people on the bench are sharp, but the tree at the same distance to the left of them is rapidly falling out of focus. I particularly like this composition with this effect—it creates a tunnel effect that leads the eye straight to the people on the bench.

Here’s another example, also straight out of the camera. In this case, the focus was on the face of the sculpture, but the body falls out of focus even though it is the same distance from the camera. In this case it has the effect of a vignette created by blurring the edges. But notice that the distant trees directly behind the sculpture still look acceptably sharp at the height of the sculpture’s head.

Shooting this sculpture relatively close on a tilt yields a sharp face and blurred legs.

In the next example, the sharper focus on the flowers vs the fountain keeps the eye lower, noticing the garden more. This is actually a “normal” use for a tilt shift lens—creating lots of DOF at a given height off the ground. This works really nicely for fields full of flowers, for example.

_U0A2614-1

Another popular use for the tilt part of a Tilt-Shift lens is miniaturizing a scene. This is a test shot through a window, but you can see how the shifted DOF causes the brain to perceive the scene as being a miniature version of a real scene:

_U0A2002-1

Once again, notice how the bricks to the right of the window are in focus, but as you get closer to the bottom of the window, they fall out of focus.

Now, you might wonder why you would buy an expensive lens in order to create these effects in camera given that this effect can be created in Lightroom or Photoshop. Truth be told, I would not buy a lens for the Tilt effect. It’s the shift effect that makes the lens worth it to me. We’ll talk more about that in another post . . .

Why does a 22.3 MP camera produce a 7 MB file size?

untitled-82-1
This file, after being resized to a small JPEG for sharing on the web, is now only 117 KB. The RAW version recorded in my camera was a whooping 28.6 MB.

First, let’s understand that megapixels refers to how many photo sites are in your camera sensor recording data to create an image. The number of photo sites equals the number of pixels (“dots”) in your image. The more dots, the smaller the dots are at any given print size, and therefore the greater the detail and resolution in your image.

So, many folks assume that if they have a 22.3 MP camera, they will get 22.3 MB files. There are many reasons why this likely won’t be true.

First, a mega pixel does NOT necessarily equate to a megabyte of data. How much data is recorded by a pixel (or, more correctly, a photo site on your sensor) varies. Brighter areas in an image record more data than darker areas. Also, badly over exposed or under exposed images record less data—the white goes to pure white and the black goes to pure black with no details. The same number of megapixels will produce different numbers of megabytes in different circumstances. Ultimately, the file size in MB is the total amount of data recorded by all pixels plus any “overhead” data added by the proprietary format.

Second, your camera has choices on how you want to record your image files. Some cameras have options to save different sizes of RAW format files and/or different sizes of JPEG format files (some even have TIFF choices). Here is an example of the different settings and the resulting file sizes from the Canon 5D Mark III manual:

Screen Shot 2015-02-18 at 12.03.26 PM

The different settings affect how many megapixels are turned on to record data as well as what file format the data is saved in, creating different file sizes.

So, what the heck does all this mean? RAW is a proprietary format that is unique for each camera vendor. It’s essentially your photo negative. It cannot be directly altered—if you edit a RAW file in software, you actually create a new file to save the changes. To share a photo, you have to convert to a standard file format such as JPEG eventually.

So, why not save all your images to JPEG in the camera to begin with? Well, there are good reasons to save JPEGs. For example, let’s say your shooting in completely predictable conditions (like a studio), you have all your settings dialed in and you know nothing is going to change on you. Shooting in JPEG can save a lot of space and allow your camera to shoot faster without having to stop and catch up periodically.

However, if you don’t feel confident that you know how to “dial-in” all of your settings (including the post-processing settings in your camera that determine things like brightness, contrast, saturation as well as the white balance setting), you might not want to risk losing data for the sake of saving space.

JPEG files are compressed. However, some of the data is thrown away when the file is compressed. So, the file size you get is significantly smaller than the RAW file, but some of that is because the data has been squished together (but is still there) and some of it is because data has been thrown away, never to be seen again.

Notice that the largest JPEG file in this example is 7 MB for a 22 MP image. This does NOT mean that 15 MP were thrown away. All 22 MP were used to record data, but that data got compressed into 7 MB. By comparison, the full RAW format would produce a 27.1 MB file. This difference does not indicate how much data was actually lost.

While JPEG is “lossy,” it also reduces file sizes by compressing data in ways that don’t necessarily result in a loss of quality. For example, instead of recording 1000 pixels individually are a particular shade of red, the JPEG file might just record that these 1000 pixels are red collectively. In that sense, the data isn’t “lost,” it’s just consolidated. However, some data is lost and repeatedly editing a JPEG causes the losses to be more significant. Also, the quality settings you choose when saving a JPEG have a significant impact.

Two areas of data loss that frequently limit what you can do with a JPEG image are data that falls outside the dynamic range of the JPEG file (pure black and pure white areas with no details) and in color casts. If you have an over-exposed sky in a JPEG file and you try to reduce the exposure in software, the sky turns gray. If you have a RAW file, it might bring back the blue—it depends on how badly over exposed it is.

White balance doesn’t fix well in a JPEG file either. If you don’t have your white balance just right, it can come out quite odd looking if you’re editing a JPEG. It can also be impossible to get the white back to white. Color-casts can ruin otherwise good images and are commonly seen in the images produced by beginning photographers.

As a general rule, if you want to do post-processing on your computer and you’re not overly concerned with hard drive space or memory, save the largest RAW files to get the maximum amount of data and the highest resolution images.

If you are confident you know how to control all the settings in the your camera properly so that you can produce final images with only the settings your camera provides and that the situation isn’t going to change suddenly (e.g., the sun coming out from behind the clouds can totally change your white balance), then you can save time and space by saving JPEGs.

Or, a simpler way to decide: are you a control freak? Save to the largest RAW format. Are you an efficiency freak? Save to the largest JPEG format. Do you not care at all how your images look? Save to the smallest JPEG format.

Frankly, I don’t know what to do with all those other choices. If you have to hand photos in JPEG format to people immediately while at a shoot, saving both RAW and JPEG makes sense to me. I haven’t come up with a use case that works for me for using smaller file sizes, however. And I sure don’t want to turn off a portion of the pixels I paid so much to have!

That said, camera makers don’t make up features just for the sake of adding features, so I’m sure there are use cases that make perfect sense for those settings as well.

Weird Colors and White Balance

During a workshop this past weekend, several folks commented about having trouble with their images looking yellow or having other weird color casts. This is generally solved by changing your White Balance Settings.

What is White Balance? Back before we had miniature super computers in our cameras, film photographers would use different film or filters to prevent photos from getting weird color casts based on the temperature of the light they were shooting in. Being able to adjust white balance in your camera is one of the great advantages of digital photography.

However, if you think about your camera as a computer, it has to be programmed to mathematically recognize white, which sometimes it does quite well. White balance basically tells the camera “this is white” and it then shifts all colors based on what it believes is white.

So, why is white not always white? Light has a temperature. That temperature causes us to see the light as more blue or more yellow and it can dramatically impact how all colors look.

For example,we once lived in a house where we’d painted every other wall  a nice, neutral gray. One of those walls was in the kitchen, which was open to the great room where two more of the gray walls were located. If we had florescent lighting turned on in the kitchen only, the gray wall in the kitchen looked robin-egg blue while, in golden morning light, the gray walls in the great room turned a soft lavender. The difference was so striking that we once had a guest ask us why we had painted the walls different colors.

The walls were painted the exact same color from the exact same paint can. The difference in color that we see is caused by the difference in the color of the light striking the walls.

This means that in the great room, I needed a different white balance setting from the kitchen to make white look white.

Auto White Balance usually works great in my camera. It has worked great for me most of the time in 5 different models of digital cameras now, even going back to the early 2000’s. As the algorithms in the camera’s computer have improved with each camera upgrade, the percent has probably gone from 75% of the time to 90% for casual shooting.

But then there are the times when it doesn’t work so well.

Auto White balance often fails when:

  • The temperature of the light is outside the range of temperatures your camera’s Auto White Balance is programed to deal with.
  • There are multiple sources of light with different temperatures lighting your subject (e.g., daylight coming through a window plus incandescent bulbs plus florescent bulbs all in the same room. Or, if you’re using flash indoors, most flash units are the temperature of daylight, so that will also create the same kind of mix as in the first example.)
  • Your subject contains a lot of one color or a limited range of colors, which can fool your auto white balance into thinking the light is cooler or warmer than it is, depending on the dominant color(s) in your subject.
  • You are shooting in the golden hour around sunrise or sunset. This is not so much a failure of auto white balance as an over application. Auto white balance will often eliminate the golden cast to the light, removing the warm glow that we usually find quite pleasing.
  • You need the white balance to be absolutely accurate so that colors are represented truly (e.g., a product photo).

So, let’s say you’re shooting away and all your images look really yellow. What to do?

Before we go through the white balance adjustment options, let’s start by saying if you have set your camera to save your images in the RAW format, one option is not to worry about white balance and to set it in post-processing on the computer later. The down side to this is that your white balance accuracy will be dependent on your eye, your memory, and your monitor. If you really need exact colors, this is not the best way to achieve white balance (e.g., product photography, art reproduction, etc). If you just need it to look good, this works very well and can save you some headaches.

That said, even if you are using the RAW format, you may prefer to have good white balance in camera as well. It can make it easier to judge your images when you are not distracted by strange color casts. So here are some options:

First, check to see what White Balance Setting you’re currently on. If you’re on Auto, try picking another pre-programmed setting that best matches your situation. Indoors this gets trickier all the time because we now have all kinds of bulbs that come in all kinds of temperatures. So if your light looks warm to you, try setting the white balance to tungsten (incandescent bulbs). If the light looks cool, try florescent.

Second, you can try setting the temperature of your white balance using the “K” option for Kelvin temperature. Daylight during mid-day is around 5000-5500K. If you change the K value to something higher, your image will look warmer (more yellow). If you change the K value to something lower, your image will look cooler (bluer). You can experiment with this to see if there is a value that works particularly well for your situation, but I find the next method to work better.

Third, if you don’t need the colors to be absolutely correct but you’d like to be able to get your white balance pretty darn close in-camera without having to depend on your eye/monitor later, use a white balance target and take a picture of it in the same lighting conditions you’re going to shoot in. You can purchase a very exact neutral target for this purpose, you can use a white sheet of paper, or you can simply look for something in the same light that is neutral (white works very well for me). The target will be more accurate, but under most circumstances, anything white is good enough. The target must occupy a good portion of the frame for this to work, so zoom in.

Follow your camera’s instructions to set the photo of your target as your custom (Canon) or preset (Nikon) white balance. This will tell your camera “this is white in these lighting conditions” and your camera will measure what white is from that image and then adjust the white balance accordingly. This is a 3 step process:

  1. take a shot of something white/neutral
  2. tell your camera “use this image to determine what’s white,”
  3. set your white balance setting to use the “custom” (Canon) or “PRE” (Nikon) white balance.

This is a really important thing to do if your other white balance settings aren’t working well and you’re saving your images as JPEGs. It’s more difficult and sometimes impossible to fix white balance in JPEG images later.

Fourth, if you are shooting in circumstances where the color must be absolutely correct (i.e., mathematically correct vs to your eye) such as product photography, use a tool like the X-Rite ColorChecker Passport to set your white balance in camera and to also calibrate individual colors during post processing. This is a combination of exactly calibrated targets and software used in post-processing to ensure your white balance and colors are correct. Most people do not need this tool. However, if you do any product photography or art reproduction work, as I do, it is a huge time/headache saver.

But what if you’re white balance is making white too white? This used to be a problem in older camera models. I would get up at the crack of dawn or time my shoot around sunset to get that beautiful golden glow in the light and then my white balance would take it away! My 5D Mark III seems to leave my images nice and warm in Auto White Balance. But, if your camera is off-setting the light more than you want it to, try setting your white balance to florescent. Or, set a Kelvin temperature for the white balance that gives you the nice warm glow you’re looking for.

Finally, a word about flash. When you are using flash indoors, you can help prevent white balance confusion by using gels on your flash to match the temperature of your flash to the indoor light. If we revisit my first example:

Even though I was able to get the skin tones back to natural looking, the rest of the scene still looks a bit warmer than it did in real life. If I had gelled my flash to make the light temperature of the flash match the light temperature in the room, all of the colors could have been white balanced to look right. As it is, because some areas are more lit by the lighting in the building while others are more lit by my flash, it’s harder to achieve good white balance consistently throughout the image. Of course, there are many other problems with this image, so imperfect color temperature is the least of my concerns! 🙂

If your only flash is your pop-up flash built into your camera, here is a do-it-yourself project to create gels for a pop-up flash, but you can also buy gels. Here is a set available for pop-up at Adorama.

For speedlites/speedlights and other strobes, there are lots of options out there for gels.

There are a lot of great resources out there on how to gel your flashes. Since this post is already too long, here’s an article by the Strobist, who has many, many great articles on using speedlites.

Christmas Time

The only thing that changed in this shot from the previous was the aperture is now f/2.8 and the shutter speed is 1/5 second. Notice how little of the tree remains in focus around the ornament.

A few tips for the best Christmas photos ever:

  1. Don’t try too hard to get great photos during intimate family gift exchanges. Seriously. There are times when being in the moment not as the observer behind the camera but as a fully present participant in the event is more important than getting pictures of it. If you must take pictures while the people most important to you are opening presents, put your camera on a tripod with a wide enough lens to cover the room, add a remote, and click the button when you think about it. Or, even better, use your iPhone to trigger your camera at set intervals and forget about it. Triggertrap is a great tool for that. Sometimes, it’s better to just remember a moment than to have a picture of it. If you’re too intrusive with your camera, those moments won’t happen.
  2. Find a neighborhood with luminaries Christmas Eve. Take a walk with your loved ones and enjoy how beautiful the luminaries are and the beauty of what they symbolize. And I’m not talking about their religious significance here—regardless of whether you celebrate Christmas as a religious holiday, a secular holiday, or not at all, luminaries are the result of a group of people who are normally too busy to do more than wave at each other actually organizing their efforts just to create something beautiful. That’s worth appreciating. After you fully absorb it and enjoy the time with your loved ones, then you might get your camera out and experiment with both close ups and wide shots of the luminaries.
  3. After everyone has gone to bed one night, spend some time shooting the Christmas tree. This part I will give you some tips for in a moment.
  4. Breathe. And breathe again. Breathe deeply and slowly. You will think more clearly and take better pictures and you will be less stressed in general. But more importantly, remember that as long as you can take a breath, there is hope. And hope is all we really need to have a great holiday.

Time with the Tree

I frequently get asked how you get “twinkle lights” in photos of the tree. I’m not exactly sure whether “twinkle lights” means star-shaped lights or soft, circular lights, but I will show you both. No special tools required (unless you think a tripod is a special tool).

First, use a tripod. It will yield much sharper images in the typically low-light situation of a Christmas tree and the tips below will not work without one.

Second, for even more sharpness, set your camera to a self-timer (2 seconds is good if you have that option) or use a remote so you’re not bumping the camera and introducing vibration pressing the shutter button.

Third, try this experiment. With the exposure type set to “M” for manual:

  1. Using  a longer lens, get up close to the tree and choose an ornament.
  2. Focus where you most want it sharp, and frame your image (without changing the distance to the subject after you’ve focused), locking your camera down on the tripod.
  3. Now, try setting your Aperture to f/22, ISO to 400, and then adjust the shutter until your meter reads 0 (or is right in the middle if you’re meter doesn’t have a 0 on it).
  4. Take a picture.
  5. If the image looks too dark, repeat only make the meter read +1. If it’s too light, -1. Repeat and adjust until you get the exposure you like.
  6. Now, don’t touch anything else, but change the aperture to the biggest aperture you have—f/5.6 on some lenses, f/4.0, f/3.5, f/2.8, f/1.4 are all common maximum apertures. So, just keep turning the dial until the f/number won’t get any smaller.
  7. Then adjust your shutter proportionally to get the same meter reading that you had in the previous picture. (If you prefer to shoot in Aperture Priority and know how to use exposure compensation, you could also do that and let the camera change the shutter for you.) 
  8. Now compare the effect you get:

You can do this same experiment with subjects that are further from the tree, like this poinsettia:

You can also do the same thing further away from the tree. Notice the effect on the lights in the background, both reflected in the glass next to the tree and shining through the glass from outside:

If you want star bursts for lights, you need a very small aperture (e.g., f/16, f/22—the biggest f/number where your images still look really sharp). The other effect of a very small aperture is that the depth of field becomes very large.

If you want big soft, round lights, you need a very large aperture. However, only the lights that are outside the depth of field will have this effect. Additionally, you will only have a very short depth of field, meaning some subjects don’t lend themselves well to this effect (e.g., wider shots of the tree can look weird with the majority of the tree soft).

Generally, I like a shallow depth of field for shots like this:

The flower begins to fall out of focus rapidly, but the sharp center holds the image together and the big out-of-focus lights in the background add interest.

But more depth of field (and “twinkle lights”) in shots like this:

We're back to star-shaped lights, although it's harder to see. Notice how much smaller the reflected and distant lights look in the window.
We’re back to star-shaped lights, although it’s harder to see. Notice how much smaller the reflected and distant lights look in the window.

Although in this case I’d like to mix the sharp tree with star-shaped lights with a soft background with big round lights–and attempt to lose the distracting elements in the reflection in the process. While you can’t combine the two extremes shown here in a single image (unless you take two and combine them in Photoshop), you can experiment with an aperture value somewhere between wide open and stopped way down to get a sharp enough tree and somewhat softer background lights. Experimentation is the name of the game!

Happy Holidays and have a wonderful new year!

Long Exposures: Part V

I’ve done many posts on things you can do with long exposures (see Disappearing Act and Long Exposures, DSLRs: Photographing Fireworks, Lightening and Long Exposure, and Long Exposures), but here in another one: Star Trails.

First, what is “a long exposure”?

When we talk about the length of exposure, we’re talking about how long the shutter is open in your camera to allow light in. Now, you may already know that how “bright” the image ends up being (or the exposure value) is dependent on the combination of shutter, aperture, and ISO settings. These 3 settings in combination control how much light reaches the sensor as well as how much light is required to get a given exposure value.

So, why would we talk about the length of the exposure separately?

How long you open the shutter determines whether you freeze motion or show motion blur and how much. So, when we talk about a long exposure, we’re really talking about showing motion in our images. Getting good exposure still requires a combination of setting the shutter, aperture, and ISO appropriately.

So, now that we’ve reviewed the basics, let’s get into a couple of examples of what you can do with long exposures (slow shutter speeds).

Star Trails

When we look at the stars, if we look at them long enough, then appear to move in the sky. This is because the earth is rotating so the stars rise and set just like our closest star, the sun. They actually move fast enough that we can record their path as a “star trail” if we leave our shutter open long enough. You can also take a series of photos and use software to combine them.

For the purpose of this blog, I’ll just tell you what I did to get this image:

Star Trails

  1. Find a location where it’s very dark and you are far from the city so you can see lots of brilliant stars in the sky.
  2. Attach remote control to camera (a remote is an absolute requirement for star trails).
  3. Place the camera on a tripod and frame what you want in the image and determine how/where you will need to focus (see next step).
  4. If you have something in the foreground on earth (like the trees in my image above), you might want to check a depth of field calculator to determine whether you need to find focus on the trees of whether you can simply focus at infinity. If you are focusing on something fairly close, you may need to use a flashlight or focus assist on your flash to find focus in the dark if you cannot see well enough to focus manually and your camera can’t see well enough with the available light to focus automatically. Just shine the flashlight on the thing you want to focus on, point your camera at that thing and lock focus (hint: this is easiest if you’re using back-button focusing, but that’s a subject for another blog post). In most cases, you will be shooting wide enough and at objects far enough away that you can simply manually set the focus at infinity and everything will look sharp. In my case, I was using a full-frame camera with a zoom lens at 27mm and my aperture at f/11. Worst case, focusing at infinity would keep everything 8 feet and further sharp. Since the trees were more than 8 ft above my head, I just set my focus at infinity.
  5. Now that you’ve found focus and locked focus, you can get your camera set on your tripod and framed the way you want again.
  6. Make sure your camera is set to “Bulb.” For some cameras, this is a setting on the shooting mode dial (where you pick Auto or Manual). For other cameras, this is an option in the shutter speed selection.
  7. Make sure your remote is set to “Bulb” as well. Bulb allows you to manually open the shutter and then manually close it.
  8. I personally like to just take a shot based on feel and then adjust from there. I started by trying to get a shot that just looked realistic. I left the shutter open about 70 seconds and this is what I got:

How the Sky Looked

  1. Because there was so little light in the area I was shooting in, I wasn’t worried about over exposing the trees with a very long exposure. If you have more ambient light, you might want to stop down more or turn down the ISO. In my case, I did f/11 for aperture and 1600 ISO. I used a higher ISO than usual because I wanted to ensure the sky registered enough light to clearly show the silhouette of the trees. Had I not been so sleepy by the time this shot completed and keeping my husband awake getting in and out of the tent to tend to the camera, I probably would have tried another shot with a lower ISO and longer exposure time to see how long I could get the star trails and if I could reduce the noise.
  2. Make sure you have a comfortable and warm place to sit where you can keep an eye on your camera. I was more worried about curious bears than people at our campsite since there wasn’t anyone else around. Also, set an alarm on your phone so you don’t forget when it’s time to close the shutter. For my example, I opened the shutter (by pressing the button on the remote 1x) and then set the timer for 30 minutes. However, I must have bumped the shutter button early because my metadata says the total exposure time was actually 1275.9 sec (21.26 minutes). The longer you leave the shutter open, the longer your star trails will be. However, be aware that extremely long exposures create more noise in the image and can build enough heat in the camera that it will shut itself off (hopefully) to avoid damage. At one time I recall reading a warning that there is a maximum limit to how long you can safely leave your shutter open on a digital camera, but I have not seen anything like that in years so this may be something only relevant for older DSLRs (or perhaps it was just a rumor).
  3. When your timer goes off, click the button again to close the shutter and go see what you got!

Trivia question: why do the star trails appear in a semi-circular pattern?


Disappearing Act and Long Exposures

A while back, I posted a couple of long exposures on Facebook (see the post here) and asked if people could tell which one had been exposed for 1/30 of a second vs 29 seconds. It was a little confusing because the shot with the higher exposure value (that is, it was brighter) was the one with the 1/30 of a second exposure.

I thought I would explain the purpose of the exercise and talk a bit about how I achieved super long exposure times (shutter speeds) in bright sunlight.

First, if you know nothing about how a given exposure value was achieved other than the shutter speed, you cannot draw a conclusion about whether a brighter image has a longer shutter speed than the darker image. As a reminder, there are 3 settings that determine exposure: aperture, ISO, and shutter speed. The same exposure can be achieved with vastly different shutter speeds by adjusting the ISO and aperture to offset the difference.

So, if all you know is the shutter speed, what differences can you see that will tell you which had the longer exposure time? From an artistic perspective, we choose shutter speed based on whether we want to show or freeze motion. “Showing motion” means motion blur becomes visible in an image. So, our first test is “how much motion blur do we see?”

However, with this particular subject, the clouds are not moving quickly. The clouds are our best clue as to how long the shutter was open. But the clouds moved slowly enough that the difference in motion blur between the 1/30 of a second exposure and the 29 second exposure is relatively subtle. When you compare the 1/60 of a second exposure to the 77 second exposure the difference becomes far more obvious.

Likewise, moving water is usually a great clue as to how long an exposure is. As the exposure gets longer, fewer ripples in the river show.

The third difference you might notice if you look very closely is that the highway that curves around the river has no cars on it in any of the images with a 29 second or longer exposure time (shutter speed).

This happens to be one of the cool reasons to do super-long exposures. It’s a way of removing traffic and crowds from a scene. “But WAIT!” you ask, “What happened to slow shutters showing motion blur?”

Disappearing objects are the extreme of motion blur. The moving objects don’t reflect enough light relative to the total light signal to register as part of an image. This is a big difference in how cameras “see” vs how we see. We do not have a time factor that increases or decreases the exposure of what we look at. A camera, however, continues to gather light, exposing the image for the length of time the shutter is open in a quantity determined by the aperture size. How much light is needed to get a given exposure is then determined by the ISO.

So, why does this make moving objects disappear? Well, let’s look at the trees in our long exposure examples. They’re very dark. They reflect back less light than the river next to them. But they are sitting still, standing in one place, reflecting back that little bit of light in the same location for the duration of the open shutter. It’s enough to register a dark image of a tree. By comparison, the cars on the freeway are driving through the frame. They reflect only a little more light than the trees, but only for a split second in each point along their trajectory–the accumulative effect of the open shutter is lost on them. They would have to be very bright to register in the image–which is how you create light trails when cars have their lights on.

So, the bottom line is that if you can get your shutter slow enough that moving objects can’t reflect enough light to show up in the image, you can make them disappear.

The next question is, of course, how do you get a super slow shutter in daylight? We can stop down the aperture as much as possible (to the point before diffraction causes our images to fall apart, but that’s another subject) and we can turn our ISO as low as it will go, but at 7:52PM in July (more than an hour before sunset), that only got me a 1/30 of a second shutter speed.

All of the example images have the same aperture and ISO settings. Having reached the limits of my camera’s ability to control exposure, my only other option to get a slower shutter was to block some of the light reaching my camera’s sensor. To do this, I used a Heliopan 10-stop neutral density filter.

So what is a Neutral Density (ND) filter? From a technical perspective, an ND filter is called “neutral” because it is designed to block all colors of light equally. In other words, the color of the light should not be affected by an ND filter, just less light should make it through the lens.

That said, 10-stop ND filters reduce the light that reaches your sensor by 1000x. Many result in a color shift. In the case of the Heliopan, it’s a red shift. The good news is that it is something easily corrected via white balance settings in the case of the Heliopan (not true of all ND filters). I personally like the color shift in these examples and didn’t bother to correct it–it was like sunset came early.

To get the identical exposure with a 10-stop ND filter, if you are changing only the shutter speed, you would need to multiple the shutter speed by 1000. So, 1/30 becomes  33.33 seconds. If you really want this shutter speed, you need to use the bulb setting on your camera with a remote and time how long the shutter has been open. I did successively longer exposures using the Bulb setting to see what I liked best.

Neutral Density filters give you more control over light. They let you use much slower shutter speeds or allow you to open up your aperture significantly in brightly lit conditions where this isn’t otherwise possible.

If you like playing with motion or shallow depth of field in bright light, neutral density filters are a great option to explore.

DSLRs: Photographing Fireworks

It’s that time of year again here in the US. The 4th of July promises 2-3 days of fireworks displays in many areas. For photographers, that means lots of opportunities to get shots of fireworks.

Having shot more fireworks than I know what to do with the past few years, I have several tips you may find helpful.

Here’s the short form:

  1. Pick a location upwind and preferably high enough to get a view above the crowd and the trees.
  2. Use Manual or Bulb exposure. Don’t worry much about depth of field. Keep ISO low and shutter speed long. Use primarily Aperture and/or secondarily ISO to brighten or darken the fireworks if they’re getting under or overexposed.
  3. Use a wide angle zoom lens (16-35mm works well if you’re close; 24-70mm if your further away; if you’re really far away, you might need a telephoto lens) on a tripod and a remote to release the shutter.
  4. Setup with a wider angle than you think you need–this will help you catch fireworks that go off in different positions more easily.
  5. Manually focus on infinity unless you’re closer than 2 football fields and using a telephoto lens.
  6. Speed up your shutter a lot for the finale when many fireworks go off at the same time.
  7. Try to let your camera have a short rest between shots when you can–this will help it keep up with writing image files, preventing it from not firing when you least expect it, and help keep it cooler, reducing noise.

Planning Tips:  Location, Location, Location

Find out where and when the fireworks will start. Look at the location on Google Earth. Even better, go to the location and check it out ahead of time. Look for a good vantage point that will give you a view of the fireworks and, preferably, the ground–you may need to get yourself invited to a rooftop party for the best view. 🙂 If you have trees between you and the fireworks, you will be limited to shots of the fireworks above the trees.

Alternatively, look for an interesting foreground subject you can put fireworks behind. Check out this famous photo by Jim Zuckerman of the Statue of Liberty surrounded by fireworks for inspiration.

Additionally, consider smoke when choosing a location. Check the weather forecast for the wind direction and speed. Hopefully there will be a light breeze that will dissipate the smoke. You want to be upwind of the fireworks with the hope that the wind will carry the smoke behind the fireworks and keep your photos clean.

Have an idea of how you’re going to get to your chosen location, how bad traffic will be, and when you will need to get there to ensure a place to setup a tripod. You will need a tripod.

Exposure Settings

Shooting fireworks is similar to shooting lightening except it’s easier because you can predict fireworks better. (See Lesson: 109 Long Exposures and Lightening).

There are two methods I have used with success. I prefer the second one, which is how I shoot lightening, but it requires imagining how much you’ve captured, so you might find the first one easier.

Method One: Manual Shooting Mode

In this method, you choose an aperture, shutter speed, and ISO setting that you think will give you good exposure of the fireworks. You then adjust your shutter speed longer or slower to get what you want and adjust aperture and ISO accordingly.

Most of my single-firework examples (in the gallery above) are ¼ to 1/13 of a second long using this method, but how fast or slow your shutter needs to be is partly dependent on how large the fireworks are in your frame, partly dependent on personal preference, and partly dependent on whether you want to get multiple fireworks in the same shot. Most people shoot fireworks with much longer shutter speeds.

You will likely want shutter speeds of 5-15 seconds or even longer to get multiples, but this is, of course, dependent on how frequently fireworks are being fired.

Note that you will not be able to use your light meter. You can meter while a firework is firing, but the brightness of one firework to another is quite variable and the percentage of the sky that is firework vs dark may make your meter reading deceptive. Also, during the finale, you will need a much shorter shutter speed because many fireworks are going off simultaneously–you may end up with a massive jumble with a very slow shutter.

As far as aperture goes, for fireworks it is more a factor of getting the exposure you want than getting depth of field–you are likely to have all the DOF you need (if you’re shooting wide and not too close). Because fireworks are a lot like light painting, the maximum amount of light you can capture is determined more by how long the firework is glowing, how wide your aperture is open, and how high your ISO is than what you’re shutter speed is. The one thing to be cautious of is if you use a very slow shutter and one firework goes off after another in the exact same spot, not only will they not look so good together in the same frame, but you will probably blow out the highlights where the brightest part of each firework ended up overlapping. This is one of the reasons I prefer using the bulb mode.

ISO can be minimized to reduce noise in most cases, although ISO 800 works for me when shooting single fireworks at shorter shutter speeds. But, bear in mind the longer the shutter speed, the more noise you will have.

Method 2:  Bulb Shooting Mode

Bulb simply allows you to manually open and close the shutter instead of setting the shutter speed ahead of time. Some cameras have an actual “Bulb” shooting mode (“B”) on the shooting mode dial. If yours doesn’t, bulb is probably selected by being in Manual Shooting mode and changing the shutter speed–it’s usually the one after 30 seconds.

I prefer this method. The advantage is that it allows you to control the shutter speed based on how bright particular fireworks are, how many have gone off, etc. Instead of guessing ahead of time what’s going to be fired, you can imagine how much light has reached your sensor and how many individual fireworks have been included in the shot.

Use your eyes and brain to “measure” the amount of light that has been produced by the total number of fireworks that have gone off since you opened your shutter. Mentally picture the combination of fireworks that have gone off in the image. This takes getting a feel for when to close the shutter, but isn’t that hard to do because each firework fades rather than continually adding light, meaning there’s a lot of leeway from an exposure perspective as long as ambient light from sources other than the fireworks is minimal.

To maximize the length of time you can leave your shutter open, you can set your ISO to 100 and stop down to f/22. However, you may find the fireworks look at bit dim. Each firework only emits light for so long, so you want enough light to reach your sensor to record each one brightly. For these examples, I used ISO 100 and f/16.

If you have a remote for your camera, this is a good time to use it. Pressing the shutter button can introduce vibration into your shot, which may cause some blur. In fact, it’s preferable to use a remote even if you’re not in Bulb mode. But it’s doubly important when using bulb mode.

Focus

The short answer is manually focus your lens at infinity (there should be a mark on your lens that is an infinity symbol with a line showing you where to turn the focus ring to). This will yield sharp fireworks the vast majority of the time.

If this makes you nervous, you can refer to Lesson 106: Focusing in the Dark. Or, you can point your camera at a bright object that is about the distance you expect the fireworks to be, if your lens has a distance meter you can look at the distance meter to see how far away that is and if your lens is focused at infinity. If you are shooting wide, you may be surprised to discover how close a subject can be and still result in focusing at infinity.

If there is nothing bright enough to focus automatically on, you can focus on infinity and check to make sure the first image you take is sharp.

If you are very close to the fireworks and using a lens that is longer (where infinity focus is much further away) you can autofocus on the first firework itself.

Realistically, you are likely to have so much DOF that accurate focusing is less important. I cannot say I’ve ever had a problem with focus, but then, I typically shoot wide. Focusing at infinity at 16mm, for example, with my full-frame camera at f/16 everything will stay in focus from less than 2 feet away to infinity. I have no desire to be that close to fireworks!

By comparison, if everything were the same except my focal length, at 100mm, I would need to be at least 70 feet from the fireworks. We are not usually that close either, so focusing at infinity will usually work. But, if you’re using a 300mm lens, you’d need to be over 600 feet away for infinity focus to work well. This is still pretty darn close for fireworks, but just keep in mind that if you’re using a 300mm lens and are less than 2 football fields away from the fireworks, that might be a time to worry about this–you might also want to keep a fire extinguisher handy.

Focal Length and Framing

Fireworks are a good time to have a zoom lens on your camera in my opinion. Especially if you are in close proximity. The first time I shot fireworks, I put my 100mm prime lens on my camera and was surprised when the fireworks didn’t fit in my frame–they were much larger than I expected shooting from about a quarter mile away. I ended up scrambling to change lenses.

Using a zoom gives you room to adjust for such misjudgments since you can’t tell how big the fireworks will be until they start going off.

If you like to include the landscape in the shot, you will definitely want to shoot wider. The other thing to be aware of is that you are setting up on a tripod and you will not have a lot of time to adjust between shots. In fact, my preference is to shoot wide enough that I never change the camera position once the show starts. I prefer not to miss shots by fussing with the tripod.

I do miss shots when the fireworks suddenly get fired in a different direction or the wind blows them out of the frame. But, this happens infrequently when I’m shooting wide.

Cautions

If you are firing off a series of long exposures one after another, there are a couple of things to be cautious about. First, you can fill your memory buffer in your camera. This is a little hard to predict when you are doing long exposures. For example, my camera can shoot 6 frames per second but if I fire 18 shots in 3 seconds, the memory buffer will fill and I will have to wait for the camera to catch up writing the images to the memory card. Theoretically, one would think if you are firing off a long exposure followed by another the camera would be able to write the first image while exposing the second and keep up. However, I have run my camera out of memory right before the finale and missed the entire finale while it was catching up. I was not happy.

Just pause every once in a while to see how long it takes for the busy light to go off–if it’s a really long time, you might want to space your shots a bit more.

The other thing to be aware of is that long exposures produce a lot of heat in your camera. This is why long exposures tend to be noisier than short exposures. Giving your camera a little time between shots may also help keep it cooler, keeping noise to a minimum.

Post Processing

Smoke is quite detrimental. You can use curves and levels in Aperture or Lightroom to darken the smoke and make it less obvious to the eye. However, you also loose some of the light in the fireworks in the process and can substantially change the texture of the light trails.

Here’s an example of before and after:

I like the way the fireworks look better in the before image, but the smoke is distracting and lowers the contrast.

Sometimes, a puff of smoke in the wrong place ruins an image no matter what you do in post-processing (well, what I do in post-processing; Photoshop gurus may be able to deal with this). And sometimes the smoke is positioned so that you can still enjoy the image (even if you’d like it better without the smoke):

Conclusion

Do not stress about shooting fireworks. It’s not hard and you’ll get a better view of the fireworks if you plan ahead a little bit whether your images turn out or not. Just don’t forget you’re having fun!

Recovering “Erased” Photos

Hopefully, you are all well-organized and have never gotten confused about which images on your memory card have been saved to your computer and which haven’t. In my case, I recently had a brain malfunction known as “brain flatulence” causing me to reformat a memory card containing about 1000 images I hadn’t uploaded yet.

It happened in a moment of distraction. I was checking to see how much space was left on the memory card in my camera in preparation for a shoot just to see if I needed to swap out the card before I started. I knew I hadn’t uploaded the images yet. I made several mistakes:

  1. I went to the format card menu to see how full the card is because it’s easier for me to see the big bar graph displayed on my LCD than the counter that tells you how many images you have room for. Putting on my reading glasses and looking at the counter would have been safer.
  2. I was sitting in my car waiting to meet someone with traffic zooming by and other distractions. In the moment when I should have selected “cancel,” a loud vehicle grabbed my attention.
  3. I use the format card menu every time I want to erase images. My muscle memory is to select “format card,” not to select “cancel”–I have to pay close attention when in the format card menu.

In the moment the loud vehicle captured my mind, my muscle memory took over and gone were all my images! Mind you, I had bushwacked through thick undergrowth, dragged myself through poison ivy, and braved the aerial version of a mine field walking under a heron rookery to get some of the images on that card. I was not a happy camper.

But, here’s the good news! When you delete images or format your card, no data is actually lost. Rather, the existing data is marked as eligible for being overwritten. This means that as long as you set that card aside and don’t write any photos on top of your “deleted” data, your images can easily be recovered with the right software.

The software I chose first was Lexar’s Image Recovery 4. My main reason for choosing this software was because it is a) available for a mac (and windows), and b) free because I own several Lexar memory cards. This software claims to work on all memory cards, but it was a Lexar card I used it with.

Unfortunately, Lexar does not have the best ordering process. You can download the trial version of the software for free, but you can only get a key by contacting support. Alternatively, you can pay $40 for their newest version, IR 5.

I recommend NOT scanning your memory card with the trial version–you can only restore one image. After I had successfully scanned my card and restored one image, I was stuck waiting for a license key. Support told me it could take up to 48 hours to get it. When I finally got the license key and rescanned the card, the software couldn’t find any images. Yes, I freaked.

Fortunately, support provided me with a key for IR5 because I had recently bought one of my Lexar cards. Once I had IR5, I had no trouble restoring all of the images. The interface is intuitive and although running the scan on a full 32GB card and restoring the images does take a significant amount of time to run, all I had to do was click a couple of buttons.

So, if you own a recent Lexar card, download the IR5 version and send support a request for a free license key (you will probably need to tell them what card you have that entitles you to the software). Wait to run the software until you receive the key and then you should have no problems.

If you don’t own a Lexar card, there are other software options out there. I was unable to find a reliable source I’m familiar with for reviews of these software options, so I went with Lexar. My logic was that they have a major stake in making sure I recover my photos successfully and they are a company I’ve already trusted with my images for many years. While they have logistics issues with giving out licenses, they were helpful and supportive, the software worked, and it didn’t cost me anything but time.

By the way, for iPhoneographers, I stumbled across software that is supposed to recover deleted data on the iPhone, including photos. I cannot vouch for the product, but here is a review on CNET: http://download.cnet.com/Data-Recovery-for-iPhone/3000-2242_4-75856767.html