Lesson 4: Focus

Today’s lesson is about focus.  Focus is usually one of the few inescapable rules of good photos.  Although, even as I write that, I think of the photo of Paul Simonon of the Clash smashing his bass on stage.  The photographer, Pennie Smith, reportedly didn’t want the photo to be used because it wasn’t sharply focused.  It graced the cover of the London Calling album anyway and is considered by many to be one of the most iconic photos in rock and roll.

However, the vast majority of the time, photos fail when the subject isn’t sharp.  With the iPhone, sometimes this gets a little tricky, but it’s easily solved.

Let’s say you see something and you pull your phone out of your pocket, launch the camera app and snap a shot as quickly as possible.  Your iPhone camera will decide what the subject is.  Sometimes it’s quite good at this (like people’s faces).  Sometimes it’s not.

To demonstrate this, I’ve lined up 3 things in a row that runs from close to the camera to far from the camera.  To maximize the difference the focus point can make, in the image on the left, I focused on the Cetaphil bottle in the foreground.  In the image on the right, I focused on my dog.  (Click on the image to get a larger view.)

Image on left is sharp on the bottle.  Image on right is sharp on the dog.
Image on left is sharp on the bottle. Image on right is sharp on the dog.

Notice the difference in how sharp the letters on the bottle are and my dog is in the background in the first image versus the second.  If I would have let the iPhone choose where to focus, it would have focused in the middle, resulting in an image with slightly soft focus in both the foreground and the background.  Instead, I can choose which part of the image I want to be sharp.

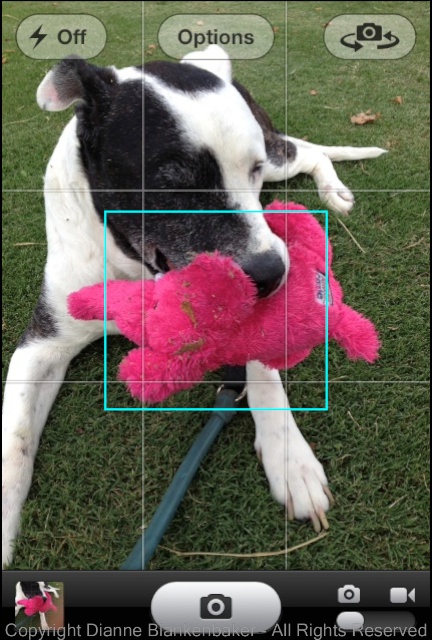
To choose what you want to focus on, touch the screen on the thing you most want to be sharp.  To demonstrate this, I did a screen capture of the iPhone camera and drew in a square approximating what the focus box looks like.  In this image, this is where the iPhone wanted to focus by default:

The iPhone chose the center of the scene, where the closest object was.

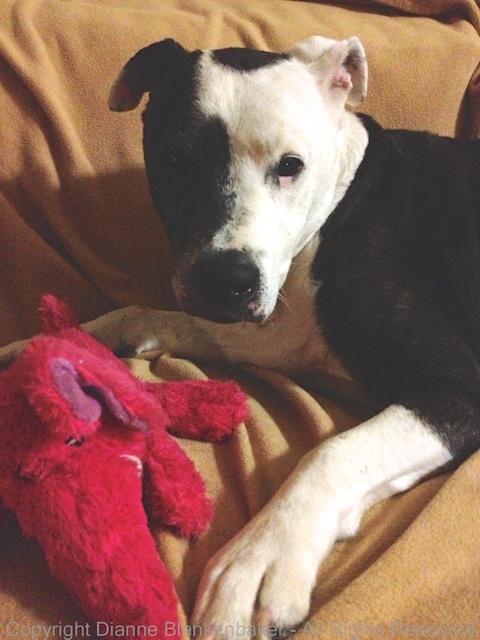
In the next image, I touched the screen to tell the iPhone to focus on my dog’s eye.  That made the elephant slightly softer in focus, but the elephant and my dog’s eye are close enough together that it’s hard to see the difference except under magnification.  The key is that my dog is the more important subject, and his eyes are the most important things to have in focus.

By tapping on my dog's eye, I ensured his eyes would be sharp.
By tapping on my dog’s eye, I ensured his eyes would be sharp.

One of the things that can be an advantage with an iPhone or any small-sensor camera is that they tend to keep a lot more things in focus from the front to back of the subject you’re photographing than a bigger, fancier camera.  This is also a disadvantage, but we’ll save that for a later lesson.

As a side note, when you touch the screen to set the focus point, the iPhone default camera app also uses that point to set the exposure.  We’ll talk more about exposure in tomorrow’s lesson.

Your assignment:  Practice taking photos of several different subjects in different settings.  Wait to take the picture until the focusing square appears.  Notice what the iPhone (or other camera) is picking for you.  Take a second photo of each subject and choose what you want to focus on.  Pick the thing that is most important to you to have in focus (hint:  eyes are always a good choice if your subject has them).  Now look at the photos on a large computer screen you can see well.   Take a look at what’s in focus.  Where does the iPhone’s automatic focusing decision work well?  When do you notice a big difference between what it chose and what you chose?

Lesson 3: Fill the Frame

In yesterday’s post we explore the rule of thirds.  Today, we’ll add the second “rule” (remember, rules are only meant to help you understand the choices you can make) of taking better photographs:  fill the frame.

You want your frame to be full of your subject.  Not the stuff around, behind, above, below the subject, just the subject.

To make this easy, let’s say you wanted to take a picture of a dog.  Often, people will take a picture of a dog that looks something like this:

IMG_2619

Let’s look at what’s in the frame.  When you look at this image, you see that I have an ugly blanket draped sloppily over my sofa, there’s a plastic tray on one arm, an outlet partially showing behind the plastic tray, and an awkward corner of an area rug in the lower foreground along with a wood floor.  All of these things distract from my subject, which is my dog.

Even though I applied the rule of thirds by placing the upper-left intersection of the grid (discussed in yesterday’s post) on my dog’s eye, my dog looks like he’s floating in the middle of a bunch of other stuff.

When I apply the rule of filling the frame with the subject, this is what I get:

IMG_2622

There are several things about this image that could be improved, but we’ll save those for later lessons.  In spite of these issues, the sloppy blanket has become a neutral background and there is no question about what the subject of this image is.

Think about it this way:  the first photo would probably be captioned as “dog on a blanket-covered sofa in the living room with his toy,” while the second image would just be captioned, “dog with toy.”  There’s nothing wrong with an image of a dog on a blanket-covered sofa in the living room with his favorite toy unless what you wanted was an image of a dog with his toy.

As a side note, I do not recommend zooming using the iPhone or any other camera that doesn’t have Optical Zoom.  Optical zoom means there is a moving lens that makes the image look closer.  A camera like an iPhone camera has Digital Zoom.  Digital zoom means the magical wizard in your smart phone figures out how to make the image look bigger, but it reduces the resolution of your image, often resulting in something really grainy.  If at all possible, use your feet instead of your fingers when it comes to getting a close up with a smart phone.

Your Assignment:  Pick your favorite subject that’s willing to stay still for a few minutes.  Stand far back and take an image of your subject applying the rule of thirds–don’t worry about what else is in the frame.  Now, step up close, apply the rule of thirds again, fill the frame with your subject, and take a second image.  Remember you have the option to turn your iPhone vertically if that helps.  Which image captures your subject more powerfully?

Lesson 2: The Rule of Thirds

In our last lesson, I explained that rules are just a way of organizing the choices you can make when you take a photo.  The rule of thirds is one of those choices.

The iPhone default camera app can be set to turn a rule of thirds grid on in the Options menu.  Most camera apps and point-and-shoot cameras have this option.  This is what it looks like with the grid on:

iPhone camera with grid on

The grid divides the frame into thirds both horizontally and vertically.  For many subjects, placing the subject so that the most important feature aligns with the intersection of one of these lines can make the subject grab the eye much more effectively.

Here’s an example.  First, in the next image, I’ve centered my dog’s head in the frame:

Subject centered in frame

In the next image, I placed one of the grid intersections on my dog’s left eye:

Rule of thirds grid 3

I chose the lower-left intersection in the grid because it allowed me to get his front legs in the frame as well.

Which one do you like better?

Your Assignment:  Turn the grid on in your camera app or camera if it has it.  If not, you can imagine where the grid would be by guestimating.  Pick a subject that isn’t moving like a flower or a vase or a sleeping dog.  Try photographing it centered in the frame, then try each of the 4 intersections of the rule-of-thirds grid.  Which do you like best?

Lesson 1: There are no rules

I am going to share a lot of “rules” with you as we go through some basics that will help you grab photos with more impact using your iPhone.  Before I do that, I just want to be clear that rules aren’t really rules.  You aren’t a bad person or even a bad photographer if you break the rules.  In fact, many of the most iconic photos break several “rules,” so it’s a good thing.  The trick is knowing that you broke the rules and knowing why.  Knowing what choices you can make gives you the power to make them.  That’s what “rules” are really for–helping you get a handle on all the choices.  So, the first lesson in photography is that rules are only rules when they’re helpful.

Your assignment:  pick a handful of favorite photos and take a look at them.  Imagine they were taken by someone else.  Imagine you didn’t know anything about the people, places, or things in the images.  Would you want to hang them on the wall?  Why or why not?