


Depth of Field is one of those concepts that most budding photographers come at in a series of stages.
First, there’s just getting your head around what Depth of Field means. To keep it simple, if you don’t know what depth of field is, we generally think about it as the distance in front of and behind where we focused that remains acceptably sharp. Close-up portraits with blurry backgrounds usually have very little Depth of Field. Wide landscape scenes are often acceptably sharp from the closest object in the frame all the way to infinity.
Second, most beginning photographers learn to gain some control over depth of field (DOF) by changing the aperture of their lens manually (in Manual or Aperture Priority mode on your DSLR). The wider you open your aperture, the less DOF you get.
Third, it eventually dawns on photographers who concentrate on controlling DOF that you don’t always get the same DOF with the same aperture and you begin to understand the other variables in play that give you more or less DOF (sensor size, focal length, distance to subject).
Fourth, you may get really technical and look up the mathematical formulas to calculate DOF and realize that it’s all kind of a guess because how much DOF you get ultimately depends on the size the image is displayed at, how far away you are viewing it from, and how good your eye sight is.
At this point, you may fall into the trap of believing you fully understand DOF and you have all the knowledge you need to get as much control as possible over DOF in your photography.
Then, perhaps one day you discover the mysterious Tilt-Shift lens, which throws everything you know about DOF completely, well, tilted.
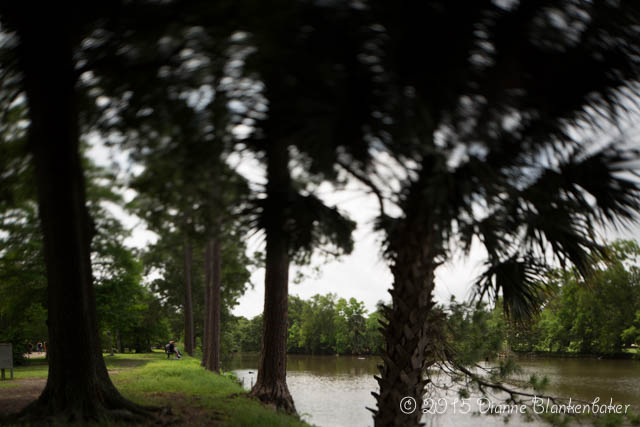
Here’s an example. With a normal lens, we expect the focal plane to be perpendicular to the camera sensor. Therefore, everything that is the same distance from the camera should be equally sharp. Take a look at this image:

This image is straight out of the camera with no editing (it was also in a bracketed set of multiple exposures for the purpose of doing a composite; I just happen to like the slightly darker exposure the best for an example).
Notice the plane of critical focus doesn’t seem to be a plane at all. It’s more like a wedge shape that runs parallel to the ground. And the area above and below the wedge that is acceptably sharp is thicker closer to the camera than further away—check out the closest tree trunk and how much of it is acceptably sharp. As you go back into the image, less and less vertical distance is sharp.
Notice that the people on the bench are sharp, but the tree at the same distance to the left of them is rapidly falling out of focus. I particularly like this composition with this effect—it creates a tunnel effect that leads the eye straight to the people on the bench.
Here’s another example, also straight out of the camera. In this case, the focus was on the face of the sculpture, but the body falls out of focus even though it is the same distance from the camera. In this case it has the effect of a vignette created by blurring the edges. But notice that the distant trees directly behind the sculpture still look acceptably sharp at the height of the sculpture’s head.

In the next example, the sharper focus on the flowers vs the fountain keeps the eye lower, noticing the garden more. This is actually a “normal” use for a tilt shift lens—creating lots of DOF at a given height off the ground. This works really nicely for fields full of flowers, for example.

Another popular use for the tilt part of a Tilt-Shift lens is miniaturizing a scene. This is a test shot through a window, but you can see how the shifted DOF causes the brain to perceive the scene as being a miniature version of a real scene:

Once again, notice how the bricks to the right of the window are in focus, but as you get closer to the bottom of the window, they fall out of focus.
Now, you might wonder why you would buy an expensive lens in order to create these effects in camera given that this effect can be created in Lightroom or Photoshop. Truth be told, I would not buy a lens for the Tilt effect. It’s the shift effect that makes the lens worth it to me. We’ll talk more about that in another post . . .
