Just a quick tip that Christmas trees work well with Hipstamatic as well as more traditional camera apps. Also try including reflections of the lights in the windows in the frame if you want something a little different from the traditional Christmas tree.
Have a wonderful day tomorrow whether you celebrate Christmas or not. Peace on earth, goodwill to all, and good night!
Hipstamatic with the Helga Viking lens and C-Type film
Camera awesome
Apple Camera App
Hipstamatic with Helga Viking Ina’s 1982
Hipstamatic with Helga Viking Ina’s 1982
Hipstamtic with Helga Viking lens and D-Type film
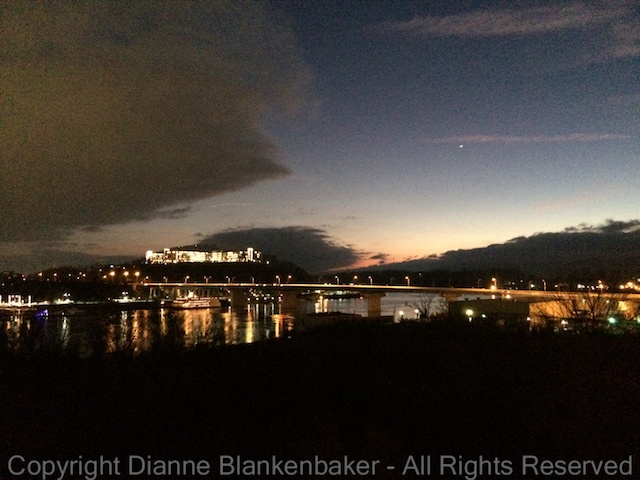
Having just passed the shortest day of the year in the Northern hemisphere, I thought it was a good time to look at how different apps perform at night on the iPhone 5S. I’m sure you all heard that the 5S was a step up for low-light photography with it’s bigger aperture and larger, less noisy sensor. If you don’t know what any of that means, that’s OK, it’s just supposed to be better than predecessors at night.
As someone who shoots a lot with a DSLR that does fantastic things at night, it’s a little hard for me to judge fairly about whether the improvement is significant between my 4S and 5S, but I was curious to see if using different apps on the iPhone while hand holding made any difference at all in the quality of the images in low light.
The answer is pretty much “no” for the apps I tried in this comparison: the Apple Camera App, Hipstamatic, Camera Awesome, and Pro HDR. Here are the things that differ, both good and bad, over the Apple Camera App:
Hipstamatic
The cool (or should I say hip?) thing about Hipstamatic at night is that the filters it applies to the image make the noise of low-light photos look intentional. They seem like part of the artistic effect instead of an annoying accident.
The downside is that you only get square images, which I don’t particularly like for a scene that is wide and short like the Chattanooga riverfront.
The level–it’s particularly useful at night when it’s too dark to judge visually if you’ve got a tilt going on or not.
Being able to separate the focus point from the exposure point gives you more control over whether you get a lighter or darker exposure (I did not use this feature in the examples, but you can see how to use it here).
Combining two images helps get better exposure, but the inherent problem of hand-holding at night is that the shutter is pretty slow, meaning more shake shows in the image. When you add a second image to that, the focus looks extra soft. We’ll try it on a tripod in another lesson to see how much that helps.
Your Assignment: Pick an app. Any app. Go out in the dark, find an area with night lights, and experiment for yourself. Does Hipstamatic make the noise tolerable? Does Pro HDR solve much of the problem or make it worse? Are you able to hand-hold and still get a sharp image? Does the level on Camera Awesome (several other camera apps include a level) help you as much as it helps me? How much does separating the exposure from the focus point help?
A large patch of frosted seed pods looks like a new bloom of flowers. Hipstamatic app, D-Type film, iPhone 5S.
A stalk of frost covered grass. Hipstamatic app, D-Type film, iPhone 5S.
Same stalk, new angle. Hipstamatic app, D-Type film, iPhone 5S.
The sun rises from behind a bridge, casting long shadows over frost. Hipstamatic app, D-Type film, iPhone 5S.
Hoarfrost formed on the otherwise brown grasses. Apple Camera App, iPhone 5S
Frost and sunlight in the park Apple Camera App, iPhone 5S
Now that winter is upon us (well, some of us more than others) in the northern hemisphere, even the tired old subjects we see everyday take on a whole new look. One of the fascinating things about photography is that everyday is a new day. Every minute is changing light. You can always find a new way to see the same thing you looked at last season, last night, the last minute. This change is particularly dramatic as the seasons change.
So, in today’s lesson, I invite you to revisit a common, convenient location like your own yard. Put on an extra layer or two if it’s especially cold in your neck of the woods, but by all means, get outside. Even if you don’t have snow where you live.
Go out early–when the temperatures drop to freezing overnight and you get out before the sun has had a chance to warm things back up, frost can be a spectacular subject.
In fact, even when the frost isn’t that dramatic, like in these images, it still creates a different look by brightening what can otherwise be dull looking plants when there’s no frost.
On the particular morning I pulled out my iPhone to capture some frosty spots in my neighborhood park, the sun was low, shadows were long, and colors were drab. After taking a few images with the Apple camera app, I decided to use the Hipstamatic app with the D-Type film for the tintype effect.
I like how the frost-covered plants look in the tintype effect–they jump out more with their frosty coating. The Apple Camera app works, too.
Your Assignment: Pick a place that might feel a little tired as a photographic subject. Your yard might be one such place. A place you walk regularly might be another. Make sure your iPhone is fully charged and then head out at sunrise (which isn’t so early these days) to look anew at what you’ve seen a hundred times before. Look at the shadows and light. Look for frost bouncing back the rising sun. Look for new angles and new ways of seeing the same old thing. Try the Apple Camera app. Try the Hipstamtic app. See if you can make something old look brand new.
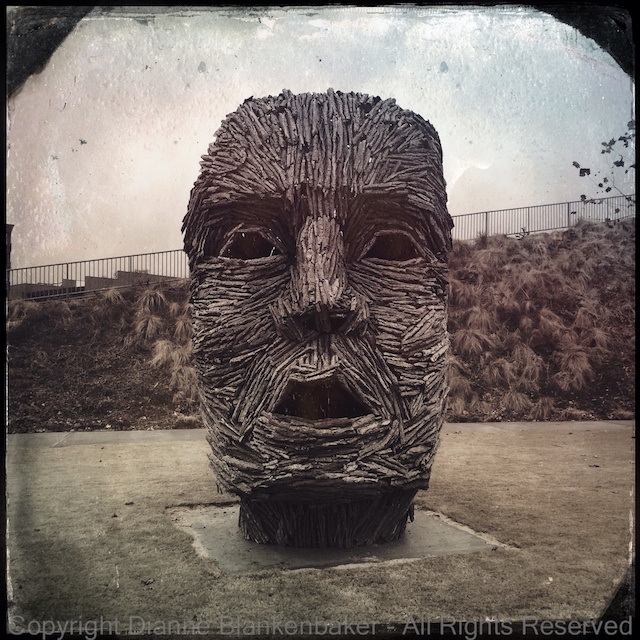
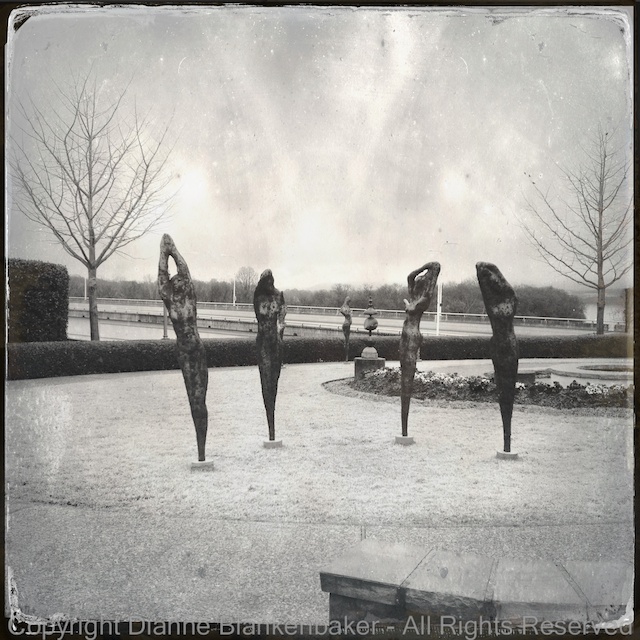
In yesterday’s lesson, I took a rather mundane photo of the recent sculpture addition in my local park, a giant head. I did several edits on it and showed you what I did. Now, for those of you who are not particularly excited by the prospect of following 17 steps to make your image more interesting, don’t forget about Hipstamatic. This gives you the ability to create many effects in a point-and-shoot way.
We first looked at the Hipstamatic app back in Lesson 13 and again in Lessons 14, 24, 29, and 30. The thing about Hipstamatic is that you choose the “film” and “lens” you want to use, which is the same as picking a collection of editing effects and the camera does all the work for you.
In the 3 examples shown here, I used the same lens: Helga Viking and 3 different films. The first is the Ina’s 1935 film. It gives the image more color and makes the sculpture pop out more. The second example used D-Type Plate film, which simulates an old black-and-white Tintype photo. Finally, in the 3rd example I used the C-Type Plate film, which intensifies the contrasts and shadows and also adds a touch of color.
Your Assignment: Dust the cobwebs off of Hipstamatic and choose a lens/film you want to use. Take an image of your favorite subject and then try changing to a different film. Experiment with the film that creates an effect that works best with your subject.
For today’s lesson, I used Hipstamatic with the Helga Viking Lens and the Black Keys film. What I’d like to focus on (sorry for the pun) is something called depth of field. Now, if you’ve read my About page, you know that I’m not allowed to explain technical stuff in this blog. I’m going to try to keep this as simple as possible: depth of field is what we call the distance from front to back of the scene that is in focus. Now that I’ve said that, I’ll warn you that that’s not entirely accurate, but let’s just leave it at that before I get into trouble with Gina.
When we looked at taking portraits in Lesson 41, we talked about wanting to keep some things in focus and other things not in focus. That’s what depth of field is all about–how do you get what you want in focus without getting other stuff in focus?
One of the painful things about the iPhone (or any other smartphone camera) is that you have very little control over this whole Depth of Field thingy. But let’s look at what happens when I use Hipstamatic to take some very close-up photos of flowers.
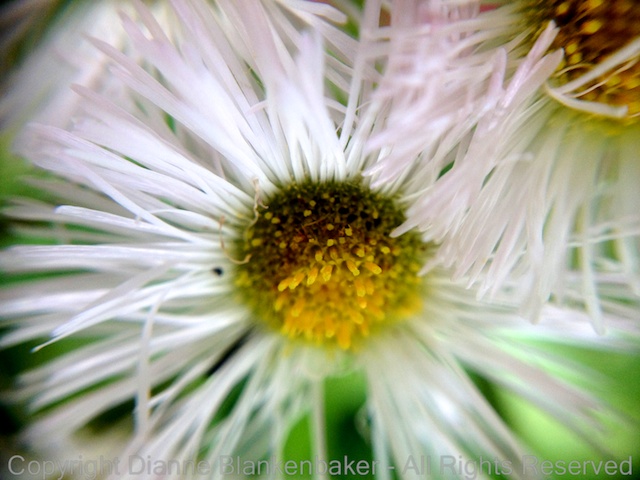
In the first photo, I was so close to the group of bright yellow flowers, the reflection off of them creates a haze around the blooms. Part of the haze is caused by soft focus on all but one flower hiding in the shadows. While I usually like sharp photos, there is something about this hazy effect that appeals to me.
In the second photo, the leaf in the foreground is what’s in focus. The softer focus in the other leaves and the background fence cause the leaf and fence patterns to start to look a lot like each other. Again, while I would normally consider this a failure because of the limited focus, there’s something appealing about this to me when combined with the Hipstamatic effects.
In the third photo, the blades of grass are very sharp in the foreground, but only a few of them. The rest blend into a mass of haze. I’m still trying to decide if I like this or not, but it’s a good demonstration of what we would call a shallow depth of focus–only an area a couple of inches deep in the scene is in focus.
The fourth photo really brings this effect home. The small, tall flowers in front are sharp while the big flowers in the background are soft. I want to love this photo, but I would love it more if the foreground flowers were lighter and stood out more. The background flowers would create a nice backdrop if there were more contrast between the background and foreground.
The fifth photo breaks one of the rules of photography. That is, don’t have stuff in the foreground that’s out of focus. Notice the big white flower completely blurred in the lower right. I like this photo anyway.
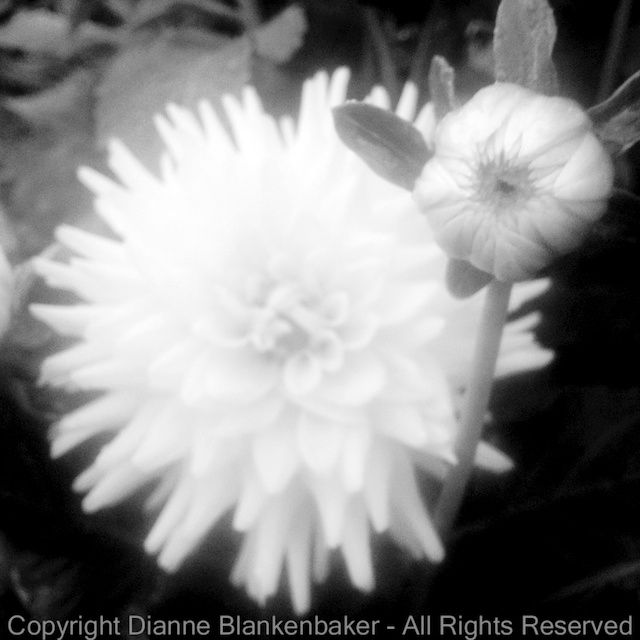
Finally, my favorite, the sixth photo focuses sharply on an unopened bud with a large bloom out-of-focus in the background. I would prefer this photo in a rectangle so that the little leaves around the bud weren’t cutoff, but I like that it’s less expected for the focus to be on the unopened bud than on the fully opened flower.
In all of these examples, I had only one way to control what was in focus and what wasn’t–distance to the subject. By getting too close to some subjects, they were out-of-focus (like in photos 1 and 5). Or, by getting just far enough away to focus sharply on the thing that was closest, I left the background out of focus like in photos 2, 3, 4, and 6.
Your Assignment: See what happens when you get very close to a subject. Pick a flower garden and shoot away. Can you get the subject in focus? How many other things are in focus? Can you get closer? When do you start to have problems getting the closest object in focus? Do you notice how far away the background objects need to be before they fall out of focus? Which do you prefer: out-of-focus foreground objects or out-of-focus background objects?
Today we’re going to return to a basic photography concept for inspiration. Early on, we talked about filling the frame, the rule of thirds, and symmetry as different ways to create interesting compositions in your photos. By composition, we’re talking about the arrangement of the stuff in your frame. We also talked about inclusion and exclusion when it comes to deciding what to put in the frame and what to keep in focus.
Today, we’re going to talk about repeating patterns. Sometimes, something that might seem ordinary and not worth photographing can become very interesting we we select a pattern from what we’re seeing and fill the frame with that pattern.
One of the aspects of what makes an interesting pattern in a photo is the 3 dimensional aspect of the subject. For example, here are a couple of repeating patterns that don’t work so well to my tastes:
A slightly wrinkled dish towel
A smooth granite counter top
Head on to a walkway
Head-on to begonias
But, when we take a repeating pattern that has some dimension to it and add an angle to help guide the eye into the photo, you start to get something more interesting. Compare the begonia angles and the walkway angles side-by-side:
Head-on to begonias
Shooting down the front of a row of begonias
Head on to a walkway
Creating an angle that leads into the photo
Gardens create interesting patterns to work with almost by definition–the gardener has probably carefully grouped together different types of flowers to create patterns pleasing to the eye. In this particular garden, I found lots to work with. Not only are the plants grouped to form patterns, but the plants themselves contain patterns, such as the large hosta. The hosta has rib patterns in its leaves, a pattern of white marks at the edge of each leaf, patterns of repeating leaf shapes, and the pattern in which it grows. It works well in color and it works in black and white against a similarly patterned fence:
The shape of the leaves and white border create yet another pattern
In B&W, the leaves and wood grain start to look more homogenous
The ribs in the leaf form a pattern
The swirl of leaves create another pattern
I particularly like to have a surprise in my photos that contain a repeating shape. For example, one flower that stands out from the rest, fallen petals, a complimentary color in the background. These are the kinds of things that make the pattern more obvious because there’s an exception.
A surprise patch of purple in the background complements the yellow
The one larger, brighter flower above the rest adds interest
The focus on the unopened bud with the blurred pattern of an open bloom
The fallen petals
A field of flowers can create more random patterns. If you look at the photo that shows a field of flowers vs the photo next to it that gets in closer and just shows a few flowers as a random arrangement of repeating shapes, it give it a totally different look at feel (these were taken with a DSLR, sorry):
A field of flowers in front of repeating metal arches
Repeating shapes of sunflowers popping above the rest of the flowers
Your Assignment: Look for repeating shapes with interesting textures and/or lines that can help draw the eye. Try taking pictures of these repeating patterns from different angles and different distances. Try using different apps–Camera Awesome is always great for realistic photos. The black and white examples were taken using Hipstamatic with the Helga Viking lens and Black Keys film. Do some patterns work better in color or B&W? Do some work better from far away? Think of photos you may have seen of the tulip fields in the Netherlands–if you haven’t see any, do a quick Google search on “tulip fields netherlands” and click on images to get an extraordinary number of examples of ways to shoot these repeating patterns). Are there times when you could think about repeating patterns to enhance the way you, say, take a picture of a flower?
Now that we’ve spent over a month together taking tons of pictures with our iPhones, we’re bound to have lots of extra photos lurking about that are just occupying space. One of the great things about digital photography is that it frees us up to experiment and take lots of pictures without worrying about the cost of film and development. The downside is that we end up with cluttered hard drives.
I use the Apple Photostream service. I love it because it means I can take pictures on my iPhone and get back to my iMac or my MacBook Pro to write my lessons and find all the photos I just took already there. There are a couple of problems with this, however. First, Photostream has a way of proliferating the problem if you have a lot of trash photos. Those trash photos get stored in the monthly archive for Photostream on each non-mobile device. Add to that backup copies you make and that’s yet another copy of trash.
There are several things you can do to reduce the load. First, apps like Camera Awesome do not automatically save the photos to your Camera Roll (which is what populates Photostream) unless you tell it to. I like to leave the setting on the default, which is manual save mode. That way, I can decide if I want to save a photo and let it proliferate or not. The rest, I can delete and keep them out of my other devices.
Here’s how to check the auto export to Cameral Roll Setting:
Here’s how to go in and delete photos from inside the app (note: make sure you’ve downloaded the ones you want first):
Fast Camera is another app that doesn’t automatically save all the photos to your Camera Roll. This is particularly good because if you’re shooting with no delay between shots, you could quickly fill Photostream with one burst of shooting. Fast Camera also has a nice organization of a series of photos–it puts them into folders. You can open a folder to review, select a few to save, save them, and then select all and delete. Here’s how to quickly delete the contents of a folder all at once:
Actually, you don’t even have to delete–if you click the done button, it will warn you that your photos will all be deleted. Only use that if you are truly done with all photos in all folders–it deletes everything.
The default Apple Camera app and Hipstamatic do save photos to the camera roll automatically. However, I tend not to take a large volume of photos with Hipstamatic because it has rather slow processing time. I’ve run Hipstamatic out of memory on more than one occasion. I also only use the default camera for panoramics, which I tend to take few of. As a result, clean up is relatively easy. If you use Photostream, just remember to remove bad photos from your Photostream as well as your camera roll. Prioritize keeping Photostream clean–it will spread those bad photos everywhere.
The final app we’ve used so far is the Pro HDR app. In this app, you can choose whether you want to save the original photos as well as the HDR processed photo or just the HDR processed photo. I like to save them all, but then I regret it when I end up with a photostream full of over and under exposed photos. I suggest just saving the HDR processed photo to minimize the clutter.
Finally, do not get attached to photos. You don’t need those 15 bad shots of the same thing.
Your Assignment:
Go delete junk photos! Here are some rules to help you get over the urge to keep them all:
If you only got one really bad shot of something really important to you, keep it. Otherwise:
If they’re out of focus, delete them.
If they’re overexposed, delete them.
If they’re underexposed, delete them.
If you have 15 you can’t tell apart, delete the first 14.
If you have 15 that are all slightly different, pick the 2 you like best and delete the rest.
If you used photos for utilitarian purposes like taking pictures of serial numbers on things you own for insurance purposes, file those away and delete them from your Photostream.
Helga Viking lens and D-type film – Landscape Portrait
Pro HDR Landscape Portrait
Let’s talk about different kinds of portraits–or, pictures of people.
To keep it simple, let’s use 3 general categories for the purposes of our discussion:
Traditional Portraits – “It’s all about you”
“You were there” portraits
Landscape portraits.
In the first category, traditional portraits are all about the person and any background is just a “mood setting.” In the second category, there’s a balance between a setting and the person (see Lesson 22). The difference being that a “You were there” portrait puts a person in a specific place that isn’t where they would normally be found.
In our final category, there’s the kind of portrait that’s more about the scene and the people provide more of a “mood” or sense of scale. I thought I made up the term “landscape portrait,” but it turns out there’s a group on Flickr on the subject. Great minds. 😉
If you’re in a setting that’s worth photographing and you also have people with you, it’s good to think about these 3 choices. Since my husband, dog, and I took a hike to a beautiful waterfall this weekend, I created examples using a couple of different combinations of lenses and films in Hipstamatic to show you the differences.
For a more traditional portrait, the Tinto 1882 lens we used in Lesson 24 works quite nicely. As you can see, the facial recognition does a good job of keeping the face sharply in focus while the rest of the scene blurs. To keep the background from getting too distracting, I took these in front of some stone steps instead of the waterfall. I used the Black Keys Fine film (available for free download from the shopping cart in the app) for the photo on the left and the Kodak XGrizzled film we used in Lesson 13 for the photo on the left:
Tinto 1884 lens and Black Keys Fine Film
Tinto 1884 lens and Kodak XGrizzled Film
I like the Black Keys film for a crisp black and white look. The Kodak XGrizzled film makes for a color photo with character. I would have also used a neutral film, but my model was starting to grumble about mosquitoes.
To get more of a balance between the setting and the “people” (including my canine kid) for a “they were there” portrait, I positioned myself much closer to the people. I also switched from the Hipstamatic app to the Camera Awesome app to get a “normal” photo:
Camera Awesome
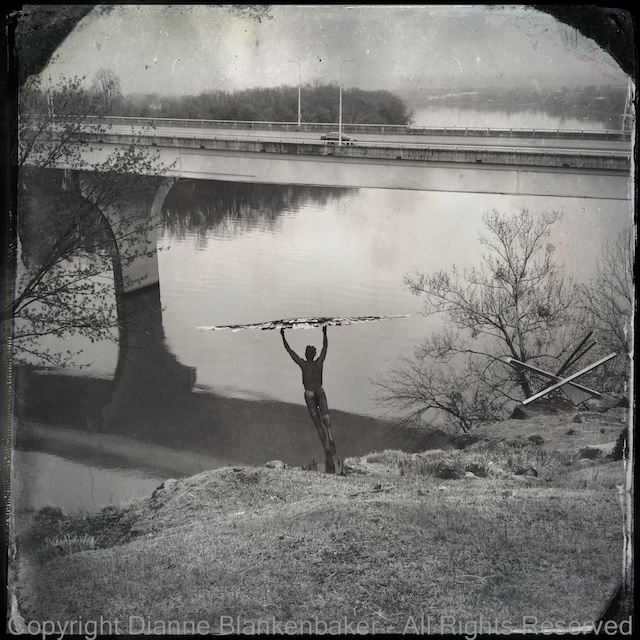
For the landscape portrait, I did two completely different looks. First, I used Hipstamatic with the Helga Viking lens and D-type film. Second, I used Pro HDR. In both examples, I included the entire waterfall and had my husband looking away from the camera. My dog was not so cooperative about where to look.
Helga Viking lens and D-type film – Landscape Portrait
Pro HDR Landscape Portrait
In both photos, the clear subject is the waterfall and having people in front of it creates a sense of scale as well as a different mood than, say, the waterfall by itself. Compare a similar Hipstamatic photo with the same lens and film side-by-side with the one with my husband and dog:
Helga Viking lens and D-type film – Landscape Portrait
Helga Viking lens and D-type film – Landscape Only
How would you describe the difference in the feelings evoked by the two photos?
Your Assignment: Take a cooperative person with you to an interesting setting. It doesn’t have to be a waterfall–an interesting building can make an equally compelling photo. Try using the different combinations of lenses and films in Hipstamatic in the different styles of portraits we discussed. Try with Camera Awesome and Pro HDR, too. Compare the photos. Which do you like best?
In lesson 13, I introduced the Hipstamatic App. In lesson 24, we used the lens from the tintype pack. Today, we’re going to use Hipstamatic with the D-type film and the Helga Viking lens. The Helga Viking lens is part of the Williamsburg Starter Hipstapak; refer to lesson 13 on how to purchase additional hipstapaks.
I am particularly fond of this combination–I tend to like virtually everything photo I take with it, no matter what the subject is. As someone who does a lot of landscape photography, I appreciate the front-to-back depth of field the Helga Viking lens provides–it works great for big landscapes. Add to that the look of black-and-white tintype and you have instant classics. Take a look at the gallery at the top of this lesson for examples.
Lesson 13 also explains how to change the lens and film in the Hipstamatic app. One thing I didn’t explain in lesson 13 is that Hipstamatic has a feature that will select the lens and film for you when you shake your phone. I do not like that feature–it causes me to end up with a different lens and film than I wanted when I least expected it. So, let’s turn that off:
Turning off the shake option
A handy feature that I use is setting a combination of film and lens as a favorite so it’s easy to pick that combo when I’m in a hurry. Once you have the D-type film and the Helga Viking lens set, click the curved arrow at the lower right to turn the camera around and you’ll notice a star at the bottom of the case. Here are the steps to save the combination as a favorite:
Saving a favorite combo
Now that it’s saved, to pick this combo, just tap on the star and then scroll through your saved favorites and pick this one. It saves time in that you don’t have to switch to the back view of the phone and scroll through the lenses and film separately.
Now that you’ve got the Helga Viking lens and D-type film, it’s time to go shoot!
Your Assignment: Try this combination in both indoor and outdoor settings. Compare the photos you take to the ones you took in Lesson 24 with the Tinto 1884 lens. Notice how what’s in focus is dramatically different? What kinds of subjects do you like best with this lens? Do you like having everything in focus compared to the Tinto 1884 lens? Are there some subjects that work better with the Tinto 1884 lens than with the Helga Viking and vise versa?
Tinto 1884 Lens with Ina’s 1969 film with focus selection on heron
Camera Awesome
Tinto 885 lens with D-Type film – but can you see the heron?
One of the challenges with the iPhone is trying to capture photos of wildlife where you can actually see the wildlife in question. In yesterday’s lesson, we looked at using the photojojo telephoto lens to get 8 to 12x magnification optically. You might think this is a really great answer for wildlife.
Using the telephoto attachment for wildlife shooting introduces several additional challenges. First, it’s hard to hold the phone steady enough to get a photo of a wild animal with the telephoto lens attached. Any shake is magnified proportionally to the magnification of the lens. Second, you have to focus manually, which can be very tricky if you’re trying to follow a moving animal. And third, if you don’t have the attachment already on the phone, there’s a good chance the wildlife will have left by the time you get it attached.
I am continuing to experiment and research what other people are doing for wildlife, but so far, I’ve found two patterns: they are shooting subjects they can get up close to without the subject moving. Or, the subject is really big. Like buffalo and moose big.
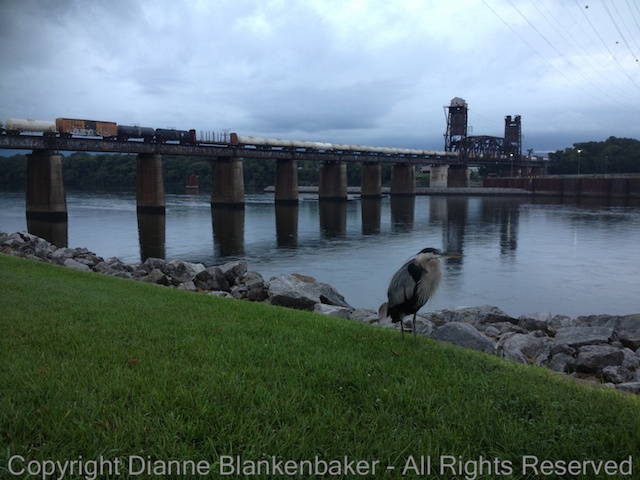
This morning, I managed to sneak up on a Great Blue Heron who was hanging out by the side of a bike path that runs along the Tennessee River. The secret to sneaking up on a heron is to start by getting as close as possible on your bike.
For heron who hang out by bike paths, they are so used to bikes going by that they assume you’re not a threat when you’re on one. Once you’re off your bike, don’t look at the heron. Get your iPhone unlocked and the app of your choice ready to go. Walk sideways or backwards towards the heron, turning just enough to get the framing you want and snap. Walk closer and snap again. Keep this up until the heron starts to look nervous. Then, back away. By the way, heron are known for stabbing at people’s eyes with their incredibly sharp beaks when threatened, so keep your eyes well out of reach!
The heron I approached this morning was pretty patient. I managed to try two different films in Hipstamatic with the same lens (Tinto 1884) we used in lesson 24 as well as the Camera Awesome app. By the time he started looking nervous, I was within 10 feet (and wishing I had eye protection).
I chose the Tinto 1884 lens because I wanted the blurred effect that helps isolate the subject. I started with the D-type tintype film because I like the look with the bridge in the background. However, because you can’t select the focus point with that film, the heron came out blurry unless I nearly centered the heron, which just didn’t create a pleasing composition:
By switching to the Ina’s 1969 film, I was able to select the focus and get a better composition. To select the focus in Hipstamatic, place your finger on the screen where you want to focus and hold it there for a second. If you look closely, you’ll see a motion in the viewfinder that simulates the turning of a lens to focus. Don’t tap–if you tap, it takes a picture.
Compare the photo on the left, taken with the D-type film that doesn’t allow for focus selection, to the photo on the right, where I was able to select the focus:
Tinto 1884 lens and D-type film–the heron is out of focus
Tinto 1884 Lens with Ina’s 1969 film with focus selection on heron
As you can see, while the D-type film may create an interesting effect for the scene, the mis-placed focus makes it less pleasing over all than the version using Ina’s 1969 film with the heron in focus.
Finally, here’s the photo I took with the Camera Awesome app (no editing):
Camera Awesome
Not bad for an iPhone in low light!
Your Assignment: Go to a local park that has a body of water. There are bound to be frogs, water birds, turtles, and spiders. Water birds are far easier than song birds, by the way. They are usually much larger and they like to sit still for endless periods of time because they’re used to watching for fish.
Try sneaking up on one, taking photos as you work your way closer. How close do you have to get for the photo to work? How big was your subject? If you spot any turtles, these are great subjects as well–they move slowly if at all. Spiders can also make great subjects, but we’ll be talking more about those in a later lesson when we use the photojojo macro attachment mentioned in yesterday’s assignment. You might also try getting photos with your telephoto attachment if you bought one. Were you able to get interesting photos with visible wildlife? Since the iPhone lens is wide angle, you’ll want to apply everything you’ve learned about inclusion and exclusion to make your photo as interesting as possible. Did you get anything really good?