Lesson 27: The Wide, Wide World

Sometimes a scene presents itself that is so wide, a single frame isn’t enough to capture it.  This is when the Panoramic feature of the iPhone default camera app comes in handy.

When you launch the camera app that comes with the iPhone, you will see an “Options” button at the top of the screen.  Tap that and the “Panorama” option becomes selectable:

IMG_3065

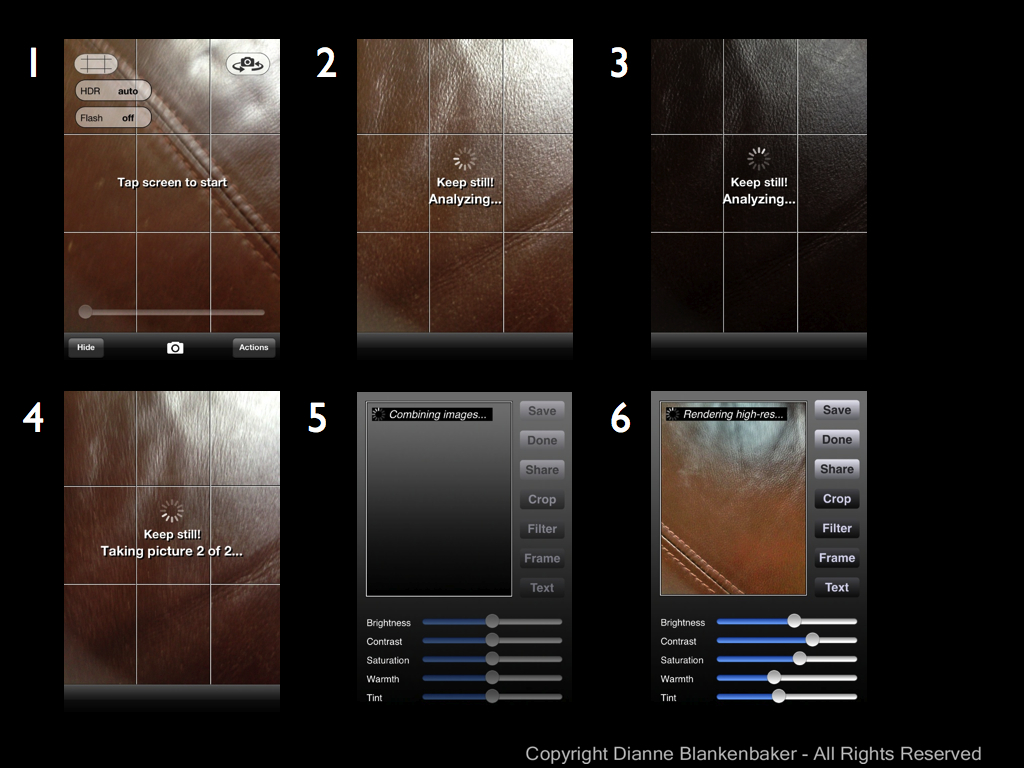
When you select it, a guide appears that will help you keep the phone on course while turning.  There are several tricks to making this work well.

IMG_3067

First, you have to move the phone left to right.  If the thing you want the most in the photo happens to have some really unattractive stuff to its right, you have to guess at where to start the photo so that you can get what you want in the photo and end up with the thing you want the most at the far right.

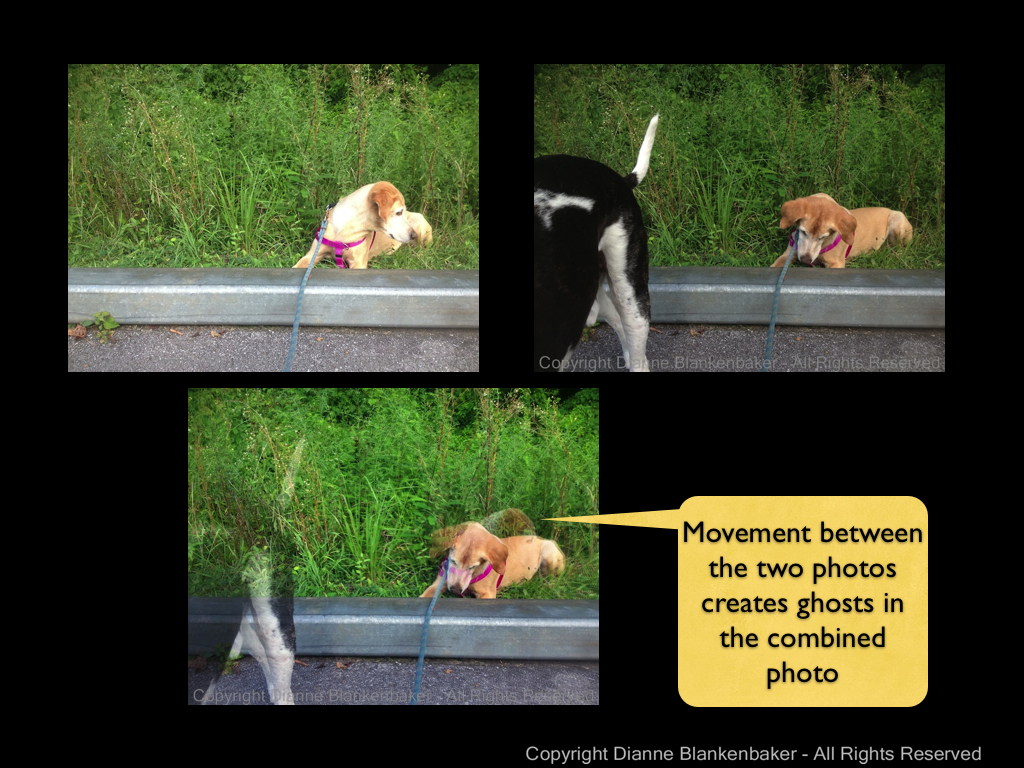
Second, you have to hold the phone vertically, which I find more difficult than holding the phone horizontally.  Check out Lesson 6 on how to hold the phone securely to help you hold it steady.  The biggest challenge I have with holding the phone during a panoramic shot is not getting my fingers over the lens.  Here’s an example where my finger got in the way:

To avoid this mishap, try putting your right middle finger on the upper right corner, your thumb on the lower right corner, and extending your remaining fingers to keep them out of the way.

Third, you have to position the phone at the far left of the scene you want to create, touch the camera button or push the volume up button.  I find it impossible to use the volume up button in this position, but perhaps your fingers are more nimble than mine.  Tapping the camera button can cause the phone to shift dramatically, so it requires some finger yoga in any case.

Fourth, if your scene has a lot of bright and dark areas, getting a good exposure can be tricky.  This is particularly true if the left side of the scene is significantly lighter or darker than the right.  You can set the exposure at the beginning, but end up with over or under exposed areas by the time you get to the end of the scene.  Here is an example where my sky got overexposed because the building I started with was significantly darker:

Finally, keeping the phone in the same plane as you turn can be tricky.  I find it helps to practice.  Plan to take multiple photos of the same scene to get what you want.  When you figure out where to start your photo, stand facing what will be the center with your feet pointing that direction.  Then, turn your upper body to the left without moving your lower body.  Start the photo and then twist around as you move the phone across the scene to minimize getting off track.  The iPhone will show you when you’re getting too far off course–watch the arrow and try to keep it on the center line.


The arrow indicates the phone is being tipped--just pause and adjust to get back on track
The arrow indicates the phone is being tipped–just pause and adjust to get back on track

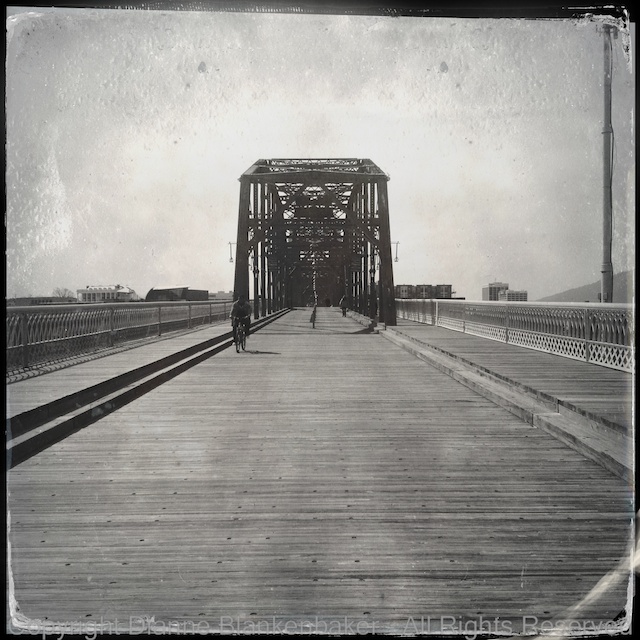
Now that you’ve mastered the basic techniques, some other things to consider are the effects on the scene itself.  I personally, being easily amused, enjoy bending railings and other straight lines.  For example, by including the railing on a bridge in both the left and right sides of the photo, the bridge gets bent into a giant “U” shape:

Similarly, standing out on a small peninsula and taking a panoramic of the relatively straight shore line, the Riviera becomes U shaped as well:

This also works at overlooks:

In general, bear in mind that you are taking a picture in a half circle in a 3-dimensional space.  Those 3 dimensions become 2 in the photo and it can create some interesting distortions.

Your Assignment:  Try taking a panoramic photo of things you wouldn’t normally think of as calling for panoramic treatment.  Maybe a panoramic of your street will create new next door neighbors.  Maybe a tall tree panned vertically will have a new twist.  Or maybe you can just take a panoramic of the sky.  If you have the opportunity, also try this technique in a wide-open scene like a view from an overlook, the top of a mountain, or some other high place that provides vast visibility.  Did you get anything really fun?

Lesson 25: Surprise! It’s Telephoto

Today’s lesson is a surprise lesson.  A surprise to me, that is.  I wasn’t planning on doing a lesson on attachments for your iPhone for a couple of weeks, but the opportunity presented itself with a full moonrise.  I am a fan of shooting the full moon rising over the horizon.  The iPhone is not particularly great at achieving good moon shots, largely because its built-in lens is very wide and getting good shots of the moon requires zooming in.

Since the iPhone cannot zoom in optically (only digitally, which will degrade your photos), some very clever people have come up with external attachments that go over your lens to give it some zoom (or should I say “zoom, zoom”?).  Photojojo.com carries such attachments at pretty remarkable prices.  The telephoto attachment comes with a case and mini-tripod for your phone for $35.  You can order it here if you’re interested.

While it’s a pretty ridiculous looking contraption, it fits in your pocket, which is hard to argue with.

This is what it looks like in its tripod:

Photojojo 8x telephoto attachment for iPhone 4S

You put the phone in the case, screw the lens into the case, and voila, you have 8x the focal length for an iPhone 4/4s and 12x the zoom for an iPhone 5.  Pretty cool.  While this will not achieve the same quality of photograph that you get with a high-end DSLR and telephoto lens securely clamped into a high-quality tripod, it’s a $35 attachment that fits in your pocket.  Compare that to the $5000 you could easily spend on a DSLR, lens, and tripod that you then have to lug around.  Once again, pretty hard to argue with that.  (Although, you won’t get the workout you’d get with the DSLR arrangement.)

To take pictures of the moon, you’ll want to use the tripod and have a stable place to set it where your phone will not, say, fall off a balcony and smash to pieces in the event the tripod tips over.  The tripod is not the most stable thing I’ve ever used, but hey, it also fits in your (back) pocket.

The lens requires manually focusing–your iPhone cannot focus automatically for you with the lens attached.  If you use glasses for reading, make sure you have them!  It really sucks to take a bunch of photos and then see them on a big screen and realize they’re all out of focus.

One of the effects of the lens attachment is called “vignetting.”  This means there may be some dark areas around the corners and edges of your photo.  You can crop the photo after you take it to both get some more zoom and get rid of the vignetting if you don’t like it.  Some people like it just fine–in fact, many photo editing tools include an option to add vignetting to a photo, so that’s another option.

Here’s what my original image looked like using the Camera Awesome app with the Photojojo 8x telephoto lens with the iPhone 4S:

Original

I did some adjusting to make the colors look more like what I saw and cropped to put the moon in the middle of the frame, eliminate the vignetting, and get a little more detail of the moon:

IMG_3039

side-by-side:

While I didn’t get some of the detail I wanted, it’s a far better photo of the moon than I’ve ever gotten with the naked iPhone.  Here’s an example I took a while back that includes the moon–it looks more like a big star without the telephoto attachment:

Your Assignment:  Decide if you are willing to spend $35 for an attachment you may end up not using much.  If so, go to Photojojo and order the telephoto lens.  While you’re there, you may want to consider ordering another set of attachment lenses that I’ll be doing lessons on in the next couple of weeks.  That set includes a wide angle, macro, 2x telephoto, and fisheye attachment for $45.  It’s a fun set of attachments, but now we’re talking $80, which is a pretty big investment for iPhone photos.  If you don’t want to spend the dough, don’t worry.

Whether you decide to order the attachments or not, check the time of the moonrise in your location.  Here’s a website that will help.  Assuming the night is clear enough, watch for the moon.  It may be late if there are hills, mountains, or buildings between you and your view of the horizon.  Watch carefully, sometimes haze at the horizon will prevent the moon from being visible until it gets a little higher in the sky.  It’s also harder to spot when moonrise is before sunset–the light of the moon may not be bright enough.

Once you spot the moon, try taking some photos of it over the landscape with your naked iPhone.  Try zooming in using two fingers and pulling them apart.  Notice the difference in the fuzziness in your image and the speckles that appear when you zoom in this way.  If you do get the telephoto attachment, try this again when the attachment arrives and compare.

Lesson 21: Filters and Photos From Your Library

Yesterday we learned how to use filters in the Pro HDR app (this link will take you to an even earlier lesson where we originally downloaded the app).  But besides being able to apply filters to photos you took using the Pro HDR app, you can also import photos from your library in to the app as well.  To import a photo from your library to apply a filter, follow these steps (click to enlarge):

Crazy HDR Filters.002

To apply a filter, the steps are the same as if you had just taken the photo:

Crazy HDR Filters.003

To adjust the photo with the filter applied and save (click to enlarge): Crazy HDR Filters.004


You may remember the original image in this example from several posts back.  I created it using the Camera Awesome app.  I saved it to my Camera Roll, so I was able to import it into Pro HDR.  This means I can apply my favorite effects from different apps to the same photo.  The possibilities are endless.

Your Assignment:  Open the Pro HDR app and go through the steps to import a photo from your library.  Try picking a photo that you created using effects in Camera Awesome in the earlier lesson.  You might also try importing an original version of the same photo to compare the accumulative effect vs just the Pro HDR filter by itself.  Did you discover any particularly great combinations?  Are you seen a loss of fidelity in the image when you edit an image that was already heavily edited?

Lesson 19: Keep It Clean

AU0A2991

If you’re expecting a lesson on how to keep your photos G-rated, that’s not what this lesson is about.  🙂  Rather, it’s about some basic maintenance that will help keep your images looking sharp.  Because we tend to use the iPhone for many things besides photography and we have it on us at all times, it tends to get dirty, including the little camera lens on both front and back.

If you find you can’t get a sharp image or there’s a constant hazy area in multiple photos, it’s probably a good time to get out the cleaning cloth and iPhone cleaner.

My personal preference is iKlear, which offers a lovely kit of Apple Polish cleaning fluid and clothes that are sized for just about every device you could own.  I use it to clean all of my monitors, laptops, iPad, iPhones, glasses, and even my glass-top desks.

AU0A2984

Speaking of glasses, if you wear them, clean them first, then clean the iPhone.  It will make spotting dirt (and dog hair) much easier.

AU0A2989

A small spritz of Apple Polish on an iKlear cleaning cloth removes the sunscreen, makeup, oil, and dirt from your phone.  (I don’t recommend spraying directly on the phone, just to be safe.)  Just don’t forget to clean the lenses while you’re at it.  In case you’re not sure where the lenses are, this slide shows you where they are (click to enlarge):

Locate the iPhone Lenses.001

The other thing to think about is if you have your iPhone in a case.  I personally use the LifeProof case most of the time because it’s water proof and I like to take my iPhone rowing.  Rowing a single-person sculling boat (especially at my limited skill level) leads to a high probability of flipping.  I also use the LifeProof Life Jacket when I row so that my iPhone will float.  I’m happy to report that the one time I did flip the boat, my iPhone floated and was kept completely dry.

That said, when you put your phone into a case that covers the lenses such as the LifeProof case, you want to make sure that you’ve thoroughly cleaned the inside of the case as well as the lenses on the iPhone before you put your phone into the case.  If you leave your phone in the case all the time, you can then just clean the outside of the case over the lenses to keep them clean.

AU0A2995

Your Assignment:  Take a few photos in different lighting.  See if there is a consistent pattern of fuzziness or haze.  If so, get out your favorite cleaning kit that’s safe for optical glass and clean away.

As a side note, I do not use iKlear on my lenses for my DSLR.

Lesson 18: When the Light is Out of Control

We’ve talked about outdoor lighting for landscape scenes in the past couple of lessons.  I thought it would be a good idea to revisit the Pro HDR app about now.  We downloaded this wonderful little app a few lessons back lesson 9, which also includes detailed instructions on how to use the app (in case you missed that one).

Today, let’s talk about the times when you end up at a great overlook with a fabulous view and it’s about high noon.  It’s a bright and sunny day with a bright sky and deep shadows on the landscape.  When you look at your iPhone screen to take the shot, you can barely see because of the bright sun.

These are the best times to whip out Pro HDR (although there are other good times, too).  If you’ve left it in automatic mode, you just tap the screen or push the up volume and the app will do all the work to take two photos with two different exposures and then combine them into one photo.

But, once you’ve got the combined photo, you can also use the app to do some additional adjustments to make the image look better lit.   After the app has taken 2 photos and combined them, the screen looks like this:

Notice the Brightness, Contrast, Saturation, Warmth, and Tint sliders.  By moving these sliders, I can make the lighting look more like the lighting I want and less like the high-noon lighting I don’t really like.  In this case, I just moved the brightness up a bit and pulled the contrast down to get a very realistic looking photo.  Here are the two exposures Pro HDR used to create a combined image side-by-side:

And here are the adjusted sliders and the photo I ended up with:

By the way, I was able to use the app to take the photos, get the combined exposure, and make the adjustments in less than one minute.  It doesn’t take a lot of effort with the Pro HDR app.

I can also do some more extreme adjustments.  In the next example, I took these photos at 8:55AM, when the light was “better.”  Here is the unadjusted photo Pro HDR created next to the unadjusted photo taken at 12:18PM:

Notice the slight difference in the amount of yellow in the earlier photo.  I decided to take the golden aspect to an extreme by adjusting the warmth and tint until I got something that looks almost like early fall:

Your Assignment:  Use Pro HDR to take a photo of a scene that has both very bright areas (like a sunny sky) and dark areas (like trees) at a time of day when the lighting is not optimal.  Now play with the sliders to see what effect each has on your photo.  If you get something you like, click the save button.  Then, try playing with the sliders some more and saving again.  You can create many different versions of the photo this way.  See if you can find a combination of adjustments that makes the lighting more comparable to “golden hour” lighting–or at least less harsh lighting.  Can you soften the effects of overhead sunlight?

Lesson 14: Another Way to Be Hip

In yesterday’s lesson, we used an included “lens” and “film” in Hipstamatic to create some interesting effects in our photos. One of my personal favorite combinations in Hipstamatic is the combination of the Helga Viking lens and the D-type plate film, which creates a black and white, tintype effect.

However, that lens and film combination costs extra, so I thought today we would look at how to create a similar effect using the Camera Awesome app, downloaded in lesson 7 and further explored in lessons 8 and 12.

One of the differences between the two apps is that in Hipstamatic, you frame and shoot and you’re done. In Camera Awesome, you have more decisions to make while shooting and then you apply different edits to get the effects. The disadvantage is the time it takes. The advantage is that you have a “normal” photo to work with and you can always get back to the original to try something different. In Hipstamatic, you get what you get.

I often take photos with Hipstamatic and then take a similar photo using Camera Awesome or my DSLR so that I have both the Hipstamatic version and something I can control. I always have to laugh when I’m standing somewhere with my DSLR hanging around my neck while I’m taking a picture with my iPhone.

In any case, let’s take a look at what the tintype effect in Hipstamatic looks like compared to using edits in Camera Awesome.

This is what I got using the Helga Viking lens and D-type plate film in Hipstamatic of my dog taking possession of my husband’s shoes:

IMG_0012

I took a similar image using Camera Awesome and started with this:

IMG_2882

I tapped the magic wand to get into the edit screen, and then did the following (click to enlarge):

camera awesome vintage.001

Next, I added a preset and a filter. If you need detail instructions, you can look back at lesson 12, just choose the Lone Star preset and the Cyanotype filter.

camera awesome vintage.002

Finally, we’re going to add a frame to the photo–I didn’t show all the screens, but it’s basically a repeat of selecting a filter. The main difference is when you’re done, it’s time to tap the done button.

camera awesome vintage.003

Now, let’s compare the Hipstamatic to the Camera Awesome version:

I did this same exercise with a landscape photo of the fog in the hills this morning. I added a square crop to better emulate the Hipstamatic look, which is done using the “Transform” option from the editing choices. Here’s a comparison of the results:

Your Assignment: Find three types of subjects to photograph: a person or pet to photograph up close, a room or garden to photograph from a bit further back, and a large open area to photograph from far away (like up the length of your street). Using Camera Awesome, photograph all 3 of these subjects. Now try applying the editing instructions to see which of them you like best with this type of look. Which kind of subject do you like best?


Lesson 12: Awesomization

Today we’re going to do something really fun.  We’re going to take an ordinary photo and turn it into something complete unique from anything you’ve ever produced with an ordinary camera.  This lesson does require an iPhone.  We will be using the Camera Awesome app we downloaded back in Lesson 7.

I started by applying yesterday’s lesson on symmetry to taking a very close-up picture of a large, silk flower.  You can choose whatever you like for your subject and framing, but taking a close-up is probably a good idea for today’s lesson.  Use the Camera Awesome app to take your photo as a starting place.

20130808 A Little Fun.001

Now that you have a picture, you’re going to open it and perform several editing steps all inside the Camera Awesome app to create a completely different look.  Start by opening the photo in the app and getting into the editing screen as shown in the example below (click to enlarge).  Also try the Awesomize slider to see if it improves your image.

20130808 A Little Fun.002

Next, we’ll try the “Transform” option to apply cropping to really get rid of any distracting background we can.  You’ll notice in my example below (click to enlarge), I still have a distracting bright area in the upper left corner of the photo even after I crop.

20130808 A Little Fun.003

Now let’s get really creative!  Let’s try the presets available.  Now, Camera Awesome offers a bunch of presets if you keep scrolling through the categories (flick to the left to see more groups of presets).  However, only the first category is free.  You have to pay $5.99 to get the other options.

20130808 A Little Fun.004

In this case, I chose Road Trip because I liked that it both reduced the glare of the bright spot and brightened the flower in a nice way.

Next, I decided to apply a filter.  Again, only the first category of filters is free.  I picked the Cyanotype because, combined with the Road Trip preset, it did some pretty cool things to my photo.

Once you’ve picked the filter you like (click “Undo” if you don’t like any of them), it’s time to click the “Done” button.  This applies your changes and save the edited image.  But before you go anywhere, make sure you also export at least your edited image.  (You may also want to export the original image.  You can go back to the same photo to export the original after you export your edited version.)  See the following example (click to enlarge):

20130808 A Little Fun.005

Now your lovely new picture is in your Camera Roll.  You can open it up and view it full screen and share it at will.  This is what my final picture looked like:

Awesomized

And this is what the original and edited version look like side-by-side:

20130808 A Little Fun.007

You’re Assignment:  Pick a subject that’s interesting close up and has some texture or a pattern of some kind.  A big, silk mum is great because it has a very dimensional texture vs, say, carpet.  However, even carpet can be interesting up close.

Use Camera Awesome to take a picture–remember to focus and expose separately if that helps.  Make sure you’re far enough away that the iPhone can focus–if you’re pictures keep coming out blurry, you may be too close.

Now use the step-by-step instructions above to play with the editing capabilities of Camera Awesome until you get an image you like.  Don’t forget to export it!

Which image do you prefer?  The original or the modified picture you created?

Lesson 11: The Rule of Symmetry

Back in lesson 2, we talked about the rule of thirds.  I showed you how to turn on the rule of thirds grid in your iPhone and gave some examples of how images can be improved by applying this rule.  Today, we’re going to talk about another rule, the rule of symmetry.

The rule of symmetry can be stated as:  if what you’re shooting looks symmetrical, don’t mess with that.  Often, subjects like architectural structures, moons, subjects with reflections in water, and anything round look better when they are more or less centered in the frame.  Sometimes, people do things that make great symmetrical photos as well. 

I pulled out a few examples from photos I’ve shot in the past.  I added an example that used a DSLR just to make the point.

In this example, I lined up the moon right on the center vertical line of the image and allowed the shapes of the bridge to create a nearly symmetrical image.  It bugs me that the bridge elements are not identical on either side, but that’s because each section of the bridge is progressively larger.  To make it symmetrical, I’d have to shoot at an angle (which might be worth trying).   Click on the image to enlarge. 

symmetry.001

In the next example, this is a pretty classic way of doing symmetry.  I was on a business trip and took a quick photo of a road leading to an arched entrance to a large courtyard in Madrid.  This is an iPhone photo taken at the peak of the afternoon sun, creating some very bright areas in the photo, but it is nearly symmetrical.

symmetry.002

The next example shows a photo taken by laying back on some steps that lead up a fire tower in a park.  The outside frame of the structure is quite symmetrical, but the stairs add a slightly off-balancing element.

symmetry.003

Finally, in this image, I unconsciously applied a slightly revised rule of thirds and the rule of symmetry.  The bridge is at about the top grid line for the rule of thirds, but the entire subject is centered on the vertical center of the photo.  This helps capture the uphill climb to the bridge as well as draws the eye more effectively to the bridge itself.

symmetry.004

To frame a shot symmetrically, I just leave the rule of thirds grid on.  However, if you’re using the Camera Awesome app, you can also choose a square grid, which can be helpful if you’re planning to crop the image to a square later or if it just helps you predict whether you’re image will be symmetrical or not.  To select the guidelines you want to display, just tap the tab at the top of the screen.  A “drawer” of options slides out and you can choose what you want to use.  We’ll stick the rule of thirds and square options right now.

IMG_2811

If you also took lesson 7, you probably have your level turned on in the Camera Awesome app.  The center circle for the level also indicates the center of your frame, which is another way to determine symmetry.

symmetry.005

Now, I just want to show one example of what happens when you try to treat a non-symmetrical subject like it’s symmetrical.  My dog is not symmetrical (at least not a this angle).  When I try to create symmetry with his head by taking a picture with his head in the middle, I don’t actually get any symmetry in the image at all.  From this angle, he’s all rule of thirds.

symmetry.006

I wanted to show how my dog can look symmetrical if photographered from head on, but my dog wasn’t particularly enthusiastic about modeling for me tonight.


Your Assignment:  Look for symmetry around you. Taking a photograph up a flight of steps, head on to a person or pet, straight at a doorway, or centered on a round flower will all create symmetry.  Try different subjects that have their own symmetry to them and see which ones you particularly like shot symmetrically.  Try combining symmetry with the rule of thirds and see what you get.  What kinds of subjects did you come up with that work well symmetrically?

Lesson 10: Taking Stock

The inspiration for these lessons, my best friend Gina, reports that her photos are getting worse instead of better.  This is a common experience–there are many reasons for this phenomena:

  1. You are developing an eye and you are seeing more of the shortcomings of your photos than you did in the past.  A photo that you thought was the best photo ever suddenly looks flawed with new found knowledge that influences your taste.  You might look back at the photos you selected in Lesson 1 to see if you see flaws in them you didn’t notice when you selected them.
  2. You are learning new skills that take time to get comfortable with.  A certain amount of physical dexterity is required to hold an iPhone level and stable while you choose focus and exposure options and click the button to take the photo.  You may not have developed the fine motor skills required to do this well.  You are also learning new things to think about when you set up to take a photo.  It can be confusing to have to decide which app to choose, how to apply the rule of thirds, think about holding the iPhone with good form, and decide how to set exposure and focus.
  3. In Lesson 1, I told you there were no rules.  But in the subsequent lessons, I introduced a series of “rules.”  When we are young and learning our language for the first time, we lack the experience to know when a new rule doesn’t apply.  For example, children often add “-ed” to the end of words inappropriately when they first start acquiring the skill of forming the past tense in English:  “I goed to the store with Mommy.”  Similarly, when you are learning a new rule, it’s hard to judge when to make exceptions.
  4. If you are dutifully doing the assignments at the end of each exercise, you are probably photographing whatever is most convenient to complete the exercise.  How interesting photos are is largely dependent on the subject you’re photographing.  Although we will eventually learn how to make seemingly uninteresting things interesting, if you look back at the photos you picked in Lesson 1, you may find that they are of particularly interesting places or people.  It’s hard to make up for that with basic skills.
  5. The 9 lessons so far are not enough to take your photos from ordinary to extraordinary.  I suggest looking at the example photos I used in the lessons (included in this post for your convenience).  You might notice that none of them appear in my iPhonography Gallery page.  This is because I don’t like them.  They are not great photos–they are exercises.  We have not yet gotten to lessons that expose the power of using an iPhone as a camera.  That power is not in its ability to capture great details or strong contrasts.  The power of the iPhone is in the range of applications available to easily do really creative things with the photos you take.  Be patient–we’ll get to those lessons.
  6. In digital photography, the equivalent of developing film is called post-processing.  This means after the photo is taken, it’s adjusted using software to make it look better.  We haven’t gotten to using any of the tools available for adjusting photos, so you are looking at photos that are merely “negatives.”  We’ll get to post-processing–just know that your photos aren’t really done yet.

Your Assignment:  Take a look at the photos you created as part of each lesson.  Take stock of what you learned from each exercise.  Do you have better control of where you focus?  Are you framing your subjects in new ways?  Are you better able to control the exposure you get?  Congratulate yourself for what you’ve learned, no matter what the photos look like.

Lesson 9: Combining Two Exposures into One Photo

Yesterday we addressed how you can use Camera Awesome to set the exposure and focus separately in your iPhone.  The advantage is being able to get a better overall exposure while still keeping the photo sharp where you want it.

Today, we’re going to learn another technique for getting the exposure you want that’s particularly useful when photographing a landscape scene like yesterday’s where there is a bright sky over a dark landscape.

We’re also going to download a second app called Pro HDR.  Good news for non-iPhone users–it’s also available for Android!  The bad news for all is that it’s not a free app.  It costs $1.99, so you’ll have to decide if you want to spend the money to experiment with it for today’s lesson or not.  If not, you can try with the iPhone’s default camera app, which has an HDR setting in the Options menu.  I do not use this setting because I haven’t found it to work well for me, but perhaps you will have better luck.

At the risk of getting too technical, HDR stands for High Dynamic Range.  It is not related to High Definition technology.  What the Pro HDR app does is take one photo exposed for the darkest areas of the scene and a second photo for the lightest areas.  Then it automatically combines the two into one image, choosing the best exposure for the different areas in the photo from the two photos and sprinkling in a little magic to make the photo look really good.

Because it’s all automated, it’s very easy to use and doesn’t require knowing anything about how HDR works.  The only thing it requires is that you hold the phone very stable while it does some analysis and then takes the two photos–this can take a while, so make sure you’re using good form holding the phone and in a position you can maintain.

To start the process, you launch the app, frame the scene the way you want and then tap the screen (you can also push the volume up button, but the volume will annoyingly pop–it does still work) to start the process.  Then, you just hold still and watch it do its magic (click to enlarge):

HDR slides.001

When I used this app while at Snooper’s Rock yesterday, these are the two photos it took and the combined image that resulted (click to enlarge):

HDR slides.002

You’ll notice that the combined image has much better exposure for the sky than in the first image and a much better exposure of the trees in than in the second.  It works very nicely for these types of subjects.

Where this technology doesn’t work so well is when you have people walking in and out of your scene or if your subject is in motion.  Check out this example of my dog’s best bud (and my dog’s tail end):

HDR slides.003

This is always disappointing to me as my black-and-white dog would be much easier to expose using Pro HDR.  However, even though he stood very still in the next image, the motion of his panting was enough to cause his throat to get blurry in the combined image:

HDR slides.004

You’re assignment:  Download Pro HDR (or turn the HDR option on in the iPhone default app).  Choose a scene with both very bright and very dark areas.  Now take a picture with the default app, with the Camera Awesome app using the methods we explored yesterday and the day before, and, finally, using Pro HDR.  Compare the images.  Do you feel like you got your $1.99 worth from the Pro HDR app?

Here’s my example comparing the results from the 3 apps:

comparison of apps.005.005

Bonus Assignment:  See if you can create some really cool ghost images using Pro HDR.  Sometimes this can be a really fun effect.