Lesson 21: Filters and Photos From Your Library

Yesterday we learned how to use filters in the Pro HDR app (this link will take you to an even earlier lesson where we originally downloaded the app).  But besides being able to apply filters to photos you took using the Pro HDR app, you can also import photos from your library in to the app as well.  To import a photo from your library to apply a filter, follow these steps (click to enlarge):

Crazy HDR Filters.002

To apply a filter, the steps are the same as if you had just taken the photo:

Crazy HDR Filters.003

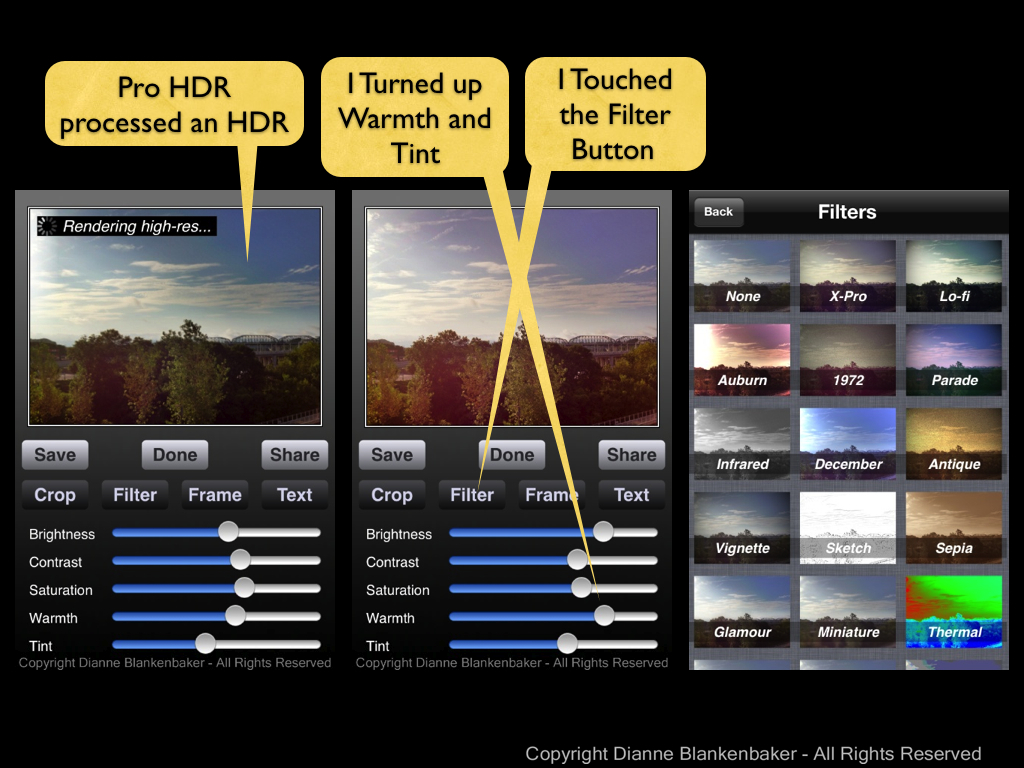
To adjust the photo with the filter applied and save (click to enlarge): Crazy HDR Filters.004


You may remember the original image in this example from several posts back.  I created it using the Camera Awesome app.  I saved it to my Camera Roll, so I was able to import it into Pro HDR.  This means I can apply my favorite effects from different apps to the same photo.  The possibilities are endless.

Your Assignment:  Open the Pro HDR app and go through the steps to import a photo from your library.  Try picking a photo that you created using effects in Camera Awesome in the earlier lesson.  You might also try importing an original version of the same photo to compare the accumulative effect vs just the Pro HDR filter by itself.  Did you discover any particularly great combinations?  Are you seen a loss of fidelity in the image when you edit an image that was already heavily edited?

Lesson 20: Using Filters in Pro HDR

We’ve spent some time using Pro HDR in a couple of different lessons now.  One thing we haven’t done with Pro HDR yet is apply some of the more “artistic” effects available in the app.

For today’s lesson, I started with a not so interesting photo of the trees in a park with a barely visible bridge behind them.  The Pro HDR app did its magic to get the best possible exposure, but the photo didn’t really have any “oomph.”  These are the kinds of images I like to play with.  Generally speaking, I try to minimize my editing time on photos, but sometimes it’s good to know what’s possible.

Plus, it takes very little time to do the edits I did in Pro HDR–a very easy app to use.

Click to enlarge the image below to see how I started by adjusting the warmth and tint and then opened the filters option:

Crazy HDR Filters.001

Next, I tried selecting many different filters to see if there was anything I particularly liked.  Each time I found something I found interesting, I touched the “Save” button to save the image and then went right back to trying another filter.  This allows you to create many different versions of the image without ever exiting from the edit screen.  It also makes it easy to go crazy with saving 15 different versions of the same photo, which I advise against unless you have a plan for those 15 different photos.  Here are some of the filters I tried:

Your Assignment:  Use Pro HDR to take an HDR photo of something that might not be the most interesting subject you’ve ever chosen.

Try every filter on a couple of different types of photos.  Notice the kinds of details that work well with a particular filter–like the lace-work of tree branches vs the solidity of a dog head.  Save the ones you really like.  How many new photos did you end up with?  Did you end up with anything you might hang on your wall?