Lesson 90: Slow Shutter

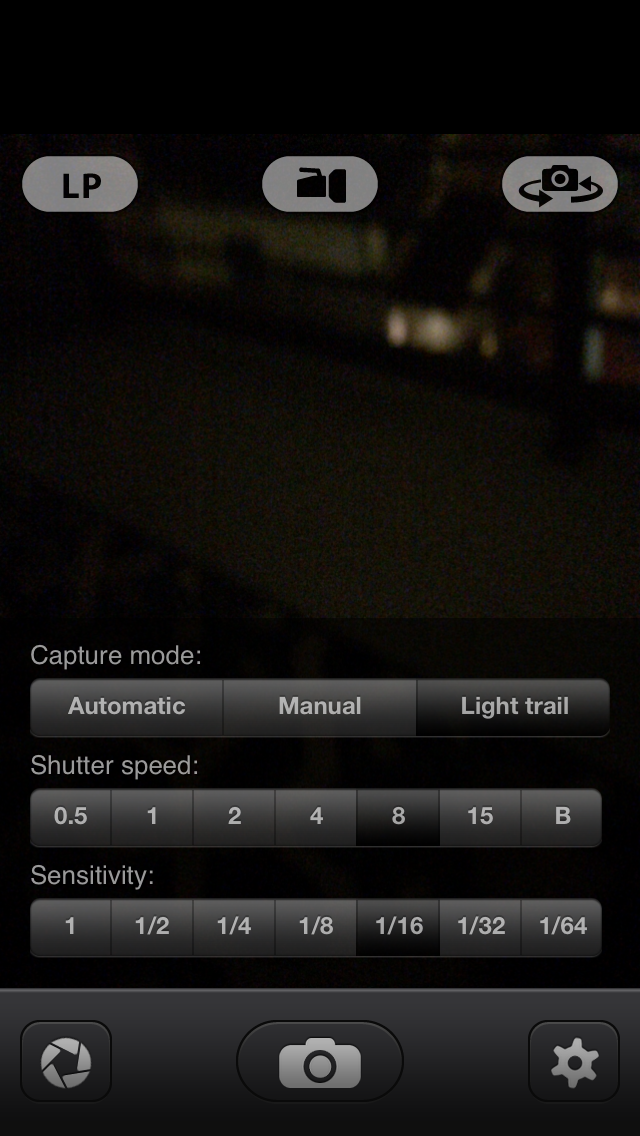
In Lesson 83, I showed you how to look at the shutter speed used when you took a photo by looking at the metadata in iPhoto iOS.  But, we didn’t have any choice about what shutter speed was used; it was picked by the camera app we used.  Today, I want to introduce you to an app that allows you to choose slow shutter speeds for fun effects.  It’s called SlowShutter and it’s available in the app store for $.99.

Using a slow shutter speed allows you to create interesting effects like light trails when cars drive by or to pan with a subject in motion, allowing the background to blur behind your subject.  For today’s example, I thought I’d start with something fun–drawing with a light source.

To do this, you need a light of some kind in darkness.  I have two examples.  For one, I found a healthy use for a lit cigarette–use it as your light source for a light trail.  For the other, I used a small light for a bicycle and handheld it.  In both cases, I set the SlowShutter app to a shutter speed of 8 seconds and then drew a heart shape in front of the camera.  I propped the camera on a steady base for both images, although a tripod would have been better–my hearts are a little shaky!

Because the light source is so much brighter than the rest of the scene, it registers in the image while the rest of the scene remains dark.  To change the shutter speed setting, tap the lens icon in the lower left corner of the SlowShutter app and then select the shutter speed you want.  I started with the “light trails” category to get to the 8 second shutter speed.

photo

Your Assignment:  Try downloading the SlowShutter app and then using a flashlight or other light source to see if you can capture words drawn with light.  Hint:  you’ll need a second person to draw the words or operation the camera so you can get enough distance between you and the light source to fit a word in the frame.

Lesson 89: Retromatic Wallpaper

Moving along to something just a bit too funky for me, but fun none-the-less.  Today, we’re going to take a look at the Retromatic app.  This app is designed to help you create really funky, retro creations.  They aren’t really photos anymore when you’re done, but they could make for fun cards, flyers, etc.

I decided to take an image I thought was cute but maybe not really a wall-hanger and see if I could make it wall-worthy by turning it into some silly wallpaper.  I can’t quite visualize what wall I would ever put this on, but I certainly had a good time playing with the capabilities of the Retromatic app.

The one challenge is highlighting just the parts of my subjects with my finger–this was especially tricky on my dog’s legs.  A stylus would probably make this much more accurate.


Your Assignment:  Try following these steps (an improvising) to create your own funky wallpaper:

Lesson 88: Hip Heads

In yesterday’s lesson, I took a rather mundane photo of the recent sculpture addition in my local park, a giant head.  I did several edits on it and showed you what I did.  Now, for those of you who are not particularly excited by the prospect of following 17 steps to make your image more interesting, don’t forget about Hipstamatic.  This gives you the ability to create many effects in a point-and-shoot way.

We first looked at the Hipstamatic app back in Lesson 13 and again in Lessons 14, 24, 29, and 30.  The thing about Hipstamatic is that you choose the “film” and “lens” you want to use, which is the same as picking a collection of editing effects and the camera does all the work for you.

In the 3 examples shown here, I used the same lens:  Helga Viking and 3 different films.  The first is the Ina’s 1935 film.  It gives the image more color and makes the sculpture pop out more.  The second example used D-Type Plate film, which simulates an old black-and-white Tintype photo.  Finally, in the 3rd example I used the C-Type Plate film, which intensifies the contrasts and shadows and also adds a touch of color.

Your Assignment:  Dust the cobwebs off of Hipstamatic and choose a lens/film you want to use.  Take an image of your favorite subject and then try changing to a different film.  Experiment with the film that creates an effect that works best with your subject.

Lesson 87: Adding Drama in iPhoto iOS

This will be the last iPhoto iOS lesson for a bit.  But, I wanted to show some editing on a “regular” photo rather than using the Paper Camera images I edited in Lessons 85 and 86.

This sculpture recently appeared in a park in my neighborhood.  It’s a pretty dramatic sculpture all on its own, but somehow the drama doesn’t quite translate in the photo taken in the Apple Camera app.  Perhaps because this was taken on an overcast day with very even lighting–as you may recall from Lesson 16, lighting makes all the difference.

In any case, I used iPhoto to bring back the drama and maybe even add a little extra.  Here’s what I did:

Your Assignment:

Choose an image that is lackluster.  Yesterday we played with the Exposure settings.  That’s a good way to add drama as a starting place.  Now try using the saturate brush and “Drama” effect in iPhoto to see if you can create an image that really “pops.”

Lesson 86: My Silly Dog and the iPhoto Exposure Tool

If yesterday’s abstract example hurt your eyes, today’s lesson should at least make you smile.  Well, if you’re a dog lover, anyway.

There is just something fun about the way the Paper Camera app’s Con Tours effect renders my dog.  I think it’s that it outlines his spots and turns his nose into a giant white circle that amuses me so much.  Hopefully you find it amusing, too.

In any case, just as in yesterday’s lesson, I started with a Paper Camera Con Tours image (see Lesson 77 for instructions on Paper Camera) and opened it in the iOS 7 version of iPhoto to see if I could make it a little more exciting.

The Paper Camera version is fun, but it isn’t quite contrasty enough for me.

Here are the steps I used to make my dog stand out better:

Your Assignment:  Use the iPhoto exposure adjustment on one of your photos that maybe looks a little dull or hazy.  Notice that the slider is split into 5 parts.  You can slide the black square at the far left to the right to brighten the whole image.  You can slide the white square right to turn down the brightness.  You can move the 3 markers in the middle to adjust the mid-tones.

This works better in a color image where there is more diversity in the range of tones than in my black and white example.  It’s worth experimenting with this because it makes a big difference in the appearance of your photo.  It also can turn into something pretty awful if you go too far with it–have a little fun!  🙂

Lesson 85: iPhoto Con Tours

Back in Lesson 77, we downloaded Paper Camera and did a bunch of fun stuff with it over several lessons.  Today we’re going to take a Paper Camera image using the Con Tours option and then do some editing with it in iPhoto to see what we can do.

Since I was out hiking with my dog, I took one photo of him and one photo of some trees using Paper Camera Con Tours.  Refer to Lesson 77 for instructions on how to take a photo with Paper Camera and to see an example of Con Tours.

After I saved my two photos to my Camera Roll from within Paper Camera, I opened up iPhoto and did some editing.

Here are the steps I used for the image of the trees (we’ll take a look at my dog in tomorrow’s lesson):

Your Assignment:  Try combining apps like Paper Camera and iPhoto and see what you can do.

Lesson 84: iPhoto Mobile Editing

Yesterday, I introduced you to metadata in the mobile version of iPhoto, a free app from Apple.  Today, I thought I’d show you a combination of using one of the brush editing tools and a filter to take my photo from not very interesting to a more retro look.  I particularly like how the light showing through the leaves in the foreground (left side) looks with the black-and-white effect.


Your Assignment:  Download iPhoto if you haven’t already.  Then open it up and select the photo you want to work on.  Here are the steps I followed for my edit:

Lesson 83: Metadata

Apple has  made iPhoto available for free on mobile devices.  It’s always been included with OS X devices (laptops, desktops).  Interestingly, it actually has more features on your mobile device for editing photos than the OS X version has, like brush tools.

But for today, I thought I would take the opportunity to show you something that you can now see on your mobile device.  In the past, you would have needed to download your photos to iPhoto or another photo organizer/editor on your computer to see what’s called the metadata.

Metadata literally means “data about data.”  It tells us things like when and where a photo was taken (and in iPhoto, even shows us on a map).  It also tells us some interesting facts about the settings the camera chose when you took the photo.

Now, I try not to get very technical in this blog, but I think it’s worth understanding something about what your iPhone camera is doing that the meta data in iPhoto can help you understand.

Let’s take a look at the metadata for this photo:

Notice the row of info right above the map?  It says “f/2.2 1/30 4.1mm — ISO 80.”  Since I promised Gina, the inspiration for this blog, that I wouldn’t get technical on her and here I am getting technical, I’m going to limit myself to talking about only one of these numbers:  1/30.  That’s how long the camera opened its shutter to allow light in to make the image.  1/30 of a second is a pretty long time for a shutter to be open–especially when it’s hard to hold an iPhone still.

But notice this photo was taken in a dimly lit room with very little light.  The iPhone had to keep the shutter open longer to get enough light in this setting.

Now let’s look at the metadata for a different image:

Notice that this one has a shutter speed of 1/800 of a second.  That’s a much faster shutter speed.  What’s different about this image?  Well, it was taken out doors in bright sunlight.  There was plenty of light to be had.

Slower shutter speeds will allow more motion to show in your photos.  Notice how my dog’s tail in the first image is blurred.  In the second image, the tree leaves are very sharp and show no motion even though there was a breeze blowing.

By looking at the metadata in iPhoto and checking what shutter speed the iPhone chose, you can get a good sense of what lighting will make it easier to show motion and what lighting will make it easier to get sharp images.

Your Assignment:  Download iPhoto if you haven’t already.  Open it up and tap the “i” button to check the metadata on a few images.  Compare indoor and daytime outdoor lighting–what shutter speeds do you see in images in each type of lighting?  Look for motion blur.  Can you find examples of slow shutter speeds leading to motion showing in your image?

Not a Lesson, Just an Update

Hopefully no one has run out of iPhoneography lessons while we were taking a hiatus!  We were all tied up getting ready for our Nov 10 Raptography workshop and didn’t quite get back on track right away.  So, here are a few shots I managed to grab during the class.  If you’d like to see some of the participant’s photos, you can check them out here:  Nov 10 Workshop.

It was an awesome experience to get to spend a day working with 10 photographers in person!  That was a DSLR class–unfortunately, I didn’t have an opportunity to discover what kinds of shots of birds of prey are possible with an iPhone, but maybe next time.  🙂

Hoping to get back on track iPhoneography lessons tomorrow.