Lesson 108 (All Cameras): Long Exposures

Note for iPhoneographers: the SlowShutter app will allow you apply this information to the iPhone, although stabilizing the iPhone (even in an iPhone tripod) can be challenging.  See Lesson 101.

When I teach beginning photography workshops, one of the things I spend a lot of time working with students on is the relationship between exposure and artistic expression.  Shutter speed is one of the big ways in which we control both exposure and motion showing in our images.

Slow shutter speeds leave the shutter open for longer periods of time, allowing more light to reach our sensors for exposure.  They also allow any motion in the subject to blur.  Most of us strive for tack sharp images, so why would we ever use long shutter speeds?

First, sometimes you have to use a slow (long) shutter speed if you’re shooting in low-light conditions.  Second, allowing motion to blur can create some cool artistic effects.  And third, if you need lots of depth of field, you’re going to need a small aperture.  The age-old analogy for the relationship between the shutter speed and the aperture size is to think of a water faucet.  How long you turn the water on is like your shutter speed.  How wide you open the valve is like your aperture.  If you turn a water faucet on wide open for a split second, you can get the same amount of water as if you turn the water on at a trickle but let it run for a much longer time.  That’s how aperture and shutter speed work together to control the total volume of light that will reach your sensor and why using a small aperture usually means a slower shutter.

Let’s start with an example that was both low-light and a small aperture, but with no motion:

AU0A2263

This example was shot at twilight with a 1 second exposure at f/18.  F/18 is a small aperture opening and 1 second is a slow shutter speed.  By using a tripod and a 2-second delay on the shooting mode, I was able to keep the camera still and avoid introducing motion blur.  I got the exposure I wanted and kept everything from the rail in the foreground to the building in the background sharp.

Now let’s take a look at what happens if you don’t keep your camera still:

AU0A2275

In this example, I literally picked up my camera/tripod and moved it in about the last second of a 25 second exposure.  Because the building in the background is so much dimmer than the lights going up the path, the building did not blur while the lights, being so bright, created trails across the image.

Now let’s talk about using long shutter speeds to show motion in the subject itself.  Waterfalls are a popular subject for this technique.  By putting the camera on a tripod again, everything in the image that is still remains sharp but the moving water blurs to a soft “flow” through the image, visually communicating the movement of the water.

Compare this image (shot at ⅙ of a second) to the one after it (shot at 1/320 of a second):

The fast (1/320) shutter speed freezes the splashes of water while the slower shutter speed (⅙) allows the water to blur into softness.  Which one you prefer is a matter of taste (in this case, I like the faster shutter speed better, but that’s partly because it’s slightly less exposed and has less flare from the sun).

Now let’s look at an example of low-light, moving water, and lots of depth of field:

AU0A2305

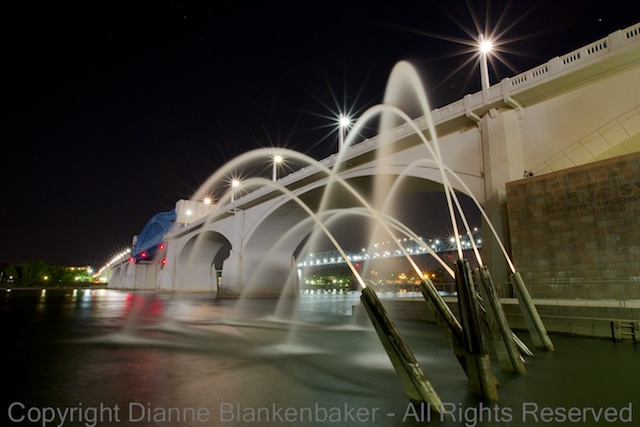
This was a 20 second exposure shot at f/16.  The small aperture not only provides more depth of field, but it also turns the lights on the bridge into stars.  The slow shutter allows the water coming out of the water cannons to blur into soft streams.  Also notice the surface of the river–the splashes and ripples have also smoothed out into soft lines.

There are many more fun things you can do with a long exposure, but I’ll save those for future posts.  🙂

Lesson 83: Metadata

Apple has  made iPhoto available for free on mobile devices.  It’s always been included with OS X devices (laptops, desktops).  Interestingly, it actually has more features on your mobile device for editing photos than the OS X version has, like brush tools.

But for today, I thought I would take the opportunity to show you something that you can now see on your mobile device.  In the past, you would have needed to download your photos to iPhoto or another photo organizer/editor on your computer to see what’s called the metadata.

Metadata literally means “data about data.”  It tells us things like when and where a photo was taken (and in iPhoto, even shows us on a map).  It also tells us some interesting facts about the settings the camera chose when you took the photo.

Now, I try not to get very technical in this blog, but I think it’s worth understanding something about what your iPhone camera is doing that the meta data in iPhoto can help you understand.

Let’s take a look at the metadata for this photo:

Notice the row of info right above the map?  It says “f/2.2 1/30 4.1mm — ISO 80.”  Since I promised Gina, the inspiration for this blog, that I wouldn’t get technical on her and here I am getting technical, I’m going to limit myself to talking about only one of these numbers:  1/30.  That’s how long the camera opened its shutter to allow light in to make the image.  1/30 of a second is a pretty long time for a shutter to be open–especially when it’s hard to hold an iPhone still.

But notice this photo was taken in a dimly lit room with very little light.  The iPhone had to keep the shutter open longer to get enough light in this setting.

Now let’s look at the metadata for a different image:

Notice that this one has a shutter speed of 1/800 of a second.  That’s a much faster shutter speed.  What’s different about this image?  Well, it was taken out doors in bright sunlight.  There was plenty of light to be had.

Slower shutter speeds will allow more motion to show in your photos.  Notice how my dog’s tail in the first image is blurred.  In the second image, the tree leaves are very sharp and show no motion even though there was a breeze blowing.

By looking at the metadata in iPhoto and checking what shutter speed the iPhone chose, you can get a good sense of what lighting will make it easier to show motion and what lighting will make it easier to get sharp images.

Your Assignment:  Download iPhoto if you haven’t already.  Open it up and tap the “i” button to check the metadata on a few images.  Compare indoor and daytime outdoor lighting–what shutter speeds do you see in images in each type of lighting?  Look for motion blur.  Can you find examples of slow shutter speeds leading to motion showing in your image?

Lesson 51: The Rule of Focus

In yesterday’s lesson, we talked about holding still.  The reason holding still is important is because of the Rule of Focus.  The Rule of Focus was once stated to me by a photography instructor as:  “If at least one thing isn’t sharp, your image will fail.”

If you’ve been following along since the beginning, you may recall that in Lesson 4, I talked about a photograph where nothing was sharp, yet it is considered by many to be among the most iconic rock and roll photos ever taken.  So, just like all other “rules,” this too can be broken.

That said, most of the time, it’s true that blurry photos don’t work.  In fact, getting sharp pictures is what drives many photographers to spend thousands of dollars on expensive lenses to get the sharpest image possible.

There are multiple parts to achieving focus.  We talked about motion blur caused by a moving camera in yesterday’s lesson.  We also talked about motion blur caused by a moving subject in Lessons 31 and 32.  Today, we’re going to talk about Depth of Field.  Now, I alluded to depth of field in Lesson 30 when we explored using a Hipstamatic lens that puts only a small portion of the photo in focus.  We also talked about depth of field in Lesson 41 when we talked about putting a human subject far from the background to increase background blur.

Today, let’s talk about some of the benefits of depth of field we get automatically when we shoot with an iPhone.  The easiest way to think of depth of field is to think of the scene you’re shooting.  The scene is 3 dimensional even though your photo has only 2 dimensions.  If you were to lay a ruler on the ground from the front of what you can see to the back of what you can see, the distance that remains in focus in your photo is called depth of field.

The point where sharpness begins is usually a bit in front of where you focused.  The point where sharpness ends is usually about ⅔ of the scene back from the point where you focused.  With the iPhone, the depth of field is far greater than with a DSLR camera with comparable settings because the sensor is so small.  This is a weirdness about depth of field–how small the sensor is affects depth of field in ways that are surprising if you don’t go into detailed, technical explanations about how light works to create images.  And, I promise, I won’t.

Here are the things that are important to remember:

  1. If you’re shooting a landscape, you generally want the photo to be sharp all the way from the front to the back.  To achieve this, try to keep objects closer than 10 feet out of the frame.  Then, select the closest object in the frame for focus.  The background will usually remain reasonably sharp.
  2. If you’re shooting a person, you generally want the person to be really sharp, especially the eyes, and you don’t care about the background–in fact, it would be better if the background were out of focus.  Focus on the person’s face or let the camera use facial recognition to achieve focus.
  3. If you’re shooting something up close, like the flowers I used in yesterday’s lesson, remember that you have to be a certain distance away to get sharp focus.  You might notice that the petals in the following photo that are closest to the camera are not sharply focused.  That’s because they were too close.  By backing away, you can get the entire bouquet in focus when you select the closest petals.

Your Assignment:  Choose a subject you’d like to have completely sharp.  Move closer and further away to determine how close you can get before the foremost part of the subject remains blurry.  Experiment with selecting different focus points to see the best place to choose focus to get the entire subject in focus.  Also try taking pictures of your favorite person to see if you can get their face sharp.  Don’t forget about the Rule of Holding Still.  If you have a landscape you can shoot, see what happens when you tilt the phone so the closest object is at least 10 feet away and you focus on that.  Try it again focusing far back in the scene and again focusing very close.  Which images have the most depth of field?  Which ones do you like best?

Lesson 50: The Rule of Holding Still

I’m not sure I previously stated this as a rule.  Since we’re reviewing the basics, I thought I would state this more directly:  hold still.  Unless, of course, you’re trying not to hold still.  But, we’ll come back to that one later.

We talked about holding the phone early on.  We also talked about different ways to prop your phone so it would be still.  And we talked about using image stabilization to help compensate for shake.

These all amount to the same rule:  hold still.

Not holding still creates blurry images.  The lower the light, the more your movement will cause blur.  If you find you consistently get slightly out-of-focus images that get worse in lower light, this probably means you were not born with the innate ability to hold an iPhone steady while taking a picture.

To show you how the amount of light available and the amount of light required to get a good exposure affects the amount of motion blur in the picture, I took 3 photos.  The first is with the flowers right under the light.  It’s pretty sharp.  The second is with the flowers a foot from the light with the exposure selected for the bright side of the flowers.  Not much difference in sharpness.  The last is the same as the second except that I asked the camera to expose the dark side of the flowers properly.  To let in more light, the camera also lets in more shake–lots of blur.

When we talked about image stabilization, I mentioned that the camera essentially waits for a moment when you’re not shaking to take the photo.  Here’s a side-by-side comparison of trying to get the dark side of the flowers exposed properly with and without image stabilization:

And here’s a second example with the flowers exposed for the well-lit portion:

If you don’t like waiting on the iPhone to decide when to take the shot (which can lead to missed moments), in the default Camera app, you can use the camera button on the screen to take a photo and create a pause between pressing the button and taking the picture by setting your finger on the button, steady yourself, and then release.  The picture is taken when you take your finger off the button.  This does not work with the volume-up button or Camera Awesome (at least not on my 4S).

I also mentioned using the headset volume-up button to take the picture as another option on the 4S or higher.  This works very well if you have a way to set your phone down, but I find it easier to press the volume-up button on the phone case than to hold the phone with one hand and use the headset when I’m hand holding.

Don’t forget about keeping your body still.  Stand with your feet wide–making a wider base will reduce sway.  If there’s a stable object you can lean against, use it.  Again, the lower the light, the more you need to worry about stabilizing yourself.  If you’re shooting in bright light, you probably won’t have motion blur problems unless you are really moving.

Your Assignment:  Try taking a photo in your house.  Indoor lighting is notoriously bad for iPhone photos.  Take a picture of something perfectly still without image stabilization turned on if you’re using the Camera Awesome app (or another app that has this feature).  Do you see blur?  Try looking at your photo on a computer screen if possible so you can tell.  Or zoom into the photo to check for blur.  Sometimes it’s too subtle to see well on the phone.

If you don’t have any blur, try less light or exposing a darker portion of the subject.  The point is to discover what level of light is required before you start having trouble holding the phone still.  Once you get to where you see a little blur, try as many of the techniques above as possible to see which works well for you to eliminate the blur.  It’s good to have several things to use for different situations as well as to combine techniques when the light is really low.