Lesson 42: New and Improved

Way back in Lesson 2, I mentioned there were several things that could be improved about the photo example that I would get to later.  I bet you thought I forgot?

Well, OK, I did, but then I remembered again.  So, here’s the photo from Lesson 2:

IMG_2613

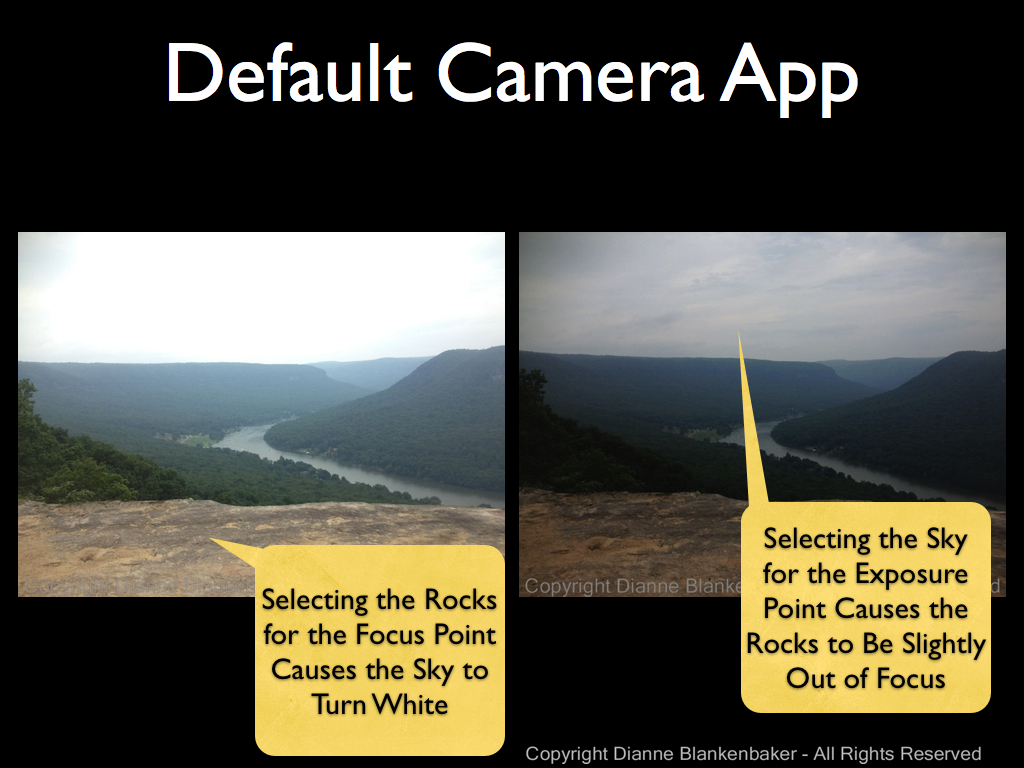
What things can you see about this photo that could be better?

Here are the things I don’t like about it:

  1. The bright areas in the background are distracting.
  2. I think my dog would look better if I’d shot lower to the ground.
  3. My dog’s black spots are under exposed.
  4. The lighting is too gray.

So, today, we’re going to do two things.  First, we’re going to try to edit the original photo with Snapseed to see if we can make it look better.  Snapseed will help with items 1, 3, and 4, but it cannot help with the angle of the photo.

Second, I’m going to take a similar photo of my dog and see if I can’t improve upon the original photo by using a different setting that has better light, and using a lower angle.  I am beginning to realize why taking my dog to obedience classes might be useful.

So let’s edit the photo in Snapseed.  Here are the steps I went through to improve the original photo:

And here is the edited version side-by-side with the original:

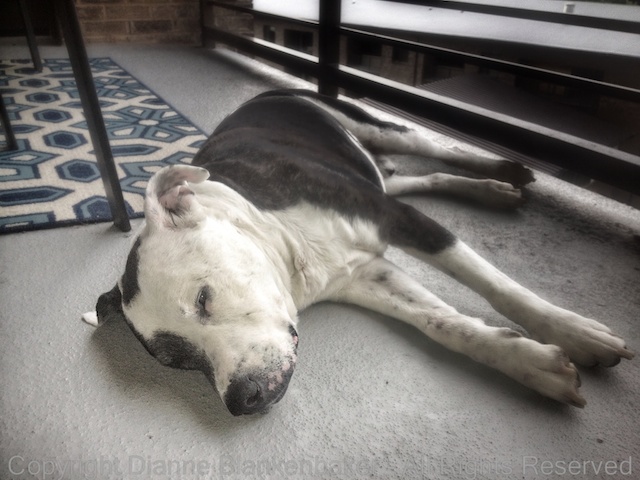
The other approach is to try to capture the same photograph in a different setting that eliminates the bright areas in the background and allows me to take the photo at a lower angle to the ground.  I was planning to have some examples of a similar pose out on the grass in some lovely evening light.  Unfortunately, my dog was unwilling to cooperate.  Here is a selection of photos I got of my dog while trying to get him to lie in the same position as in the original photo:

But even that has a lesson in it:  if someone or something you love is doing something you want to remember, take the photo.  Sometimes you can’t get rid of distracting background.  Sometimes you can’t get the perfect angle before the subject jumps up and runs away.  But having imperfection is better than having nothing.  And, as we will discover over and over again on our photographic journeys, no two moments are ever exactly the same.

You’re Assignment:  Choose a photo from one of our early assignments you think you might be able to improve upon using Snapseed.  Get a little crazy with it.  See if you can create something that you really like.  Now, try to recreate the same situation with whatever bugged you about the photo fixed.  Is that even in the realm of possibility?

Lesson 40: The Morning After

Or, the afternoon or evening after a shoot . . . whatever the case may be.  It all calls for post-processing.  What is post-processing, you ask?  Well, to put it simply, it’s “gentle” photo editing.

Photo editing can range from creating a completely new picture (like we did in Camera Awesome in Lesson 12) to doing minor adjustments to make your photo look more like reality.  The latter category of editing is usually referred to as “post-processing.”  Post as in “after you’re done shooting” and “processing” as in the digital version of developing a photo.

When you take photos with your iPhone, the iPhone is making a lot of decisions for you.  It decides how saturated to make your colors, how to balance the tones so that white looks white, how bright to make the image, etc.  Sometimes it does a pretty good job.  Sometimes it guesses wrong.

Today, we’re going to download another app.  This time, it’s not a camera, it’s a photo editing tool.  Good news!  It’s free!

Sometimes people are disappointed when they realize that some level of editing is called for to get the most out of their photos.  Using photo editing tools can help  take a ho-hum picture to something much more dramatic.  Often, it’s the drama that gets lost when you take a photo; you’re just putting back what your eyes saw.

We’re going to do a simple edit with Snapseed today.

I’m using an image that has a distracting background I’d like to make less distracting.  To do this, I start by opening the app and then selecting the image I want to edit.  The graphics below will walk you through all the edits I made to this one photo:

I applied a few simple adjustments but left it looking pretty similar to the original–just a little better.  Here they are side-by-side:

Your Assignment:  Download Snapseed (did I mention it’s free?).  Follow the instructions to open a photo that you ilke, but weren’t thrilled with.  Try making the simple post-processing adjustments above.  Do you like it better?  Are there still things you would like to change about it?  What are the things you couldn’t figure out how to do that you’d like to change?

Lesson 39: 2X

This is not a lesson about shirt sizes.  Instead, we’re continuing our progress using the Photojojo lens attachments with the iPhone.  Yesterday, we looked at the wide angle attachment.  The day before, we used the macro attachment.  Today, let’s take a look at the 2x Telephoto attachment.

This is what it looks like up close:

Telephoto Lens

If you either have reading glasses handy or don’t need them, you can see the edge of the lens is labeled “telephoto” to help you tell it apart from the other lenses in the kit.  If you’ve already adhered the metal ring around the built-in lens on your iPhone, the magnet in the 2x Telephoto lens will hold the lens in place on the ring.  If not, refer to the instructions that came with the lens kit for more info.

We previously used a different telephoto lens attachment in Lesson 25 to take pictures of the moon.  That one is 8x telephoto (or 12x for an iPhone 5).  So, you might ask, why would I want 2x if I have 8x (or 12x)?  Well, the answer is simple.  Sometimes, 8x (or 12x) is too much.  Bigger is not always better.

Let’s take the example of being in a park where you want to get a picture of a spider.  The spider is close enough that using the 8x telephoto wouldn’t allow the entire spider to fit in the frame, but far enough away that with no zoom, the spider gets lost in the flowers.

Let’s consider the macro attachment.  You might wonder why you wouldn’t use that for the spider as well.  There are three considerations:  1) How big is the spider?  2) Will the spider hold still while you manipulate the lens inches (or less above it)?  3) Will you scream and throw the phone if the spider suddenly moves while you’re that close?

The 2x zoom gets you in tighter without having to get within grabbing distance.

Here’s a side-by-side comparison of my spider with and without the 2x zoom (uncropped):

And a second one, just for fun.  By the way, in the interest of full disclosure, even with the 2x zoom, I still jumped when the spider suddenly ran to the top of its web.  It’s a big spider.

Your Assignment:

Attach the 2x telephoto lens to your camera.  Look for subjects where you’d like to get closer without getting physically closer.  Notice how 2x sounds like a lot, but really only brings things in slightly closer.  Can you use the 2x telephoto attachment to fill the frame with your subject from further away?  Did you get any great photos of critters that can be hard to get close to like spiders or butterflies?

Lesson 38: Wide Views

In yesterday’s lesson, we used the Photojojo macro lens to take close-ups of small subjects.  Today, we’re going to use the exact same lens but with the wide angle ring in place.  As a reminder, the wide/macro lens has two parts that look like this when separated:

Wide/Macro lens with the Wide ring removed

When the two parts are screwed together, lens looks like this (the one in the middle):


The complete lens kit with the Wide/Macro lens in one piece

If you still have them separated, reattach the wide angle ring for this lesson.  The lens will stick to the metal ring around your iPhone lens via a magnet.  Refer to Lesson 37 for more details about attaching the lens.

The iPhone lens is quite wide to begin with.  It’s a 4mm lens, which helps to compensate for its very small sensor when you’re trying to go big.  However, sometimes it’s still not wide enough.

The Photojojo wide angle lens takes your built-in lens from 4mm to 2.68mm, putting more stuff in the frame when the scene you’re shooting is really big.  Here’s a side-by-side comparison of what you get without and with the wide-angle attachment:

Notice two side-effects.  The corners of the image can get dark (called Vignetting) and objects around the edges of the photo start to bend.  Sometimes those effects can be fun to play with, too.

Your Assignment:  For an easy subject, try taking a picture from the corner of a room in your house.  If you can stand on a chair, even better.  Take the photo both with and without the wide angle attachment.  Can you get the whole room in?  Do you see both the ceiling and the floor in the photo?  How much more do you see with the attachment?  If possible, try the same experiment outside.  Notice what happens to street lights and houses at the outside edges of the frame–you get a little reality bending with a lens this wide.

Lesson 37: Small Subjects

Tiny subjects like small flowers can often be difficult to capture with the iPhone.  One way to address the problem is to use a lens that attaches over the built-in lens much like the telephoto attachment we used in Lesson 25.  In this case, we’re going to use the Photojojo macro lens attachment.

You can order a set of 3 lenses that attached via a magnet over the iPhone lens here:  http://photojojo.com/store/awesomeness/cell-phone-lenses/

The macro lens attachment will help you get up close to small subjects.  It’s actually part of the wide angle lens in the Photojojo kit.  You just have to unscrew a ring to get to the macro lens part.  Here’s what the kit looks like out of the box:


The fisheye, 2x telephoto, and wide angle/macro lens attachments from Photojojo

And here it is with the wide angle ring removed from the macro lens:

Wide angle lens with the ring to make it macro removed

To attach the lens to the iPhone, you simply stick the metal ring around the built-in lens on the back.  I used the iPhone ring intended to attach to the glass back of the iPhone.  However, I attached it to the outside of my LifeProof case so I could keep the phone protected while shooting.  This is what it looks like on my 4S:

Once you have the ring adhered around your lens, remove the extra ring from the wide angle/macro lens in the kit and then let the magnet do the work to keep the lens attached to the phone.  Check to make sure the lens is centered around the lens before you start shooting–it can move around and block a portion of your photo.

To take macro photos, find a small subject like a flower and then get very close to it.  So close that you’re almost touching it.  You will need to experiment with your angle to the subject as well as your distance from the subject to get your subject in focus.  You will also need to hold really still–the magnifying effects of the attachment also magnify your motions.  This is a good time to refer to Lesson 34 on how to keep the phone still.  If you can use a tripod, do.

Here’s are some side-by-side comparisons of taking photos of small subjects with and without the attachments.  Notice that the iPhone is unable to focus at all on the flowers I chose for subjects without the attachment.

Your Assignment:  If you decided to buy the Photojojo lens kit mentioned in Lesson xx, try your own up-close experiment.  See how close you need to get the subject to the lens attachment to get the image in focus.  Note that if you’re holding the phone so that the volume buttons are at the top right corner, the lens will be at the bottom right-hand corner.  Try taking a picture of the same subject from the same distance without the attachment.  Are you able to get the subject in focus without the lens attachment?


Lesson 36: Creating Space

Now that we’ve spent over a month together taking tons of pictures with our iPhones, we’re bound to have lots of extra photos lurking about that are just occupying space.  One of the great things about digital photography is that it frees us up to experiment and take lots of pictures without worrying about the cost of film and development.  The downside is that we end up with cluttered hard drives.

I use the Apple Photostream service.  I love it because it means I can take pictures on my iPhone and get back to my iMac or my MacBook Pro to write my lessons and find all the photos I just took already there.  There are a couple of problems with this, however.  First, Photostream has a way of proliferating the problem if you have a lot of trash photos.  Those trash photos get stored in the monthly archive for Photostream on each non-mobile device.  Add to that backup copies you make and that’s yet another copy of trash.

There are several things you can do to reduce the load.  First, apps like Camera Awesome do not automatically save the photos to your Camera Roll (which is what populates Photostream) unless you tell it to.  I like to leave the setting on the default, which is manual save mode.  That way, I can decide if I want to save a photo and let it proliferate or not.  The rest, I can delete and keep them out of my other devices.

Here’s how to check the auto export to Cameral Roll Setting:

Here’s how to go in and delete photos from inside the app (note:  make sure you’ve downloaded the ones you want first):

Fast Camera is another app that doesn’t automatically save all the photos to your Camera Roll.  This is particularly good because if you’re shooting with no delay between shots, you could quickly fill Photostream with one burst of shooting.  Fast Camera also has a nice organization of a series of photos–it puts them into folders.  You can open a folder to review, select a few to save, save them, and then select all and delete.   Here’s how to quickly delete the contents of a folder all at once:

Actually, you don’t even have to delete–if you click the done button, it will warn you that your photos will all be deleted.  Only use that if you are truly done with all photos in all folders–it deletes everything.

The default Apple Camera app and Hipstamatic do save photos to the camera roll automatically.  However, I tend not to take a large volume of photos with Hipstamatic because it has rather slow processing time.  I’ve run Hipstamatic out of memory on more than one occasion.  I also only use the default camera for panoramics, which I tend to take few of.  As a result, clean up is relatively easy.  If you use Photostream, just remember to remove bad photos from your Photostream as well as your camera roll.  Prioritize keeping Photostream clean–it will spread those bad photos everywhere.

The final app we’ve used so far is the Pro HDR app.  In this app, you can choose whether you want to save the original photos as well as the HDR processed photo or just the HDR processed photo.  I like to save them all, but then I regret it when I end up with a photostream full of over and under exposed photos.  I suggest just saving the HDR processed photo to minimize the clutter.

Finally, do not get attached to photos.  You don’t need those 15 bad shots of the same thing.

Your Assignment:

Go delete junk photos!  Here are some rules to help you get over the urge to keep them all:

  1. If you only got one really bad shot of something really important to you, keep it.  Otherwise:
  2. If they’re out of focus, delete them.
  3. If they’re overexposed, delete them.
  4. If they’re underexposed, delete them.
  5. If you have 15 you can’t tell apart, delete the first 14.
  6. If you have 15 that are all slightly different, pick the 2 you like best and delete the rest.
  7. If you used photos for utilitarian purposes like taking pictures of serial numbers on things you own for insurance purposes, file those away and delete them from your Photostream.

Lesson 35: Do the Time Warp

In Lesson 32, we downloaded Fast Camera and discussed using Fast Camera to take pictures of moving subjects. We also exported a series of photos as a movie. What we didn’t do was talk about time-lapse photography. That is what we are doing when we take a series of still images and then string them together into a video. When the video plays so that the photos are shown closer together in time than they were taken, that’s a time lapse.

This used to be (and still can be) something complicated and difficult to do, but Fast Camera makes it very easy. There are two tricks to creating interesting time-lapse videos. First, the camera must be still through the entire process of taking the photos. This is what happens when you follow a moving subject around and then try to create a time-lapse video from them:

It looks more like a series of photos of my dog than a time-lapse. While, technically, it is still a time-lapse video, because the background keeps changing, we lose sight of the fact that we’re watching a scene unfold. Instead of following a subject around, place the iPhone on the tripod we used back in Lesson 25 and again in Lesson 34. Or, refer to Lesson 34 for other ways to stabilize the phone. For this exercise, I used the tripod:

AU0A3745

Notice the headset plugged into the iPhone. I used the volume up button on the headset to start and stop taking photos so I wouldn’t knock my precariously balanced iPhone over.

Putting the iPhone on a tripod for time-lapse photography also implies that there needs to be something moving in the frame while you take a series of photos. For example, you’ve probably seen some really awesome time-lapse videos of a flower blooming or of city traffic. In the first case, the subject remains in the frame the entire time but moves. In the second case, the subject is the city itself and the traffic driving through it provides the motion.

Another great subject for movement is water. When I chose the river as my subject, I was hoping for a nice big barge to go by or perhaps a low-flying Great Blue Heron. I didn’t get that lucky. The only boats that went by were so small and far away that they’re very hard to see. However, the movement of the water still creates interesting motion. As a side note, the small tripod on an uneven rock wall makes it rather difficult to get a level photo.

Here is a time lapse taken under a bridge:

And another looking down the river:

Could you spot the boats moving through the video? These were both shot with a 5 second delay between photos.

Another great subject for time lapse is any astronomical body. For the iPhone, the sunset is a safe bet. A couple of problems happened during my sunset time lapse. First, I used a 10-second delay between photos. Because of the lack of cloud motion, that was too fast. Second, the sun popped through the cloud coverage in a couple of frames, causing sudden overexposure. Finally, failing to take my own advice on making sure I had a fully charged phone before heading out to shoot, I ran out of juice before the sun had gone down. See Lesson 28 for tips on conserving battery life when you’re out to get a time-lapse–it is battery intensive. This is what it looks like:

The final thing to think about is what frame rate you want to create the video at. The frame rate is how many of the photos will be displayed per second. 30 frames per second is the rate that most movies are played at, so if you want a really smooth looking video, that would be the rate to choose. Since I took a smaller number of photos, I slowed things down a bit and exported my videos at 24 frames per second. Think of it this way: if you want 1 minute of video at 30 frames per second, you need 60*30=1800 photos.

Your Assignment: Open Fast Camera (and stop the photos if you have it set to start taking photos at launch) and follow the instructions below to set the time between photos. The faster the movement, the less time you need between photos to create a sense of movement. I used a 5 second delay for the river and a 10 second delay for the sunset. I would suggest using a 1 minute delay for the sunset instead, but it depends on whether the clouds are moving rapidly or not.

Now decide on your scene. If you don’t have one, you could try setting the phone up in your living room during a time when people (and/or pets) will be coming in and out. Time-lapse videos of families moving in and out of a room can be quite amusing.

Save and export your movie using the instructions in Lesson 32. Choose the frames per second based on whether you want it to look like a real video or whether you’d rather slow things down. You can also export the video and then go back and export it again at a different speed so you can decide what works best later.

What do you think? Is this a medium you could get into?

Lesson 34: When You’ve Got the Shakes

In Lesson 31, we talked about how adding the iPhone flash can help reduce the blur of slow-moving subjects.  What we didn’t talk about was another way blur can be introduced by movement–the movement of you holding your iPhone.

One way to reduce movement of your phone is to hold it very still.  For tips on how to hold it as steady as possible, see Lesson 6.  Sometimes, it’s hard to hold your phone still–especially if you’re shooting in low-light conditions when holding it still makes the biggest difference.  In those cases, using a tripod would be ideal, if a little silly looking.

In Lesson 25, we looked at using a telephoto attachment from Photojojo that includes a mini-tripod for your iPhone.  You don’t have to use the telephoto attachment to benefit from the tripod.  If you are taking landscape photos, especially in low-light, and you purchased the telephoto kit, try using the tripod without the telephoto lens to see how it improves your landscape photos.

There are other options if you don’t have a tripod for your iPhone.  For one, you can find a place to set the iPhone if you can balance it or prop it against something to eliminate your shake.  If you are a die-hard iPhone user, you may also find some of the various attachments for the iPhone that are helpful for keeping it stable.  For example, a car holder that doesn’t block the camera, a mount on your bike, or even the LifeProof life vest I showed in Lesson 19.  The large block size of the life vest makes the iPhone easier to grip securely.  It also makes it easier to stand on edge.  As a bonus–if your iPhone falls off its perch, there’s not much chance it will get damaged!

But let’s say you want to take a photo when there is no way to prop up your phone, or, the only place you could prop your phone would not result in getting the photo you want.  Another option is to use the “image stabilization” feature provided in many camera apps.  Unfortunately, not the default camera app from Apple, but, yes, it is one of my favorite features in the Camera Awesome app.

Unlike expensive gear that comes with image stabilization features that work mechanically, the Camera Awesome app uses the gyroscope in the iPhone to determine if the phone is moving.  If it is, it waits until a moment when you’re still before taking the photo.  This works great in that pushing the volume-up button or touching the shutter button on the screen creates most of the motion.  This setting allows the movement to settle before the picture is taken.

The downside is that the pause can cause you to miss the exact shot you wanted when your subject is fickle (like my dog) and decides to walk away while you’re waiting for the photo to take.  I highly recommend it when you’re taking photos of subjects that are either still or cooperative.

Here’s how to turn the image stabilization feature on in the Camera Awesome app (downloaded in Lesson 7):

Your Assignment:  Get out the Camera Awesome app and turn on the image stabilization feature.  Take some photos of a scene that isn’t moving.  Now, turn it off and take the same photos.  Do you notice a difference?  If so, you might want to make it a setting you use a lot.  If you happen to have very steady hands, you might prefer not to use it because of the delay it can introduce.

Lesson 22: People and Landmarks

Today, we’re going to switch gears and revisit an earlier lesson on filling the frame.  This lesson applies to any camera.

In lesson 3, we talked about filling the frame with your subject.  But what do you do when you have two subjects and one is very large while the other is very small?  This is a classic dilemma that most people face when on vacation.  You’re at the grand canyon and you want a beautiful sweeping view of the canyon but you also want to have the people with you in the photo.  What to do?

How many times have you seen photos from someone’s vacation (and perhaps your own) that look like this:

This is the Walnut Street Bridge in Chattanooga, Tennessee.  It’s an extremely popular subject for photographers and tourists alike.  To get this example, I accosted a young couple visiting and stood where the boyfriend was standing to take about the same photo he took.

Since I was interrupting perfect strangers in the middle of their photo session, instead of asking the girlfriend to move to where I wanted her, I moved to where I could at least give you an idea of how to place people in the frame.  Sorry about that–I’ll be a little pushier next time.  🙂

By moving so the girl was close to the camera and off to the side of the landmark, I was able to get a much better photo of her and keep the bridge in the photo as well.  Ideally, I would have framed the bridge better and then placed her in the frame so I had a better photo all the way around, but, again, I was trying to minimize my disruption of their evening.

As a side note, this photo was taken at 6:37PM on the West side of the bridge, providing good lighting for both the bridge and the person (see lesson 17).

Here’s what I got by moving up close to the girlfriend:

Ideally, I would have used the framing of the bridge in the first photo and placed the girlfriend here:

Compare the two photos side-by-side.  Can you see how placing the person close to the camera can make the photo far more effective for both subjects?

Your Assignment:  If you aren’t going to be at an interesting landmark with a group of people for a while, you can still practice.  Try using a big building as the landmark.  Place a friend, family member, or even a large stuffed animal in front of the larger subject and try standing back and shooting.  Now place the person or thing you’re using as a model close to where you’re standing and to one side of the big subject.  What positioning makes for the best of both subjects?  Notice the lighting that you get while you’re at it.  Can you also adjust the position/angle to get the best lighting?

Lesson 8: Separating Focus from Exposure

In yesterday’s lesson, we downloaded the app Camera Awesome.  If you missed yesterday’s lesson, you might want to download it now.  It’s a free app available from the Apple App Store.

One of the pains of using the default camera app that comes with the iPhone is that you can only pick one spot on your screen to set both the exposure and the focus.  The Camera Awesome app is one of several apps that allows you to pick one spot to set the focus and another spot to set the exposure.

Why is this awesome?  There are many times when the thing you want to be in focus is  darker or lighter than the overall scene and you have to choose between what you want in focus and how you want the image exposed (see lesson 5).  With Camera Awesome, you can focus in one spot and adjust the exposure in another spot so you get a better exposure and still get the focusing point you want.

For example, when shooting landscape scenes like the one in the example below (click to enlarge), with the default camera app, if I choose the rock for the focus point, the sky turns white.  If I choose the sky to get a better exposure, the rock is not longer sharp.  I don’t want a blurry foreground and I don’t want a white sky.

Separate Focus and Exposure.001

Using the Camera Awesome app, I can touch the screen with one finger and, while keeping that finger still, tap the screen with a second finger to get a green square for focusing and a blue circle for setting exposure. I can move each around with a fingertip to find the best focus point and best exposure point separately.

Separate Focus and Exposure.002

By separating the two functions, I have more choices about how the photo will look.

Separate Focus and Exposure.003

One note I didn’t mention in yesterday’s lesson:  With the Camera Awesome app, the photo is stored inside the app until you tell it to save it to your Camera Roll.  It’s best to choose the images you want to keep and save them to your Camera Roll for future use as soon as you’re done shooting.  That way you won’t end up with hundreds of photos in the app.

Here’s one last example of when separating focus and exposure are important.  I focused on my dog is in the foreground, but found an exposure that keeps details visible in both the dark spot on his face and the sky.

IMG_1956

Your Assignment:  Choose a scene that has some brighter and darker areas where you want to focus on something in the foreground.  Using the default camera app that comes with the iPhone, choose the focus point and take a picture.

Next, open up the Camera Awesome app and practice touching with one finger and tapping with a second finger to get the separated exposure and focus settings to appear.

Focus on the same point you focused on using the default app.  Now slide the exposure around until you get the best exposure for your image.  Take a picture.  Save it to your Camera Roll.  Compare the two images.  Which one do you like better?