Since we’ve been on the topic of HDR for a few lessons now, one thing I wanted to mention was that even when you used HDR photography, you can still gain more control over the end result of your image by doing post-processing.
Now, as you know by now, I love Pro HDR for iPhone HDR photos. Pro HDR has several adjustments you can make before you save the image. You can see details about those adjustments in Lesson xx. However, that’s not quite the same as post-processing. After you’ve saved the image, you still may want to apply some adjustments to make the photo look the way you want.
For example, let’s say I thought my sunrise HDR photo from the iPhone 5S from the Sunrise showdown was too dark. I could use adjustments in Snapseed to brighten up the image. That is, I could if my iPhone screen weren’t currently broken and I could see to edit on my iPhone! 🙂 Sorry, I had to cheat one last time and edit in Aperture. But, my replacement phone is on its way!
So, imagine this was edited in Snapseed:
5S Pro HDR after some adjusting to brighten it
I tend to be fond of darker images with strong contrasts, so I’m not particularly enamored with this edit. However, I often find that when I see my photos later, they look too dark to me, so maybe tomorrow I’ll like the brighter one better.
Your Assignment: Take a photo that your pretty happy with. Do just a few adjustments on it like brightness and contrast. For details on how to use Snapseed, check out Lesson 41, 45, and 46. Are there certain adjustments that seem to really help your image?
I mentioned in Lesson 40 that post-processing is the stuff you do to your photo after you take it to make it look the way you want. Something we don’t always remember is that back when photos were taken using film, part of how a photo turned out was determined by the mysterious person who developed that film and printed our photos. Unless you had a dark room, you didn’t have any control over how those final steps were performed, yet there is a considerable amount that can be altered in the developing and printing process.
Since that’s about all I know about developing film, let’s talk about how this translates into “developing” digital images. Back in Lesson 40, I also mentioned that the iPhone (or whatever camera you’re using) makes a lot of decisions for you about how much to saturate the colors, how bright to make the image, how to balance the whites, etc. For you to have control over what that final photo looks like, you need to change those decisions to your liking.
What you should not do is spend a lot of time trying to fix things that can’t be fixed. So here are some of the things not to waste your time on:
Focus. If the focus is very slightly soft, you might be able to sharpen it slightly. In most cases, it will still make your eyes cross and the photo will look “crunchy” (to borrow a term from photographer John Greengo).
Bright spots that are completely and totally white. There’s no getting that data back in JPEG photos (which is what you get with smart phones). If the photo is still tolerable with those blown-out areas, keep it. If not, toss it.
Dark spots that are completely and totally black. Just like #2, there’s no getting that data back. It’s called “clipping” when the camera can’t record the details in dark areas and just records solid black. Once again, decide if you can live with it or toss the photo.
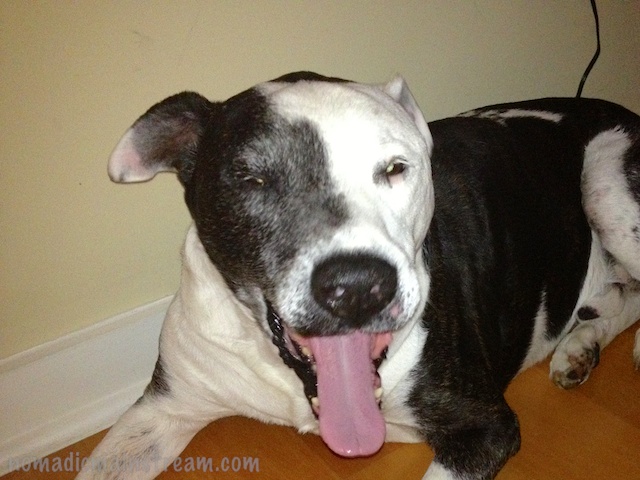
Proving I am a hypocrite, I was able to find an example photo that contains all three of these problems (yet, I did post-processing on it and tried to save it anyway):
Blown-out white around the left eye, clipped black in the black on his side, and definitely not sharp!
What can I say–I really love my dog, it’s hard to toss photos of him no matter how bad they are.
We’ve been using Snapseed for editing so far in this series of lessons, but there are other options. In fact, there are over 2000 photo editing apps in the Apple App Store. Plus, many of the camera apps (including the iOS 7 Apple Camera app) also have some level of editing capability. Before you get too crazy looking at different photo editing capabilities, just take it one step at a time.
Your Assignment:
When you take a photo that you thought was going to be really cool, but it’s not quite what you wanted, try the adjustments available in the camera app you’re using to see if you can get what you wanted.
If you can’t, that might be a good time to invest some time using Snapseed. It’s pretty intuitive once you get through one or two edits and there are plenty of lessons to help you along in this blog (do a search on Snapseed from the iPhonography Lessons page).
As you start getting comfortable with a few adjustments, you’ll find yourself wanting to use them more and more often. You’ll start recognizing when a photo needs a contrast boost, for example. Post-processing will become a quick and easy workflow you can apply to the photos you want to keep.
When you have something your really can’t get what you want out of, it might be time to investigate what other photo editing tools are available and what you might be able to do with them. I’ll be doing some lessons on PhotoForge in the near future.
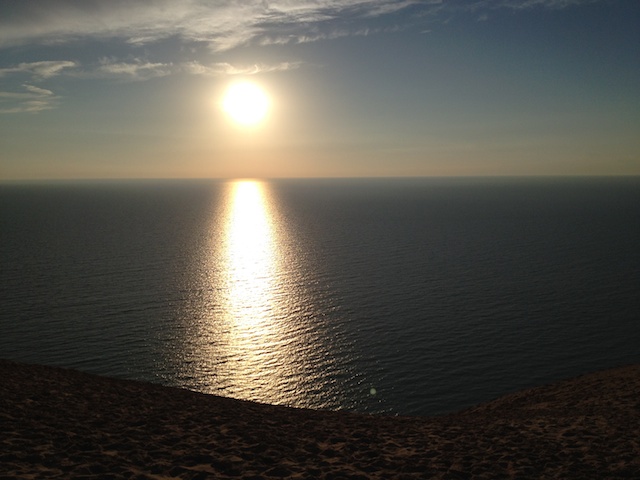
OK, this is the 3rd and final makeover post of Gina’s vacation photos (at least for now). This time, we’re going to take a look at my favorite photo of the 3 Gina sent me. I love this photo. I love dramatic contrasts and I never tire of sunsets. This one has lots of appeal with the way the light is reflected on the lake. The exposure is great and the focus is perfect.
Here is the original photo Gina sent me:
Original Photo from Gina
She felt it was too dark. Specifically, the foreground. Without understanding what Gina was shooting for (sorry for another pun), I looked at it and said, “Oh, this would be great shot symmetrically.” To simulate what that would look like, I used Snapseed to crop the photo a lot (and to turn up the contrast a touch and did a slight straighten) to get this:
Cropped to simulate a vertical, symmetrical version
Gina liked it, but she said she had liked the curved beach in the foreground of the scene–that was the part that was too dark. Realizing I had missed the beach entirely, I went back and tried again. This time, I used the Brightness Selective Adjustment in Snapseed to brighten up the beach along with a very slight contrast and straighten adjustment. This is what I got:
Beach brightened just enough to show itself in the foreground
Gina liked both versions. Her comment was that it was cool to see the same thing two different ways. I agree. I often shoot a subject vertically, horizontally, using the rule of thirds, using symmetry, standing up, laying down, and anyway else I can think of. Sometimes I get nothing. Sometimes I get several shots I love. But what I hate is when I get home and look at my photos and think, “Oh, if only I would have shot _____ way.”
One final comment: it’s pretty tough to get an exposure that works for the beach, the water, and the sky. The only option is the Pro HDR app, which isn’t necessarily going to work that well for a sunset (depends on how fast things are moving and how well you can hold still). Plus, Pro HDR probably wouldn’t have created the dramatic contrast between the sunlight and dark water. Using apps like Snapseed to adjust after you shoot lets you decide how you want different parts of the photo to look–something the camera just doesn’t always predict well. They’re still working on the mind reading camera.
Your Assignment: Try this checklist the next time you’re taking photos of something (of course, not all of these work for all subjects):
Today, I randomly chose a photo and edited it in Snapseed to demonstrate 3 things:
Using some of the tools in Snapseed we haven’t used in earlier lessons
You can edit yourself in circles
Editing doesn’t necessarily make a photo better.
Here is the original photo next to my resulting photo after editing:
Original Photo
Final Edit
In the process, I used the Grunge, Vintage, Details, Retrolux, Drama, and Tune Image tools. There are several reasons why it probably isn’t a good idea to use this many editing tools on one photo.
First, while there are several claims on the web that Snapseed is “non-destructive,” meaning the resolution of your photo is not compromised by the editing process, I am not convinced. It’s very difficult to tell what is photo degradation vs editing effects both visually and from a file size perspective. I tried saving each version of the photo between steps and found that the file size got progressively smaller until I added a texture and then the file size increased. So, I am going with the assumption that data loss from the original image occurs each time you apply an editing tool, although some editing tools apply extra data.
Second, Applying edits in different orders creates different results. Working from left to right applying the same edits created a very different photo. Here are the two different edits side-by-side:
Final Edit
Edited using tools in left-to-right order
Some edits seem to “undo” previous edits by applying, for example, a different texture to the photo. In the end, there are a nearly infinite ways in which you can change the photo. But, the question is: should you change the photo?
In this case, the main issue with the original photo is that the focus is behind some of the unopened petals in the center. Neither edit fixed this problem. If I wanted to improve the photo, I would try sharpening it to see if I could get the center petals in focus. Interestingly, one of my interim edits did result in a sharper image than the original:
Edited using tools in left-to-right order
Interim edit in left-to-right order
I would still prefer to have had the original photo with the focus I wanted. Focus is one of the things it’s hard to fix after the fact.
Your Assignment: Pick a photo that maybe isn’t so interesting. Open it in Snapseed and try the various tools. For the steps I took editing the photos, refer to the instructions below. Try the different tools in Snapseed in different orders to see which order seems to work best for you. Here are the instructions for the first edit:
In Lesson 40, we took a badly lit photo of my dog sitting on my husband and did some basic editing to shift the attention from the bright background to my intended subjects using Snapseed. These are the original and post-processed versions side-by-side:
Original
Lightly edited
I mentioned in Lesson 40 that post-processing is usually considered the digital equivalent of developing film. However, you can also do an extreme amount of editing and end up with something that doesn’t look like a photo at all. This is usually called digital manipulation or graphic art, but when editing crosses from post-processing to “manipulation” is largely subjective and hotly debated.
Since it really doesn’t matter what you call it, we’re not going to argue about it. I’m just going to show you an example of more extreme editing that produces a completely different look from what I actually saw when I took the photo.
I used Snapseed to do a similar editing process as in Lesson 40, but I took my changes to the extreme. I also used heavy sharpening to create an effect that makes my husband and dog look more like a drawing than a photo.
Here are the steps I used in this edit. Note that there is a clever tip included on copying and pasting selective adjustments that comes in very handy.
Let’s look at the original photo, the previsously post-processed version, and today’s extreme edit side-by-side:
Original
Lightly edited
Manipulated version
Personally, I am a bit of a traditionalist. I like photos to look like photos or to not at all look like photos. More abstract subjects work for me in extreme editing modes, but I am not fond of this look for human or animal subjects. Maybe someday it will wear me down and I’ll start to like it–in the meantime, I always think of images of Elvis on black velvet when I do these types of edits. 🙂
Your Assignment: Start with a photo that has something a bit off in it like a too-bright background and poorly lit subject. See if you can use this series of edits (and/or throw in some of your own) to create something that looks really cool. Or, perhaps, makes you, too, think of Elvis on black velvet. Do you like this look? It’s OK if you do. 🙂 That’s the important point–discovering what is possible and what appeals to you.
Way back in Lesson 2, I mentioned there were several things that could be improved about the photo example that I would get to later. I bet you thought I forgot?
Well, OK, I did, but then I remembered again. So, here’s the photo from Lesson 2:
What things can you see about this photo that could be better?
Here are the things I don’t like about it:
The bright areas in the background are distracting.
I think my dog would look better if I’d shot lower to the ground.
My dog’s black spots are under exposed.
The lighting is too gray.
So, today, we’re going to do two things. First, we’re going to try to edit the original photo with Snapseed to see if we can make it look better. Snapseed will help with items 1, 3, and 4, but it cannot help with the angle of the photo.
Second, I’m going to take a similar photo of my dog and see if I can’t improve upon the original photo by using a different setting that has better light, and using a lower angle. I am beginning to realize why taking my dog to obedience classes might be useful.
So let’s edit the photo in Snapseed. Here are the steps I went through to improve the original photo:
And here is the edited version side-by-side with the original:
Original
Edited
The other approach is to try to capture the same photograph in a different setting that eliminates the bright areas in the background and allows me to take the photo at a lower angle to the ground. I was planning to have some examples of a similar pose out on the grass in some lovely evening light. Unfortunately, my dog was unwilling to cooperate. Here is a selection of photos I got of my dog while trying to get him to lie in the same position as in the original photo:
But even that has a lesson in it: if someone or something you love is doing something you want to remember, take the photo. Sometimes you can’t get rid of distracting background. Sometimes you can’t get the perfect angle before the subject jumps up and runs away. But having imperfection is better than having nothing. And, as we will discover over and over again on our photographic journeys, no two moments are ever exactly the same.
You’re Assignment: Choose a photo from one of our early assignments you think you might be able to improve upon using Snapseed. Get a little crazy with it. See if you can create something that you really like. Now, try to recreate the same situation with whatever bugged you about the photo fixed. Is that even in the realm of possibility?
We talked about focus long ago in Lesson 4. One of the things I mentioned back then was that because the iPhone has a very small sensor, it tends to keep a lot of stuff in your photo in focus, even when things are far apart from the front to the back of the scene.
Sometimes, like when you’re creating a portrait of a person, we don’t want everything to be in focus. Sometimes, we just want the one main subject to be in focus.
Unfortunately, the one setting that has the most impact on whether everything will be in focus or not cannot be changed when using an iPhone. Instead, we have to find ways to trick the iPhone into giving us the kind of focus we want.
We actually did this in some previous lessons. In Lesson 30, we used Hipstamatic with the Tinto 1882 lens to blur everything except the face in the photo. In Lesson 37, we used a macro lens attachment to get very close to small subjects and only a tiny little bit of the subject was in focus.
However, what to do if you don’t want to use a Hipstamatic effect or shoot macro?
There are only a few things that will help create a similar effect when you take the picture, but there are also editing tricks that will help create the blur you want.
When you’re shooting, the closer you are to your subject and the farther your subject is from the background, the more blurred the background will look. To really emphasize your subject, having a dark background with no bright colors and relatively bright lighting on your subject will also help separate them from the background. This can get pretty fancy pretty quickly, so let’s take one simple example.
I want to take a photo of my husband outside. I place him so his back is to the sun. This creates a rim of light in his hair that will help separate him from the background. I also place him so that at the angle I’m shooting at will show mostly dark trees in the background. Now, I get pretty close to my husband to eliminate other background stuff from sneaking into the frame. However, I don’t want to get so close that I make his nose look bigger. This is a good time to use the 2x telephoto attachment we talked about in Lesson 39. It will help me fill the frame with my husband without distorting his face. It will also make the distant background more blurred. Compare the two photos side-by-side–can you see how his nose starts to distort and the shape of his face changes when I get too close to him with the default lens?
Camera Awesome Flash on – notice nose
2x telephoto and Camera Awesome – face more natural shape, but some glare
Now, the next challenge is that his face is in shadow. I can do 2 things about that. First, I can take off the telephoto attachment and use the iPhone built-in flash like in this photo:
Camera Awesome Flash on – notice nose
By the way, in case you’re wondering what happens if you leave the 2X Telephoto attachment on with the flash, you get scary looking bright circles of light that may indicate paranormal activity:
A second option is to find a way to reflect some light into his face either using a white poster board or an actual photographer’s reflector. Since my husband was already squinting, I opted for trying to fix it using Snapseed, similar to what we did in yesterday’s lesson. Here are instructions for the edits I made:
Original Photo
After Snapseed Edits
Select the photo in Snapseed
Crop the Photo
Use automatic adjustments
Blur the background and brighten the subject
Save the final photo
Your Assignment: Try using the 2X Telephoto attachment with your iPhone to see if you can create better separation between your subject and the background. Compare the effect to getting closer to the subject without the 2X Telephoto. Also try standing back a bit and using the flash, then cropping the photo to get a more zoomed in look. Which method is the most flattering to your subject? Have you noticed changes in their face shape based on how close you were with the iPhone? Are any of those changes flattering?