Lesson 65: Sunset Makeover

OK, this is the 3rd and final makeover post of Gina’s vacation photos (at least for now).  This time, we’re going to take a look at my favorite photo of the 3 Gina sent me.   I love this photo.  I love dramatic contrasts and I never tire of sunsets.  This one has lots of appeal with the way the light is reflected on the lake.  The exposure is great and the focus is perfect.

Here is the original photo Gina sent me:

Original Photo from Gina

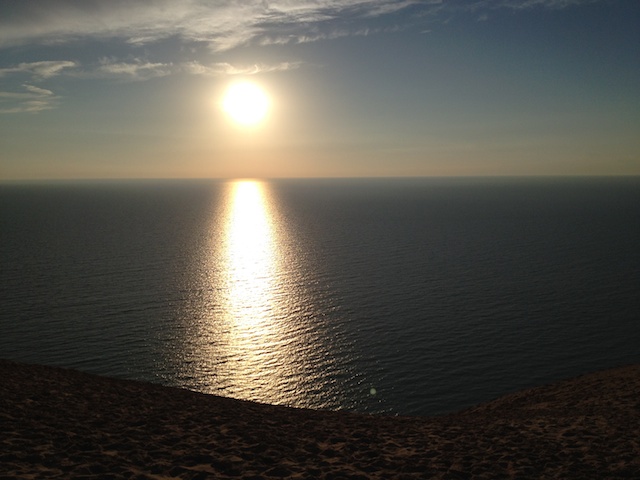
She felt it was too dark.  Specifically, the foreground.  Without understanding what Gina was shooting for (sorry for another pun), I looked at it and said, “Oh, this would be great shot symmetrically.”  To simulate what that would look like, I used Snapseed to crop the photo a lot (and to turn up the contrast a touch and did a slight straighten) to get this:

Cropped to simulate a vertical, symmetrical version

Gina liked it, but she said she had liked the curved beach in the foreground of the scene–that was the part that was too dark.  Realizing I had missed the beach entirely, I went back and tried again.  This time, I used the Brightness Selective Adjustment in Snapseed to brighten up the beach along with a very slight contrast and straighten adjustment.  This is what I got:

Beach brightened just enough to show itself in the foreground

Gina liked both versions.  Her comment was that it was cool to see the same thing two different ways.  I agree.  I often shoot a subject vertically, horizontally, using the rule of thirds, using symmetry, standing up, laying down, and anyway else I can think of.  Sometimes I get nothing.  Sometimes I get several shots I love.  But what I hate is when I get home and look at my photos and think, “Oh, if only I would have shot  _____ way.”

One final comment:  it’s pretty tough to get an exposure that works for the beach, the water, and the sky.  The only option is the Pro HDR app, which isn’t necessarily going to work that well for a sunset (depends on how fast things are moving and how well you can hold still).   Plus, Pro HDR probably wouldn’t have created the dramatic contrast between the sunlight and dark water.  Using apps like Snapseed to adjust after you shoot lets you decide how you want different parts of the photo to look–something the camera just doesn’t always predict well.  They’re still working on the mind reading camera.

Your Assignment:  Try this checklist the next time you’re taking photos of something (of course, not all of these work for all subjects):

Screen Shot 2013-10-01 at 8.29.10 PM

Lesson 63: Photo Makeover

As I’ve mentioned, my best friend Gina is the inspiration for this blog.  Today, she sent me a picture at just didn’t work for her.  I thought this would be a good opportunity to pull together several earlier lessons in the context of one photo.

Here’s the photo Gina sent me:

Original

She and her husband were recently on vacation with another couple and Gina wanted a shot of her friends standing in front of the lake they were staying at.  Unfortunately, it was extremely windy, making it difficult to hold the phone still.  Although the photo was shot at 7:58PM during the golden hour, the lake and sky were far brighter than the light on Gina’s friends.

The first thing I did was try using Snapseed to see if the photo was fixable.  Had I had my glasses on and realized the severity of the focus problem, I might not have tried–focus is something you really can’t change much in software.  However, ignoring the focus problem for a moment, let’s look at what can be achieved through editing:

To some degree, the lighting on the people can be helped.  I edited in Snapseed using the Selective Adjustment tool to brighten the people.  As a comparison point, I also edited the original in Aperture using several general adjustments rather than selective adjustments.  Both methods work to brighten the subjects.

So what would have prevented the focus problem?

  1. Selecting a face to set focus (see Lesson 4)
  2. A faster shutter speed, which can be partially accomplished by setting exposure separately from focus (see Lesson 8 on using Camera Awesome and Lesson 61 on picking a brighter part of the scene to get a faster shutter speed).

But how could Gina have gotten more light on her subjects’ faces?  Given that this was shot right after sunset, it might have been a good time to have her subjects facing the fading light.  They might have been lit in the last glow of the golden hour–or, they might have gotten some light bounced off the lake.  In either case, they would at least have been brighter.

The other choice, if having the lake in the background was important, would have been to apply two previous lessons:  Lesson 22 on placing people in front of landscape scenes and Lesson 31 on using the flash to fill.  The combination of these two might have allowed the flash to brighten up the people.

Since none of these things may have been possible (I wasn’t there and every situation is different), a couple other thoughts on how to prevent the motion blur:

  1. Turn on image stabilization (see Lesson 34)
  2. Prop yourself against something stable or set the phone on something stable (see Lesson 34)

And, finally, for exposures that are so disparate, this might be a good time to use Pro HDR, see Lesson 9 and Lesson 18.  It’s kind of a toss up–with a high wind, the movement might have been too much.  But, if Gina’s friends were willing to hold still for 30 seconds or so, Pro HDR might have solved the exposure problem and still achieved focus (although the blowing hair would have been a problem).

Your Assignment:  Pull up a “photo failure.”  Can you fix it using Snapseed?  If not, what is causing it to “fail”?  Do you know what to do differently the next time around?  Now, test yourself.  Pick a subject with similar challenges to your “photo failure.”  Shoot the subject every way you can think of.  Use every app you know how to use.  Shoot vertically, shoot horizontally.  Use the rule of thirds, the rule of symmetry, the rule of telling a story.  Try different angles and think about position for light.  Try with and without flash.  Try to get at least 20 different photos of that subject.  Did you get anything that surprised you in a good way?