Original image taken with Apple Camera App in iPhone 5S
Revised image using Con Tours effect in Paper Camera
Yesterday we used the Paper Camera app to create a sketch by taking a picture. Today we’re going to use Paper Camera to turn a “regular” photo into a line drawing.
Paper Camera not only acts as a live-view of effects, it also allows you to apply those effects to existing photos. This has the advantage that if you decide you don’t like the effect later, you still have the normal photo to work with.
However, you can’t create a “normal” photo using Paper Camera. You can use Camera Awesome, the Apple Camera App, or your favorite camera app to take the photo and then open it in Paper Camera to apply the effects.
This means you can use any photo you’ve got on your iPhone to play with the effects.
Start by opening the Paper Camera app. Next, follow these steps to open an existing photo from your Camera Roll and apply effects:
Your Assignment: Pick a photo that you want to play with. Follow the steps above to apply the effect of your choice. Did you turn someone you love into a comic superhero? Or maybe create a simple line drawing? Did you have fun?
Today, I want to introduce another app. This one is called Paper Camera. It’s $1.99 and it’s available for both iPhone and Android phones.
I found this app while looking for an app that has the same levels adjustment PhotoForge has (see Lesson 76)–I still haven’t found one yet, so let me know if you have one! I downloaded it out of curiosity, played with it a few minutes and then forgot about it.
Then, I was working on creating a graphic for a small business. I’m not a graphics artist, so I was starting with a photo and doing all kinds of crazy things in Photoshop Elements trying to turn the photo into something that would work. After spending hours shooting and editing, I realized I didn’t have the right composition to make the image work.
I packed up my tripod, camera, light stand, light modifiers, flash, and various accessories and headed back to the client’s location to shoot again. I got there (feeling like a pack mule) and suddenly remembered the Paper Camera app. I pulled it out, and with a single tap on the screen, created a graphic that will work. I immediately got depressed.
But, you should rejoice! This little app will allow you to create really funky stuff when you’re feeling like having a little fun. What’s also exciting is that it will create the same effects in video. And, you can see the effects in your screen as you’re taking the photo/video. It’s pretty wild.
There are three things I don’t like about the app:
It doesn’t save an unedited version of the photo–you only get the image with effects applied.
It’s upside down, doesn’t rotate, and the volume-up button doesn’t work for shutter release. I guess this could be 3 things, but it’s the combination of them that I find annoying.
While the icons in the app are cute, if you’re someone who needs reading glasses but tries to get by without them, it’s hard to tell what they are.
That said, it’s still a lot of fun to see the world in line drawings or cartoon live on your phone.
Your Assignment: If you’re interested in this app, download it and try out the various effects. Try flipping over to video with the “Con Tours” effect on. It’s fun. Here are screen shots of the different effects. I’ll do some more details on what you can do with this app in later lessons.
Since we’ve been on the topic of HDR for a few lessons now, one thing I wanted to mention was that even when you used HDR photography, you can still gain more control over the end result of your image by doing post-processing.
Now, as you know by now, I love Pro HDR for iPhone HDR photos. Pro HDR has several adjustments you can make before you save the image. You can see details about those adjustments in Lesson xx. However, that’s not quite the same as post-processing. After you’ve saved the image, you still may want to apply some adjustments to make the photo look the way you want.
For example, let’s say I thought my sunrise HDR photo from the iPhone 5S from the Sunrise showdown was too dark. I could use adjustments in Snapseed to brighten up the image. That is, I could if my iPhone screen weren’t currently broken and I could see to edit on my iPhone! 🙂 Sorry, I had to cheat one last time and edit in Aperture. But, my replacement phone is on its way!
So, imagine this was edited in Snapseed:
5S Pro HDR after some adjusting to brighten it
I tend to be fond of darker images with strong contrasts, so I’m not particularly enamored with this edit. However, I often find that when I see my photos later, they look too dark to me, so maybe tomorrow I’ll like the brighter one better.
Your Assignment: Take a photo that your pretty happy with. Do just a few adjustments on it like brightness and contrast. For details on how to use Snapseed, check out Lesson 41, 45, and 46. Are there certain adjustments that seem to really help your image?
HDR photography has continued to grow in popularity–more and more cameras have built-in HDR processing. However, High Dynamic Range photography comes in a wide array of styles. The HDR styles that result in images that no longer resemble photographs failed to catch on in the photographic circles I run in. At the same time, there seems to be a growing appreciation for what can be accomplished subtly with HDR technology.
In case you are just jumping into this conversation, Lesson 9 was when we first introduced HDR and there have been several lessons that talk about it since, including yesterday’s lesson.
As far as achieving subtlety in HDR photos, the iPhone 4S and 5S excel. While it’s possible I just need new glasses, it’s a little too subtle for me. The Pro HDR app results in more oomph than either of the built-in apps, although sometimes it’s a little more oomph than I want.
Revisiting the examples we used in the previous post, let’s take a look at what Pro HDR was able to achieve in both the 4S and 5S versions:
4S Pro HDR
5S Pro HDR
Now let’s look at the 4S Apple Camera App with HDR next to Pro HDR:
4S with HDR
4S Pro HDR
And, of course, the 5S Apple Camera App with HDR next to Pro HDR:
5S with HDR
5S Pro HDR
Your Assignment:
Take a close look at the above images. Which look do you prefer? If you’ve downloaded the Pro HDR app, try experimenting with your own photo to see if using the adjustments in the app allows you to get a range of looks that give you more flexibility than the Apple Camera app.
I mentioned in Lesson 40 that post-processing is the stuff you do to your photo after you take it to make it look the way you want. Something we don’t always remember is that back when photos were taken using film, part of how a photo turned out was determined by the mysterious person who developed that film and printed our photos. Unless you had a dark room, you didn’t have any control over how those final steps were performed, yet there is a considerable amount that can be altered in the developing and printing process.
Since that’s about all I know about developing film, let’s talk about how this translates into “developing” digital images. Back in Lesson 40, I also mentioned that the iPhone (or whatever camera you’re using) makes a lot of decisions for you about how much to saturate the colors, how bright to make the image, how to balance the whites, etc. For you to have control over what that final photo looks like, you need to change those decisions to your liking.
What you should not do is spend a lot of time trying to fix things that can’t be fixed. So here are some of the things not to waste your time on:
Focus. If the focus is very slightly soft, you might be able to sharpen it slightly. In most cases, it will still make your eyes cross and the photo will look “crunchy” (to borrow a term from photographer John Greengo).
Bright spots that are completely and totally white. There’s no getting that data back in JPEG photos (which is what you get with smart phones). If the photo is still tolerable with those blown-out areas, keep it. If not, toss it.
Dark spots that are completely and totally black. Just like #2, there’s no getting that data back. It’s called “clipping” when the camera can’t record the details in dark areas and just records solid black. Once again, decide if you can live with it or toss the photo.
Proving I am a hypocrite, I was able to find an example photo that contains all three of these problems (yet, I did post-processing on it and tried to save it anyway):
Blown-out white around the left eye, clipped black in the black on his side, and definitely not sharp!
What can I say–I really love my dog, it’s hard to toss photos of him no matter how bad they are.
We’ve been using Snapseed for editing so far in this series of lessons, but there are other options. In fact, there are over 2000 photo editing apps in the Apple App Store. Plus, many of the camera apps (including the iOS 7 Apple Camera app) also have some level of editing capability. Before you get too crazy looking at different photo editing capabilities, just take it one step at a time.
Your Assignment:
When you take a photo that you thought was going to be really cool, but it’s not quite what you wanted, try the adjustments available in the camera app you’re using to see if you can get what you wanted.
If you can’t, that might be a good time to invest some time using Snapseed. It’s pretty intuitive once you get through one or two edits and there are plenty of lessons to help you along in this blog (do a search on Snapseed from the iPhonography Lessons page).
As you start getting comfortable with a few adjustments, you’ll find yourself wanting to use them more and more often. You’ll start recognizing when a photo needs a contrast boost, for example. Post-processing will become a quick and easy workflow you can apply to the photos you want to keep.
When you have something your really can’t get what you want out of, it might be time to investigate what other photo editing tools are available and what you might be able to do with them. I’ll be doing some lessons on PhotoForge in the near future.
In yesterday’s post, I compared the iPhone 4S and 5S flash photos. Today, I want to switch gear’s and revisit the rule of light. This is a rule of photography that cannot be broken, although it can be bent, manipulated, and worked around. But no matter what you do, you have to have light and enough of it to get a photograph–after all, that’s what photography is: a recording of light.
In Lessons 16, 17, and 18 we talked about how time of day affects outdoor lighting, how you can choose the direction you shoot from based on the lighting, and how to use Pro HDR to help combat big differences in light and dark areas in your photos.
What we didn’t talk about is indoor lighting. The iPhone has traditionally struggled with low-light situations and most rooms create a low-light situation–especially at night.
And what happens when you shoot in a low-light situation? Well, if you might remember from Lesson 31, when you don’t have enough light you get more blur. In Lesson 31, I didn’t explain this because my best friend Gina, the inspiration for this blog, doesn’t want to know. However, today I have decided to risk upsetting Gina by explaining that it’s because the less light you have, the slower the shutter speed will be on the camera and the slower the shutter speed, the more blur you’ll get.
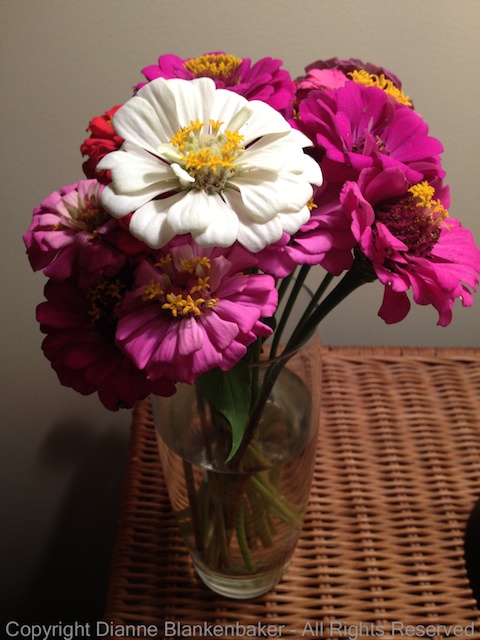
The best way to combat this indoors is to add light. Add light by turning on every light in the room. Move a lamp over to your subject. Move your subject over to a lamp. Position the lamp to light your subject as best as possible. Do all of these things if you can. For example, you may remember this example of flowers from Lesson 50:
Still flowers under bright light = sharp photo
By putting the bouquet of flowers directly under a lamp, I was able to get a sharp photo because both I and the flowers were holding still. The more light you have, the faster the shutter will open and shut. The faster the shutter opens and shuts, the less blur you’ll get.
In this photo, the shutter opened and shut at the exact same speed as in the photo above. However, because Twiggy, the dog in the foreground, was moving, her face blurred:
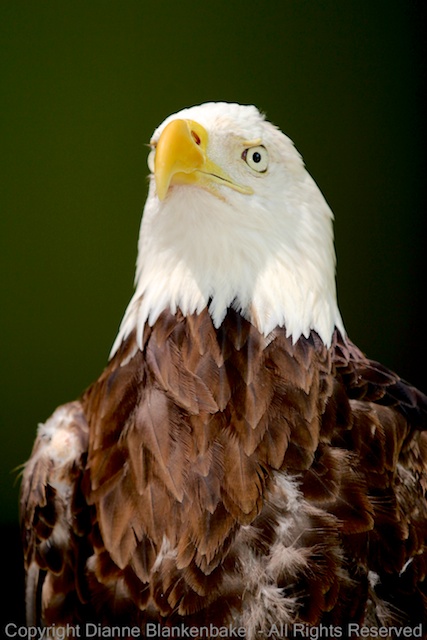
If you can’t add any more ambient light, you can always turn on the flash. But there’s another option we haven’t talked about in past blogs: set the exposure based on a lightest part of the photo. For example, in this photo of my dog, I chose to expose on the white side of his face:
This got me a slightly faster shutter speed than in similar photos where I set the exposure on a darker part of the subject. It’s probably not a big enough difference to stop my dog’s motion if he were to, say, jump up from the couch. But, it is enough of a difference to help with more subtle movement. Because white reflects more light than black, when you select a white area for exposure, you get a faster shutter speed. If you need a reminder on how to set the exposure separately from the focus, check out Lesson 8 on how to do this in the Camera Awesome app.
Your Assignment: Try taking some pictures indoors. Try taking a picture of your living room for example. In one photo, choose a dark object for the exposure. Take a second photo with the same composition but pick a light object for the exposure. Can you see the difference in the exposure of the two photos based on what you selected? Now, try including a subject with a tiny bit of slow motion like a relaxed dog or a person who will move slowly for you. Does choosing light vs dark areas for exposure make a difference in stopping the motion of the moving subject? How slowly do they have to move before it makes a difference?
My iPhone 5S arrived! This means 2 things at my house:
I’m geeking out,
My dog is scared.
In the first case, I am having a ball with the fingerprint unlock feature. I can’t tell you how excited I am about that feature! I feel like a safer driver already and I haven’t driven anywhere yet. I’ve had my husband and my dog try to unlock my phone with their prints and so far, I’m the only one it recognizes. 😉
I’m also geeking out on the new flash feature. This is what has led to case 2. My dog has been hiding out in a totally dark room, trying to avoid me. I managed to sneak up on him and grab a couple of shots with the 5S and with the 4S so we could compare how the flash looks. I used the default iPhone Camera app just in case the 3rd party apps are not optimized for the new flash yet. Here are the results:
This is my favorite. I caught Tisen with the 5S just as he realized I was sneaking up on him again.
The 4S makes Tisen look ghoulish from his black side
Tisen looks like the sweet but annoyed dog he is with the 5S
Tisen looks possessed from his white side with the 4S
I ran into a glitch (already) with the 5S flash, however. I set the flash to “on,” but out of 5 shots, the flash only fired 2 times. I’m not sure what’s going on there, but hoping that will sort itself out quickly–like by the time I finish downloading the first update to iOS7.
What I want to focus on in the meantime is how much of an improvement the 5S is over the 4S. Let’s talk about the circumstances I was shooting in:
Dark room with almost no ambient light
Black and White dog on a dark couch who wouldn’t hold still (except in my favorite of the four photos above)
Hand-holding and guessing at exactly where my dog was because the room was that dark.
These are pretty challenging circumstances. Let’s compare these two photos since my dog was moving around about equally and I got the white side of his face in both images:
Tisen looks like the sweet but annoyed dog he is with the 5S
Tisen looks possessed from his white side with the 4S
First, let’s talk about why the 5S photo is so much sharper. This could, in part, be due to the fact that I was closer with the 4S and, therefore, had less depth of field. However, under magnification, the 4S photo has no sharp areas at all, which implies it had a hard time finding focus.
Now, I can’t say for certain that I was holding both phones with identically steadiness nor that my dog was moving the same amount, but, the 5S introduces some really cool technology that takes 4 images and combines them to get the sharpest image possible. That’s pretty cool. Although, I would appreciate being able to turn it off.
Second, take a look at the quality of the light in each image. Again, virtually all of the light on my dog is from the tiny little LED flash on each iPhone. Both did a pretty good job of lighting my dog (I was only about 2-3 feet away), but notice how much warmer the light in the 5S shot looks?
Finally, also on the subject of the light, notice how my dog’s eye is glowing a lot more in the 4S version in spite of the fact that his eye is turned further from the camera than in the 5S version? This is a nice improvement. My poor dog has looked possessed in far too many iPhone photos.
I took a very close-up look at both photos (I told you I was geeking) and the difference is even more impressive under magnification. I can’t wait to get my dog into some better light so I can see what it looks like without the flash!
Your Assignment: Pay attention to how much you use flash and how often you’re getting shots with blur. Since these are two things that make the 5S attractive, it’s a good time to notice whether these features would make a difference to you or not.
You’ve probably figured out how to send someone a photo from your iPhone. Hopefully, you’ve figured out how to send several photos, too. But there is a less-known tip for attaching photos to an existing email.
I often found myself replying to an email, writing a fairly long response (for an iPhone keyboard), and then deciding to attach a photo, which usually led to a lot of cursing. I confess, it took me until I was on my iPhone 4S before I figured out how to do it–and boy was I excited when I did!
Here’s what you do. You’re in your email, writing away. Then, you decide to attach a bunch of photos. So, double-click the home button to get to your open apps or single click to return to your home screen if your Photos app isn’t already open. Next, choose the album where your photos are and click the “Select” option in the upper right corner:
iOS 7 – Switch from your email app to your Photos app
iOS 7 – Choose the album you want
iOS 7 – Click “Select” in the upper right corner
iOS 6 – Choose the album you want
iOS 6 – tap the box with the arrow in the lower left
iOS 6 – The screen changes to select mode
Tap on each photo you want to attach; a check mark appears when it’s selected:
iOS7 – Selected photos
iOS6 – Selected Photos and Copy Button at bottom of screen
Now, tap the little box with the arrow in the lower-left corner. A bunch of choices appear. Normally, you would select “Mail,” but if you do that, it will create a brand new email instead of adding the photos to the email you just wrote. Instead, pick the “copy” button
iOS7 Options when you tap the “share” icon
iOS6 – Selected Photos and Copy Button at bottom of screen
Double-click the home button to go back to the email you were writing. Place your finger on the email until you get a pop-up that includes the “Paste” option and touch “Paste.” The iPhone pastes all the photos you selected into the email you were writing.
iOS7 – touch your email screen until the paste option appears
iOS 6 – Touch your email screen until the paste option appears
The photos you selected will be attached to the email you were writing:
iOS7 – Photos are attached to the email you selected
iOS 6 – Photos are attached to the email you were writing
Finally, when you send the email, you’ll be prompted to pick what size photos you want to send. You can choose what size makes sense based on who you’re sending to, why you’re sending it, and whether space and/or bandwidth is a consideration or not:
iOS7-Choose the size most appropriate for the purpose of your email/photos
iOS6-Choose the size most appropriate for the purpose of your email/photos
Your Assignment: Write an email to yourself, but before you send it, attach several photos to it. Send it to make sure you get the photos. Will this come in handy?
In Lesson 53, I talked about what “filling the frame” means when you’e shooting a landscape. In Lesson 3, I talked about filling the frame when you’re shooting a person (or dog). In Lesson 3 (and a few other times), I’ve mentioned not to use the zoom function on the iPhone but to use your feet instead.
There are two times when using your feet might not be a good idea. First, sometimes getting physically closer to your subject is not possible without peril (like Capa, who, as I mentioned in Lesson 53, was killed stepping on a land mine). There can be physical obstacles or social ones to getting close to your subject sometimes. Second, as I mentioned in Lesson 41, getting too close can cause unattractive distortion in the your subject’s face.
So, if you’re not supposed to use the digital zoom feature on the iPhone (the only “zoom” capability the iPhone offers) and you can’t get physically closer to your subject, what are you supposed to do? Well, the only other option is cropping your photo. I showed you how to crop a photo using Snapseed in Lesson 41, but I thought I would show you today how cropping compares to using digital zoom.
Compare the following 3 photos:
iPhone 4S with no zoom, uncropped
iPhone 4S Digitally zoomed photo
iPhone 4S Cropped version (from the first photo)
The first one is taken with no zoom and I didn’t crop it. The second one is zoomed in all the way using the digital zoom capability. The third one is actually the first photo cropped to approximately the same “zoom” amount as the second photo.
Notice that the digitally zoomed photo is blurry and very grainy compared to the cropped photo. In theory, this should not be the case. In theory, taking a photo and cropping it after you take it should result in the exact same quality photo as digitally zooming while you’re taking it.
Since my dog doesn’t usually hold perfectly still, it’s possible the increased blur is due to him moving rather than the difference in zoom vs crop. To test that, I did the same exercise using a wooden bear carving since, so far, it has never turned its head in the middle of a photo:
The cropped version of the bear
Bear shot using digital zoom
Interestingly, I got the exact opposite results. The digital zoom yielded a slightly sharper image than cropping a non-zoomed photo.
This is not exactly a scientific process, but my experience in the field is that I have consistently gotten better results by taking the photo without zooming and cropping to the degree the photo can tolerate before it gets too grainy and blurred over trying to zoom in while I’m shooting. the main advantage to not digitally zooming while shooting is that you can decide later how much cropping your photo can stand without creating graininess and reducing sharpness. If you shoot the photo already zoomed in, you cannot go back–the only photo that got recorded has the noise and blur recorded, too.
As a side note, in case you’re curious, I also got out an old 10 megapixel DSLR (to make it somewhat more comparable to the 8 megapixel iPhone–although it’s still apples and oranges) to demonstrate what optical zoom looks like. Optical zoom is always better than cropping (assuming all other variables remain the same). You get closer to the subject using a lens rather than degrading the quality of the image by spreading out the remaining megapixels when you crop (or digitally zoom). Here’s a comparison for you:
DSLR cropped
DSLR using the optical zoom of a lens
Your Assignment: Try the digital zoom function. Do a similar exercise to the one I did–take the picture both zoomed in digitally and without zooming and cropping later. Are you able to get better photos with the digital zoom or by not zooming and then cropping? How about with a subject that doesn’t necessarily hold still all the time? Do you get the same results?
Here’s a simple tip that we haven’t talked much about: when you find yourself struggling to get a photo you like, try shooting vertically. I was once told by a photography instructor that roughly 85% of all photos taken around the world are taken horizontally. By this, I mean the widest side goes left to right and the narrower side goes up and down, like this:
Shot horizontally (also called Landscape, even when the subject is not a landscape)
I can’t verify the statistic (I don’t even know how anyone would know that), but it is definitely true that the majority of the time, photos you see posted were shot in the horizontal (or landscape) camera position. It’s pretty fascinating to take the same scene and look at it through a vertical frame. Let’s compare these two photos:
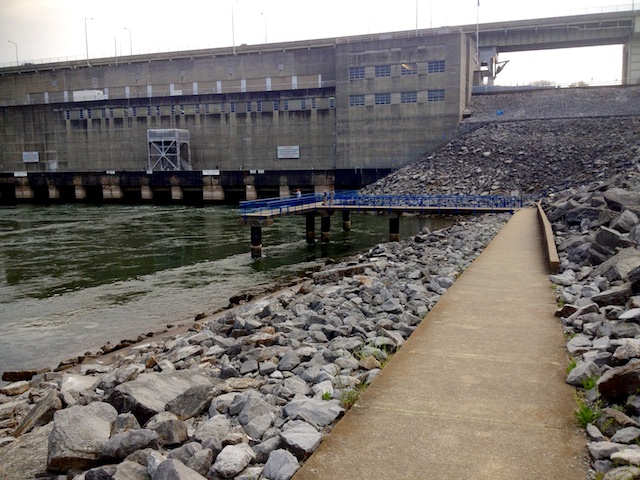
Horizontal view taken with iPhone 4S and Pro HDR app
Vertical view also taken with iPhone 4S and Pro HDR app, 2 minutes later
These were both shot using the iPhone 4S with the Pro HDR app. Notice how different the two photos look. The horizontal framing cuts out the rocks in the foreground and puts the emphasis on the sky and the reflection of the sky in the water, putting the bridge mostly into silhouette. By going vertical (and shooting from a slightly different position), I was able to include the rocks in the foreground and expose for them, which also allows the details of the bridge to show.
Each photo has its own merits and each has its own deficits. Which one you like better is a matter of taste. But the point is that, in spite of these being of the same subject about 2 minutes apart, they look completely different. That’s the beauty of changing the shape of the lens you look through–it gives you a whole new way of seeing.
In addition to giving you an option on how to look at the world, sometimes subjects just work better vertically. For example, most portraits of one person work better shot vertically if you just want the person in the frame. Dogs also often look better vertically when you want a photo of just their face. (Check out Lesson 3 for an example of how shooting vertically let’s you get tight on a canine subject.) And, of course, shooting tall, narrow subjects vertically allow you to eliminate empty background space.
Your Assignment: For the next few days, every time you pull out your iPhone to take a picture, take one vertically, too. Compare the horizontal and vertical framing to get a sense for what works well vertically. Many subjects work equally well horizontally and vertically, but give you completely different looks. Did you get anything you really like?


")
")