
A few tips for the best Christmas photos ever:
- Don’t try too hard to get great photos during intimate family gift exchanges. Seriously. There are times when being in the moment not as the observer behind the camera but as a fully present participant in the event is more important than getting pictures of it. If you must take pictures while the people most important to you are opening presents, put your camera on a tripod with a wide enough lens to cover the room, add a remote, and click the button when you think about it. Or, even better, use your iPhone to trigger your camera at set intervals and forget about it. Triggertrap is a great tool for that. Sometimes, it’s better to just remember a moment than to have a picture of it. If you’re too intrusive with your camera, those moments won’t happen.
- Find a neighborhood with luminaries Christmas Eve. Take a walk with your loved ones and enjoy how beautiful the luminaries are and the beauty of what they symbolize. And I’m not talking about their religious significance here—regardless of whether you celebrate Christmas as a religious holiday, a secular holiday, or not at all, luminaries are the result of a group of people who are normally too busy to do more than wave at each other actually organizing their efforts just to create something beautiful. That’s worth appreciating. After you fully absorb it and enjoy the time with your loved ones, then you might get your camera out and experiment with both close ups and wide shots of the luminaries.
- After everyone has gone to bed one night, spend some time shooting the Christmas tree. This part I will give you some tips for in a moment.
- Breathe. And breathe again. Breathe deeply and slowly. You will think more clearly and take better pictures and you will be less stressed in general. But more importantly, remember that as long as you can take a breath, there is hope. And hope is all we really need to have a great holiday.
Time with the Tree
I frequently get asked how you get “twinkle lights” in photos of the tree. I’m not exactly sure whether “twinkle lights” means star-shaped lights or soft, circular lights, but I will show you both. No special tools required (unless you think a tripod is a special tool).
First, use a tripod. It will yield much sharper images in the typically low-light situation of a Christmas tree and the tips below will not work without one.
Second, for even more sharpness, set your camera to a self-timer (2 seconds is good if you have that option) or use a remote so you’re not bumping the camera and introducing vibration pressing the shutter button.
Third, try this experiment. With the exposure type set to “M” for manual:
- Using a longer lens, get up close to the tree and choose an ornament.
- Focus where you most want it sharp, and frame your image (without changing the distance to the subject after you’ve focused), locking your camera down on the tripod.
- Now, try setting your Aperture to f/22, ISO to 400, and then adjust the shutter until your meter reads 0 (or is right in the middle if you’re meter doesn’t have a 0 on it).
- Take a picture.
- If the image looks too dark, repeat only make the meter read +1. If it’s too light, -1. Repeat and adjust until you get the exposure you like.
- Now, don’t touch anything else, but change the aperture to the biggest aperture you have—f/5.6 on some lenses, f/4.0, f/3.5, f/2.8, f/1.4 are all common maximum apertures. So, just keep turning the dial until the f/number won’t get any smaller.
- Then adjust your shutter proportionally to get the same meter reading that you had in the previous picture. (If you prefer to shoot in Aperture Priority and know how to use exposure compensation, you could also do that and let the camera change the shutter for you.)
- Now compare the effect you get:


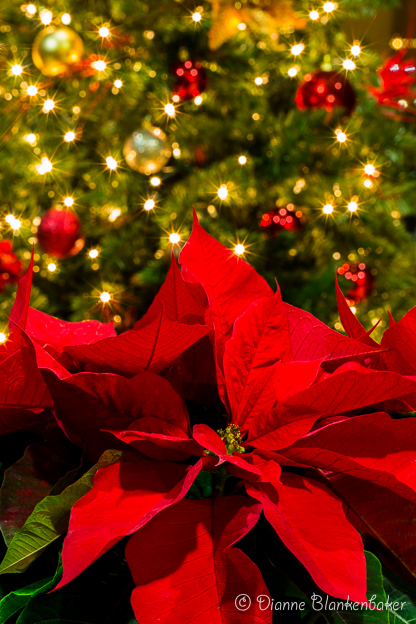
You can do this same experiment with subjects that are further from the tree, like this poinsettia:


You can also do the same thing further away from the tree. Notice the effect on the lights in the background, both reflected in the glass next to the tree and shining through the glass from outside:


If you want star bursts for lights, you need a very small aperture (e.g., f/16, f/22—the biggest f/number where your images still look really sharp). The other effect of a very small aperture is that the depth of field becomes very large.
If you want big soft, round lights, you need a very large aperture. However, only the lights that are outside the depth of field will have this effect. Additionally, you will only have a very short depth of field, meaning some subjects don’t lend themselves well to this effect (e.g., wider shots of the tree can look weird with the majority of the tree soft).
Generally, I like a shallow depth of field for shots like this:

But more depth of field (and “twinkle lights”) in shots like this:

Although in this case I’d like to mix the sharp tree with star-shaped lights with a soft background with big round lights–and attempt to lose the distracting elements in the reflection in the process. While you can’t combine the two extremes shown here in a single image (unless you take two and combine them in Photoshop), you can experiment with an aperture value somewhere between wide open and stopped way down to get a sharp enough tree and somewhat softer background lights. Experimentation is the name of the game!
Happy Holidays and have a wonderful new year!
