Will Back-Button Focusing Make Me a Better Photographer?

All right, DSLR owners. I’ve had so many people ask me this summer about back-button focus and how and why to use it that I thought it would make a good post. Since this is (as usual) a long post, let me just summarize by saying if you don’t understand “focus-and-recompose,” focusing modes, focus selection points, critical focus, the focal plane, depth of field, and how to control all of these things, you probably should worry about those before you worry about using the back button to find focus. Back-button focusing is a great tool to achieve better control over autofocusing, but if you don’t understand how to control focus and what settings and techniques allow you to do that with autofocus now, it’s really not going to make a big difference for you.

That said, here goes my explanation of what back-button focusing is, why I use it, and some pointers on how to enable it on your camera if you want to give it a whirl.

First, what the heck are people talking about?

Back button focus means using a button on the back of your camera body to autofocus instead of autofocusing when you half-press/press the shutter button.

Why would you want to do that?

By separating autofocus from the button that also releases the shutter, you gain complete control over when your camera is focusing and when it isn’t, you can stop switching between autofocus modes and leave your camera in continuous focusing mode, and you make it easier to avoid releasing the shutter when you don’t mean to.

Why wouldn’t you want to do that?

Well, personally, I think back-button focusing is the bomb and I’ve been using it for so many years that it’s the first setting I adjust when I buy a new camera body because I can’t handle focusing via the shutter button.

That said, I have one big caution for you when it comes to switching to back-button focusing: choose when to make the switch cautiously. Your brain is programed to believe that the shutter button autofocuses right now. If you switch to back button, you will need to practice daily for about 2 weeks (depending on the neuroplasticity of your particular brain) to retrain yourself to go for the back button to find focus before you press the shutter. You would not want to make the switch and then go on the once-in-a-lifetime trip and/or to a once-in-a-lifetime event without having taught yourself this new habit before you get there–you will forget to focus and make a bunch of blurry photos at first.

Also, because of this need to create an unconscious habit, you don’t want to switch back and forth between using the back button technique vs the shutter button–you will get yourself very confused.

I Don’t Get It–Why is Back-Button Better?

In spite of all the hype about back-button focusing, a lot of students don’t get it at first. They look at me puzzled and try to understand why they would care which button causes the camera to focus.

So, let me tell you a little story about why I was so enthused when I learned about back-button focusing.

Back when DSLR screens weren’t so big or bright, I was doing a lot of landscape photography on a tripod. I found manual focus to be extremely difficult because the viewfinder focusing screen was terrible and I hadn’t yet invested in a loupe for my LCD screen, so I couldn’t see if I was in focus in daylight. So, I would put my camera on the tripod, compose my image, and then decide where I should focus based on DOF and hyperfocal distance. Then, I would begin the struggle of turning the camera to point at the place where I wanted to focus, hold the shutter button halfway, and then try to recompose the image back to what I wanted without releasing the shutter. I invariably either took the shot while still adjusting or lifted my finger and my focus unlocked. When you lose focus lock and then press the shutter button again, the camera re-focuses on whatever it picks to focus on instead of where you want to focus.

I then discovered there is a little focus lock button on Canon’s that if you press it, focus will remained locked “for a few seconds” giving you an unspecified amount of time to reset and shoot before it turns off. This little button just stressed me out because I was racing against a clock and I didn’t know how much time I actually had before the focus would unlock.

Then, I learned about back button focus. And, ahhhh, breathed a sigh of relief. I could still autofocus, but once I found focus with the back button, I was free to move the camera with both hands for as long as I wanted until I was ready and could get the shot I wanted. And so my love of back-button focusing was born.

If you’re not using autofocus on a tripod a lot (Manual focus avoids this problem), you will not have the same appreciation for this struggle. That doesn’t mean back-button focusing doesn’t still have many advantages.

By the way, even though I now have the tools to manually focus on a tripod, my lenses allow full time manual focus, meaning I can manually focus even when the lens is set to AF. By using back-button focus, I can leave my lenses on AF at all times and I don’t have to worry about undoing my manual focus when I press the shutter button.

I’m Not Autofocusing on a Tripod–Why Would I Care?

A big reason it can be hard to grasp why back-button focusing is so powerful is if you haven’t spent much time working on gaining control over focus in general. If you’re going around autofocusing with all your selection points turned on in single focus/one-shot focus mode (or if this sounds like gibberish to you), you actually have no idea where you are focusing. If you have no idea where you are focusing, back-button focusing probably isn’t the first step you need to take to get control of focus.

Personally, I have 3 bodies that have 61 focus selection points. Those 61 focus selection points are handy when I’m trying to get a shot of, say, a Cliff Swallow in flight. It’s a tiny bird that swoops and dives erratically and I cannot pan with it well enough to keep it in focus using my normal technique. As such, those 61 focus points become very handy when the bird is against a sky or other background that doesn’t fool my camera into focusing on the background (and I’m in continuous focusing mode and I have tracking set properly for such a subject).

The rest of the time, I use either 1 or 9 focus selection points. If I’m shooting landscape, portraits, etc, I use 1 focus selection point. If I am shooting moving subjects like birds that aren’t as erratic or small as swallows but are likely to fly, I turn on focus point expansion that allows me to find focus using the center point, but will activate the surrounding 8 points if the subject moves to help keep the subject in focus.

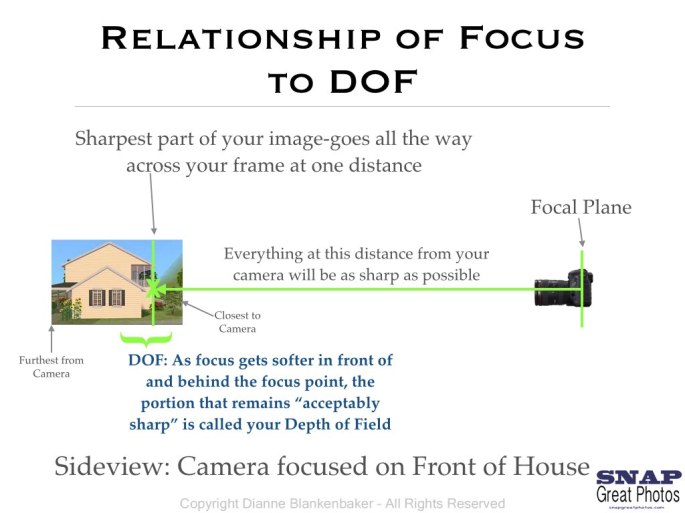
Now, this is about when students ask, “But I want more than one thing in focus. How am I supposed to get multiple people in focus if I only find focus in one place?” Well, I have news for you: critical focus only occurs at one distance from the camera. If 4 focus points light up when you press the button, it’s because the camera thinks all four of those things are the same distance away. If you want multiple people in focus, you need to understand DOF. This is the diagram I use to explain the relationship between where you find focus and how DOF keeps more than that distance sharp to students:

DOF and Focal Plane Diagram.001

So, first understand how focus works and how DOF helps you get what you want sharp, then worry about whether you should be using the back button to find focus or not.

Once you are very clear on what the focal plane is (which is technically where your camera sensor is positioned in your camera body, but is also often used to mean the plane of critical focus in the scene/subject you are shooting) and how to control DOF, you will realize the advantage of using one focus selection point whenever possible: it let’s you decide what should be sharpest in your image instead of your camera.

All of the Images in this Gallery Used the Focus-and-Recompose Technique (All of my Images are Made Using Back-Button Focusing)

Once you make the switch to using only one focus selection point, you then will want to make a lot of use of “focus-and-recompose,” which is what I was doing in the tripod example. However, focus-and-recompose is a fundamental technique  whether you’re on a tripod or hand-holding. It allows you to get both the focus you want and the composition you want without being dependent on a focus selection point being in the right place (if you are in one shot/single focusing mode). It means that, for example, you can use the center focus selection point (which always has the greatest ability to focus the most precisely in all cameras) to autofocus on a subject’s eyes and then lock focus and recompose so that your subject is artistically framed in your image. It gives you the ability to control critical focus without losing control over composition. The key is to ensure that when you recompose, you don’t change your distance from the subject as this will cause focus to shift forward or backward based on your movement.

The other key is that if you recompose, you must hold the focus. And this is where back-button focus becomes a life saver. If you have to half-press the shutter and hold it while you shift, you may either accidentally press the shutter all the way or let go of the shutter all together. Then you have to start over. With the back button, you can simply press the back button to find focus, release, and then concentrate on recomposing. When you press the shutter, because you have turned off focusing on the shutter button, your focus does not change and, as long as you also haven’t changed the distance from you to the subject, their eyes will be the sharpest thing in the image even though the focus selection point is no where near their eyes when you eventually do press the shutter button.

There are also advantages to using back button focusing when you are continuously focusing (AF-C on Nikon, AI Servo on Canon). As you track a subject in motion, you hold the back button and it keeps focusing, giving you more control on when you focus vs fire (it can be challenging to pan while holding the shutter button half way without firing). If the subject stops, you can release the back button, locking focus as if you were in one-shot/single mode and fire away. Essentially, you gain total control over when the camera is autofocusing and when it is not. It’s a beautiful thing once it clicks in your head how much easier it is to control focus this way.

This also means you never have to switch between one-shot/single focusing mode and continuous focusing mode–if you’re not pressing the back button, your focus is locked regardless of which focusing mode you’re in. By comparison, when you use the half-press of the shutter to focus, if you’re in continuous focusing, it keeps refocusing until the shutter releases, meaning it’s not possible to focus-and-recompose.

To summarize, back-button focusing is an advantage in all situations. There are fewer settings you have to use to control focus when you back-button focus and you gain greater control with less coordination. I honestly cannot think of any reason not to switch to back-button focusing other than ensuring you have the time to develop the habit before you make the switch.

You Convinced Me–Now What?

Remember, if you make the switch, you will forget to focus at first. Do not, say, decide you are going to make the switch because you are shooting a wedding tomorrow and you want to give it a try. Make the switch and really pay attention to whether you are finding focus when and where you want until you find yourself automatically pushing the back button without thinking about it and getting the results you want. Then, you can go shoot a wedding with back-button focus. 🙂

Now, the remaining question is, how do you turn it on/disable the shutter button focus? This requires finding the setting in your manual (which is usually different for each camera) that will allow you to assign functions to your buttons. You will, unfortunately, not find anything called “back-button focusing” in your manual.

In Canons, these settings are in the custom function menus and are pretty obtuse. Once you find a setting for the shutter button in custom controls, set it for “Metering Start” (or another setting that doesn’t include anything with AF in it) which will disable focusing with the shutter button. Find the settings for the AF-On button (the button is in upper right corner of camera back and furthest to the left of those 3 buttons—very convenient to find with your thumb once you get used to it). Make sure the AF-On button is set to “Metering and AF Start.”

In Nikons, it’s even more obtuse, but I don’t look at Nikons every day, so maybe it makes more sense to a Nikon shooter. In any case, you also need to go to the custom setting menu, to controls, and then go to assign AE-L/AF-L button. Choose AF-On from that menu. If the shutter button is also in that menu, check to make sure it isn’t enabled for AF-On as well. I’ve been told that in many Nikons you also need to set the camera so that the camera will still fire if it hasn’t been focused in order to get it to fire when it doesn’t know that you don’t want to refocus. That setting is also in the Custom Setting Menus under Autofocus and you want to set AF-C and AF-S priority selection to “release.”

Now, go practice, practice, practice! 🙂


Just When You Think You Understand Depth of Field

Depth of Field is one  of those concepts that most budding photographers come at in a series of stages.

First, there’s just getting your head around what Depth of Field means. To keep it simple, if you don’t know what depth of field is, we generally think about it as the distance in front of and behind where we focused that remains acceptably sharp. Close-up portraits with blurry backgrounds usually have very little Depth of Field. Wide landscape scenes are often acceptably sharp from the closest object in the frame all the way to infinity.

Second, most beginning photographers learn to gain some control over depth of field (DOF) by changing the aperture of their lens manually (in Manual or Aperture Priority mode on your DSLR). The wider you open your aperture, the less DOF you get.

Third, it eventually dawns on photographers who concentrate on controlling DOF that you don’t always get the same DOF with the same aperture and you begin to understand the other variables in play that give you more or less DOF (sensor size, focal length, distance to subject).

Fourth, you may get really technical and look up the mathematical formulas to calculate DOF and realize that it’s all kind of a guess because how much DOF you get ultimately depends on the size the image is displayed at, how far away you are viewing it from, and how good your eye sight is.

At this point, you may fall into the trap of believing you fully understand DOF and you have all the knowledge you need to get as much control as possible over DOF in your photography.

Then, perhaps one day you discover the mysterious Tilt-Shift lens, which throws everything you know about DOF completely, well, tilted.

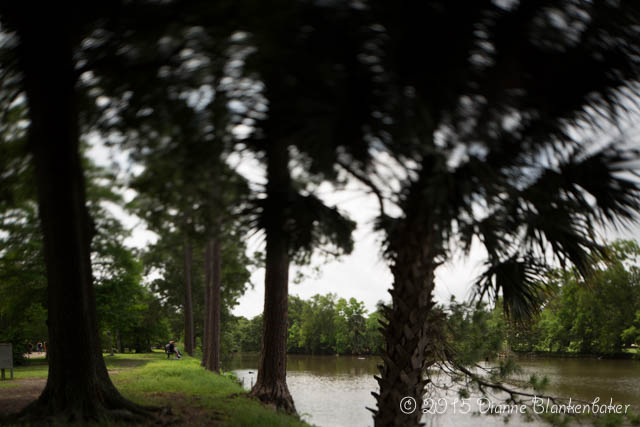
Here’s an example. With a normal lens, we expect the focal plane to be perpendicular to the camera sensor. Therefore, everything that is the same distance from the camera should be equally sharp. Take a look at this image:

What is acceptably sharp forms a wedge that runs roughly parallel to the ground rather than a plane that spans the entire angle of view and runs parallel to the camera sensor.
What is acceptably sharp forms a wedge that runs roughly parallel to the ground rather than a plane that spans the entire field of view and runs parallel to the camera sensor.

This image is straight out of the camera with no editing (it was also in a bracketed set of multiple exposures for the purpose of doing a composite; I just happen to like the slightly darker exposure the best for an example).

Notice the plane of critical focus doesn’t seem to be a plane at all. It’s more like a wedge shape that runs parallel to the ground. And the area above and below the wedge that is acceptably sharp is thicker closer to the camera than further away—check out the closest tree trunk and how much of it is acceptably sharp. As you go back into the image, less and less vertical distance is sharp.

Notice that the people on the bench are sharp, but the tree at the same distance to the left of them is rapidly falling out of focus. I particularly like this composition with this effect—it creates a tunnel effect that leads the eye straight to the people on the bench.

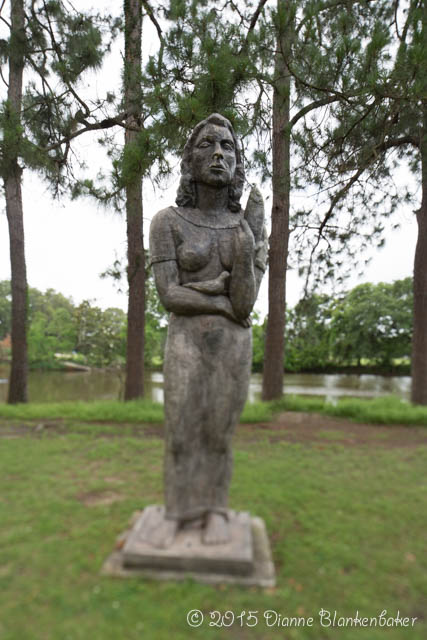
Here’s another example, also straight out of the camera. In this case, the focus was on the face of the sculpture, but the body falls out of focus even though it is the same distance from the camera. In this case it has the effect of a vignette created by blurring the edges. But notice that the distant trees directly behind the sculpture still look acceptably sharp at the height of the sculpture’s head.

Shooting this sculpture relatively close on a tilt yields a sharp face and blurred legs.

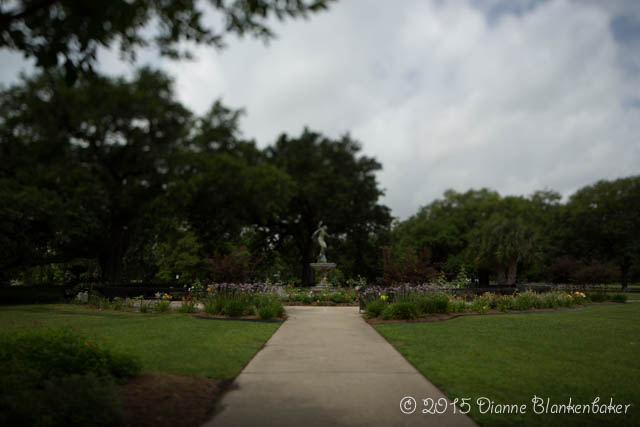
In the next example, the sharper focus on the flowers vs the fountain keeps the eye lower, noticing the garden more. This is actually a “normal” use for a tilt shift lens—creating lots of DOF at a given height off the ground. This works really nicely for fields full of flowers, for example.

_U0A2614-1

Another popular use for the tilt part of a Tilt-Shift lens is miniaturizing a scene. This is a test shot through a window, but you can see how the shifted DOF causes the brain to perceive the scene as being a miniature version of a real scene:

_U0A2002-1

Once again, notice how the bricks to the right of the window are in focus, but as you get closer to the bottom of the window, they fall out of focus.

Now, you might wonder why you would buy an expensive lens in order to create these effects in camera given that this effect can be created in Lightroom or Photoshop. Truth be told, I would not buy a lens for the Tilt effect. It’s the shift effect that makes the lens worth it to me. We’ll talk more about that in another post . . .

Disappearing Act and Long Exposures

A while back, I posted a couple of long exposures on Facebook (see the post here) and asked if people could tell which one had been exposed for 1/30 of a second vs 29 seconds. It was a little confusing because the shot with the higher exposure value (that is, it was brighter) was the one with the 1/30 of a second exposure.

I thought I would explain the purpose of the exercise and talk a bit about how I achieved super long exposure times (shutter speeds) in bright sunlight.

First, if you know nothing about how a given exposure value was achieved other than the shutter speed, you cannot draw a conclusion about whether a brighter image has a longer shutter speed than the darker image. As a reminder, there are 3 settings that determine exposure: aperture, ISO, and shutter speed. The same exposure can be achieved with vastly different shutter speeds by adjusting the ISO and aperture to offset the difference.

So, if all you know is the shutter speed, what differences can you see that will tell you which had the longer exposure time? From an artistic perspective, we choose shutter speed based on whether we want to show or freeze motion. “Showing motion” means motion blur becomes visible in an image. So, our first test is “how much motion blur do we see?”

However, with this particular subject, the clouds are not moving quickly. The clouds are our best clue as to how long the shutter was open. But the clouds moved slowly enough that the difference in motion blur between the 1/30 of a second exposure and the 29 second exposure is relatively subtle. When you compare the 1/60 of a second exposure to the 77 second exposure the difference becomes far more obvious.

Likewise, moving water is usually a great clue as to how long an exposure is. As the exposure gets longer, fewer ripples in the river show.

The third difference you might notice if you look very closely is that the highway that curves around the river has no cars on it in any of the images with a 29 second or longer exposure time (shutter speed).

This happens to be one of the cool reasons to do super-long exposures. It’s a way of removing traffic and crowds from a scene. “But WAIT!” you ask, “What happened to slow shutters showing motion blur?”

Disappearing objects are the extreme of motion blur. The moving objects don’t reflect enough light relative to the total light signal to register as part of an image. This is a big difference in how cameras “see” vs how we see. We do not have a time factor that increases or decreases the exposure of what we look at. A camera, however, continues to gather light, exposing the image for the length of time the shutter is open in a quantity determined by the aperture size. How much light is needed to get a given exposure is then determined by the ISO.

So, why does this make moving objects disappear? Well, let’s look at the trees in our long exposure examples. They’re very dark. They reflect back less light than the river next to them. But they are sitting still, standing in one place, reflecting back that little bit of light in the same location for the duration of the open shutter. It’s enough to register a dark image of a tree. By comparison, the cars on the freeway are driving through the frame. They reflect only a little more light than the trees, but only for a split second in each point along their trajectory–the accumulative effect of the open shutter is lost on them. They would have to be very bright to register in the image–which is how you create light trails when cars have their lights on.

So, the bottom line is that if you can get your shutter slow enough that moving objects can’t reflect enough light to show up in the image, you can make them disappear.

The next question is, of course, how do you get a super slow shutter in daylight? We can stop down the aperture as much as possible (to the point before diffraction causes our images to fall apart, but that’s another subject) and we can turn our ISO as low as it will go, but at 7:52PM in July (more than an hour before sunset), that only got me a 1/30 of a second shutter speed.

All of the example images have the same aperture and ISO settings. Having reached the limits of my camera’s ability to control exposure, my only other option to get a slower shutter was to block some of the light reaching my camera’s sensor. To do this, I used a Heliopan 10-stop neutral density filter.

So what is a Neutral Density (ND) filter? From a technical perspective, an ND filter is called “neutral” because it is designed to block all colors of light equally. In other words, the color of the light should not be affected by an ND filter, just less light should make it through the lens.

That said, 10-stop ND filters reduce the light that reaches your sensor by 1000x. Many result in a color shift. In the case of the Heliopan, it’s a red shift. The good news is that it is something easily corrected via white balance settings in the case of the Heliopan (not true of all ND filters). I personally like the color shift in these examples and didn’t bother to correct it–it was like sunset came early.

To get the identical exposure with a 10-stop ND filter, if you are changing only the shutter speed, you would need to multiple the shutter speed by 1000. So, 1/30 becomes  33.33 seconds. If you really want this shutter speed, you need to use the bulb setting on your camera with a remote and time how long the shutter has been open. I did successively longer exposures using the Bulb setting to see what I liked best.

Neutral Density filters give you more control over light. They let you use much slower shutter speeds or allow you to open up your aperture significantly in brightly lit conditions where this isn’t otherwise possible.

If you like playing with motion or shallow depth of field in bright light, neutral density filters are a great option to explore.

DSLRs: Photographing Fireworks

It’s that time of year again here in the US. The 4th of July promises 2-3 days of fireworks displays in many areas. For photographers, that means lots of opportunities to get shots of fireworks.

Having shot more fireworks than I know what to do with the past few years, I have several tips you may find helpful.

Here’s the short form:

  1. Pick a location upwind and preferably high enough to get a view above the crowd and the trees.
  2. Use Manual or Bulb exposure. Don’t worry much about depth of field. Keep ISO low and shutter speed long. Use primarily Aperture and/or secondarily ISO to brighten or darken the fireworks if they’re getting under or overexposed.
  3. Use a wide angle zoom lens (16-35mm works well if you’re close; 24-70mm if your further away; if you’re really far away, you might need a telephoto lens) on a tripod and a remote to release the shutter.
  4. Setup with a wider angle than you think you need–this will help you catch fireworks that go off in different positions more easily.
  5. Manually focus on infinity unless you’re closer than 2 football fields and using a telephoto lens.
  6. Speed up your shutter a lot for the finale when many fireworks go off at the same time.
  7. Try to let your camera have a short rest between shots when you can–this will help it keep up with writing image files, preventing it from not firing when you least expect it, and help keep it cooler, reducing noise.

Planning Tips:  Location, Location, Location

Find out where and when the fireworks will start. Look at the location on Google Earth. Even better, go to the location and check it out ahead of time. Look for a good vantage point that will give you a view of the fireworks and, preferably, the ground–you may need to get yourself invited to a rooftop party for the best view. 🙂 If you have trees between you and the fireworks, you will be limited to shots of the fireworks above the trees.

Alternatively, look for an interesting foreground subject you can put fireworks behind. Check out this famous photo by Jim Zuckerman of the Statue of Liberty surrounded by fireworks for inspiration.

Additionally, consider smoke when choosing a location. Check the weather forecast for the wind direction and speed. Hopefully there will be a light breeze that will dissipate the smoke. You want to be upwind of the fireworks with the hope that the wind will carry the smoke behind the fireworks and keep your photos clean.

Have an idea of how you’re going to get to your chosen location, how bad traffic will be, and when you will need to get there to ensure a place to setup a tripod. You will need a tripod.

Exposure Settings

Shooting fireworks is similar to shooting lightening except it’s easier because you can predict fireworks better. (See Lesson: 109 Long Exposures and Lightening).

There are two methods I have used with success. I prefer the second one, which is how I shoot lightening, but it requires imagining how much you’ve captured, so you might find the first one easier.

Method One: Manual Shooting Mode

In this method, you choose an aperture, shutter speed, and ISO setting that you think will give you good exposure of the fireworks. You then adjust your shutter speed longer or slower to get what you want and adjust aperture and ISO accordingly.

Most of my single-firework examples (in the gallery above) are ¼ to 1/13 of a second long using this method, but how fast or slow your shutter needs to be is partly dependent on how large the fireworks are in your frame, partly dependent on personal preference, and partly dependent on whether you want to get multiple fireworks in the same shot. Most people shoot fireworks with much longer shutter speeds.

You will likely want shutter speeds of 5-15 seconds or even longer to get multiples, but this is, of course, dependent on how frequently fireworks are being fired.

Note that you will not be able to use your light meter. You can meter while a firework is firing, but the brightness of one firework to another is quite variable and the percentage of the sky that is firework vs dark may make your meter reading deceptive. Also, during the finale, you will need a much shorter shutter speed because many fireworks are going off simultaneously–you may end up with a massive jumble with a very slow shutter.

As far as aperture goes, for fireworks it is more a factor of getting the exposure you want than getting depth of field–you are likely to have all the DOF you need (if you’re shooting wide and not too close). Because fireworks are a lot like light painting, the maximum amount of light you can capture is determined more by how long the firework is glowing, how wide your aperture is open, and how high your ISO is than what you’re shutter speed is. The one thing to be cautious of is if you use a very slow shutter and one firework goes off after another in the exact same spot, not only will they not look so good together in the same frame, but you will probably blow out the highlights where the brightest part of each firework ended up overlapping. This is one of the reasons I prefer using the bulb mode.

ISO can be minimized to reduce noise in most cases, although ISO 800 works for me when shooting single fireworks at shorter shutter speeds. But, bear in mind the longer the shutter speed, the more noise you will have.

Method 2:  Bulb Shooting Mode

Bulb simply allows you to manually open and close the shutter instead of setting the shutter speed ahead of time. Some cameras have an actual “Bulb” shooting mode (“B”) on the shooting mode dial. If yours doesn’t, bulb is probably selected by being in Manual Shooting mode and changing the shutter speed–it’s usually the one after 30 seconds.

I prefer this method. The advantage is that it allows you to control the shutter speed based on how bright particular fireworks are, how many have gone off, etc. Instead of guessing ahead of time what’s going to be fired, you can imagine how much light has reached your sensor and how many individual fireworks have been included in the shot.

Use your eyes and brain to “measure” the amount of light that has been produced by the total number of fireworks that have gone off since you opened your shutter. Mentally picture the combination of fireworks that have gone off in the image. This takes getting a feel for when to close the shutter, but isn’t that hard to do because each firework fades rather than continually adding light, meaning there’s a lot of leeway from an exposure perspective as long as ambient light from sources other than the fireworks is minimal.

To maximize the length of time you can leave your shutter open, you can set your ISO to 100 and stop down to f/22. However, you may find the fireworks look at bit dim. Each firework only emits light for so long, so you want enough light to reach your sensor to record each one brightly. For these examples, I used ISO 100 and f/16.

If you have a remote for your camera, this is a good time to use it. Pressing the shutter button can introduce vibration into your shot, which may cause some blur. In fact, it’s preferable to use a remote even if you’re not in Bulb mode. But it’s doubly important when using bulb mode.

Focus

The short answer is manually focus your lens at infinity (there should be a mark on your lens that is an infinity symbol with a line showing you where to turn the focus ring to). This will yield sharp fireworks the vast majority of the time.

If this makes you nervous, you can refer to Lesson 106: Focusing in the Dark. Or, you can point your camera at a bright object that is about the distance you expect the fireworks to be, if your lens has a distance meter you can look at the distance meter to see how far away that is and if your lens is focused at infinity. If you are shooting wide, you may be surprised to discover how close a subject can be and still result in focusing at infinity.

If there is nothing bright enough to focus automatically on, you can focus on infinity and check to make sure the first image you take is sharp.

If you are very close to the fireworks and using a lens that is longer (where infinity focus is much further away) you can autofocus on the first firework itself.

Realistically, you are likely to have so much DOF that accurate focusing is less important. I cannot say I’ve ever had a problem with focus, but then, I typically shoot wide. Focusing at infinity at 16mm, for example, with my full-frame camera at f/16 everything will stay in focus from less than 2 feet away to infinity. I have no desire to be that close to fireworks!

By comparison, if everything were the same except my focal length, at 100mm, I would need to be at least 70 feet from the fireworks. We are not usually that close either, so focusing at infinity will usually work. But, if you’re using a 300mm lens, you’d need to be over 600 feet away for infinity focus to work well. This is still pretty darn close for fireworks, but just keep in mind that if you’re using a 300mm lens and are less than 2 football fields away from the fireworks, that might be a time to worry about this–you might also want to keep a fire extinguisher handy.

Focal Length and Framing

Fireworks are a good time to have a zoom lens on your camera in my opinion. Especially if you are in close proximity. The first time I shot fireworks, I put my 100mm prime lens on my camera and was surprised when the fireworks didn’t fit in my frame–they were much larger than I expected shooting from about a quarter mile away. I ended up scrambling to change lenses.

Using a zoom gives you room to adjust for such misjudgments since you can’t tell how big the fireworks will be until they start going off.

If you like to include the landscape in the shot, you will definitely want to shoot wider. The other thing to be aware of is that you are setting up on a tripod and you will not have a lot of time to adjust between shots. In fact, my preference is to shoot wide enough that I never change the camera position once the show starts. I prefer not to miss shots by fussing with the tripod.

I do miss shots when the fireworks suddenly get fired in a different direction or the wind blows them out of the frame. But, this happens infrequently when I’m shooting wide.

Cautions

If you are firing off a series of long exposures one after another, there are a couple of things to be cautious about. First, you can fill your memory buffer in your camera. This is a little hard to predict when you are doing long exposures. For example, my camera can shoot 6 frames per second but if I fire 18 shots in 3 seconds, the memory buffer will fill and I will have to wait for the camera to catch up writing the images to the memory card. Theoretically, one would think if you are firing off a long exposure followed by another the camera would be able to write the first image while exposing the second and keep up. However, I have run my camera out of memory right before the finale and missed the entire finale while it was catching up. I was not happy.

Just pause every once in a while to see how long it takes for the busy light to go off–if it’s a really long time, you might want to space your shots a bit more.

The other thing to be aware of is that long exposures produce a lot of heat in your camera. This is why long exposures tend to be noisier than short exposures. Giving your camera a little time between shots may also help keep it cooler, keeping noise to a minimum.

Post Processing

Smoke is quite detrimental. You can use curves and levels in Aperture or Lightroom to darken the smoke and make it less obvious to the eye. However, you also loose some of the light in the fireworks in the process and can substantially change the texture of the light trails.

Here’s an example of before and after:

I like the way the fireworks look better in the before image, but the smoke is distracting and lowers the contrast.

Sometimes, a puff of smoke in the wrong place ruins an image no matter what you do in post-processing (well, what I do in post-processing; Photoshop gurus may be able to deal with this). And sometimes the smoke is positioned so that you can still enjoy the image (even if you’d like it better without the smoke):

Conclusion

Do not stress about shooting fireworks. It’s not hard and you’ll get a better view of the fireworks if you plan ahead a little bit whether your images turn out or not. Just don’t forget you’re having fun!

Lesson 110 (DSLRs): How Clean Does Your Lens Need to Be?

For those of you who don’t have time to read a long post, here’s a summary so you can decide what’s relevant to you:

  1. Don’t clean your lens unless you’re actually seeing spots, areas of low contrast or fuzziness in your images.  The first part of this post provides an example and links to other examples on what it looks like when stuff on your lens shows up in your images.
  2. If you do clean your lens, be gentle to avoid doing more harm than good.  Take the time to go to the second part of this post and read the referenced article before you start cleaning.
  3. Before you have your sensor cleaned, make sure your problem really is dirt on your sensor.  The last part of this post provides a tip and a link to step-by-step instructions on testing whether your sensor is dirty.

Recognizing When You Need to Clean the Lens

It always amazes me how much debate there can be over seemingly simple topics in photography.  However, most experienced photographers tend to agree on this one:  your lens doesn’t usually need to be all that clean.

I confess, I hate to clean a lens.  I don’t do it unless I really have to.  When it comes to my lenses, when I first started getting “serious” about photography, one of my mentors warned me that cleaning a lens too vigorously could damage the coatings on the lens and cause more problems than the dirt.

This made me so paranoid that I was afraid to clean my lenses.  What I discovered was that the crud on my lens didn’t show up in my images, so I was convinced it really wasn’t worth risking damaging the lens to clean it.

Then, a few years ago, I found myself shooting outdoors in the middle of the day a lot more frequently than I would prefer.  When this led to experimenting with more shots that include a lot of bright sunlight, I suddenly started getting images with blurry flare spots all over the place.  Advised that I had a dirty sensor, I took my camera in and had the sensor cleaned.  But that didn’t solve the problem.  My problem was the dust on my lens.

Since then, I’ve learned a few things about troubleshooting spots in your images.  First, there’s lens flare, which can occur regardless of how clean your equipment is.  But, when you have dust on your lens, if light strikes the front lens at the wrong angle, the dust can also contribute to seeing lots of flare spots in your image.

In the following example, some of the flare is not attributable to dust, but the large number of large, bright blurry spots indicate there was dust on my lens and the sun was hitting them just right:

AU0A7331

One of the challenges of this problem is that it may occur quite infrequently.  This was shot at 28mm and f/20–both the wide angle and the stopped down aperture make it more likely that flare will turn up in the image.  The inclusion of the sun in the image also meant my lens hood wasn’t going to block direct light from hitting the front lens element, which is the root of flare problems.  However, in this case, I wanted lens flare to show in the image.  I wasn’t, however, bargaining for an entire sky full of blurry bright spots!

Since cleaning the lens, the problem has been reduced to “normal” lens flare.

But the caution I received so many years ago remains true–over cleaning your lens is more damaging than under cleaning–you really only need to clean the lens if your images are affected.

Here is an amazing article that shows just how little stuff on your lens may show up in your images–it’s definitely worth the read:  Dirty Lens Article.

In spite of what the Dirty Lens Article demonstrates, this is not a justification for abusing your lens.

First, just like the dust on my lens did not show in my images the vast majority of the time, damage to the lens will also show up under different circumstances.  Note that Munger’s examples with named aperture settings were all at f/5.6.  As mentioned earlier, flares are more likely to show up when you’re stopped down.

Second, even if you don’t care if your lens is in pristine condition, should you ever want to sell your lens, your buyer probably will.

How to Clean the Lens

When you do clean your lens, remember that less is more.  You don’t want to rub at the lens like you’re cleaning a window.  Instead, try starting with a fun little toy called a blower.  I particularly like the Giottos Rocket Air Blaster.  It doubles as a fascinating conversation piece should you decide to keep it on display in your living room.

By using a blower, you can shoot dry air (unlike when you blow with your mouth) across the lens to blow away any loose dust on the lens.  Dry air does a better job lifting away dust than moist air.  Plus, do you really want to know how much spit you spray when you blow on something?

Some people like to use a very soft brush after the blower to brush away more stubborn dust.  The idea is to remove anything that might be abrasive gently so that it doesn’t scratch the lens or the coatings on the lens.  When you start rubbing at the lens with a cloth, you can effectively turn dust particles into sand paper, abrading those special coating that do things like reduce flare.

I skip the brush step and do the next step very, very gently.

When I first attempted lens cleaning, I bought fancy lens cleaning fluid and cleaning papers.  I put a few drops of cleaning fluid on the paper and gently wiped the lens.  Later, I adopted Ken Rockwell’s approach of breathing on the lens to fog it up instead of using cleaning fluid.  (That article is still available and includes additional tips for using methyl alcohol to clean stubborn spots:  How to Clean Lenses, Monitors, Filters and CCDs.)  I also switched from using cleaning papers to microfiber chamois clothes–the main problem with the paper for me was gently getting rid of streaks without having my fingers slip off the paper and create new fingerprints.  But then, I have below-average coordination.

If you are going to go to the trouble of cleaning your lens, clean the back element as well as the front (at the end that attaches to the camera).  According to Nasim Mansurov, rear element dust shows up as dark specks in the out-of-focus portions of the image. He shows an example in this article.

Dust on the Rear Element vs Dust on the Sensor

Since dust on the sensor also shows up as dark spots on images, it’s probably worth cleaning the rear element before having your sensor cleaned (or cleaning it yourself).  If you want to be positive whether it’s the lens or the sensor, take test shots using two different lenses based on the instructions in this article from Jeff Guyer, Got Sensor Dust?  Check.  See if the spots show in the same places even when you switch lenses.  This will guarantee there’s no confusion between lens dust and sensor dust.

Lesson 107: Depth of Field Through the Lens

I taught a Beginners class on macro and close-up photography on Saturday.  Macro teaches us a lot of great skills as photographers.  Because shooting subjects life-sized or bigger magnifies the mistakes we might get away with if our subjects didn’t loom so large on our sensors, macro serves to remind us and help really bring home some basic photography concepts in a whole new way.

Depth of Field is of primary concern with macro photography.  When you’re shooting practically on top of your subject, DOF is reduced to fractions of an inch–sometimes DOF is so tiny that it’s easier to think of it in millimeters, even for metric-adverse Americans.

One of the things that often confuses beginning (and even more experienced) photographers is that the depth of field you see when you look through the lens is not the depth of field you’ll get when you create the image (unless you happen to be shooting with your aperture wide open).

For example, during class, I was shooting with the Canon 100mm f/2.8L IS macro lens.  When I looked through the lens at a dandelion, this is what I saw:

The inside of the dandelion (f/2.8)

Pretty cool, huh?  When you are looking through the lens, the aperture is wide open regardless of what aperture setting you have selected for exposure.  This allows the maximum light through the lens for you to see as well as for functions like autofocus to work better. 

Some cameras have a DOF preview button that stops the aperture down to what you’ve set it at so you can theoretically tell how much DOF you’re actually going to get.  I find this button to be only marginally useful.  I rarely can tell how much DOF I’m getting by pressing it, partly because of the loss of light.

Instead, I tend to take a shot and use a magnifying loupe to look at it on the LCD.  I may also zoom into the image to enlarge it for more careful viewing.  Then I decide if I like the DOF I’m getting and adjust if not.

In the next example, I shot the same dandelion at f/16 instead of f/2.8 (as in the first example).  Notice how we see the full ball of fluff instead of getting a horizontal view of the inside of the dandelion seeds?  That’s because there is enough DOF for the foreground portion of the seed ball to not blur completely out of view.

Same Dandelion at f/16

Personally, I find the very shallow depth of field more interesting in this case–it’s like having a view of the inside of the flower.  However, if I wanted a shot of dandelion that looked more like what we see in life, the second example would be my pick.  In fact, I’d probably want a little more depth of field to keep the tufts of the closest seen “fronds” sharp.

Lesson 104: Bird Photography Tips, or When Not to Use an iPhone

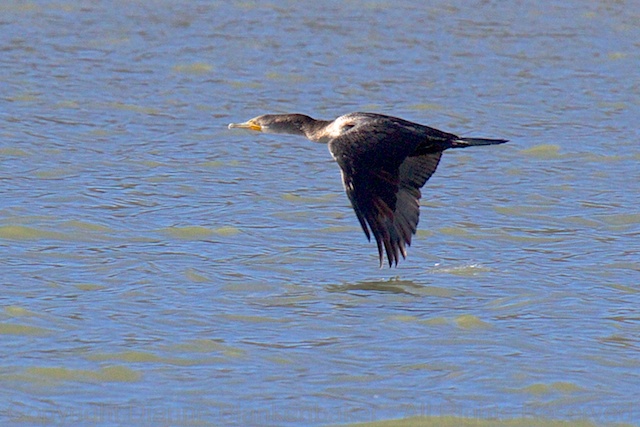
In Lesson 26, we looked at trying to get wildlife photographs with an iPhone.  Specifically of a Great Blue Heron hanging out by a bike path.  Today, I am sharing a few images from a recent river cruise in a wildlife preserve during Sandhill Crane migration.

All of the images in this post were taken with a DSLR.  In fact, I used two different DSLRs, each with a telephoto lens to take these images.  If your an iPhoneographer, I’m sorry, but here are the reasons why I left my iPhone in my pocket:

  1. Focusing while tracking a bird in flight with the iPhone may be possible, but if it is, I haven’t mastered it.  While I’ve gotten good images of a bird flying directly toward me with the iPhone, I’ve not been able to get images worth keeping of a bird flying across the field of view.
  2. The super-wide lens on the iPhone means that unless you can get within a few feet of a bird, you’ll end up with tiny bird spots instead of recognizable birds.
  3. The timing of when you click and when the image is made can be quite delayed in the iPhone–not ideal for a moving subject.
  4. Getting the exposure right for a small bird in a big sky is trickier than what can be accomplished quickly on the iPhone and speed is imperative when shooting moving birds from a moving boat.
  5. The resolution is too low to do a lot of cropping, which number 2 makes necessary.

So now you know why I didn’t use my iPhone.  Here are a few tips for photographing birds with a DSLR:

  1. Unless you’re going to be very close to large birds (like in our Raptography workshop), use the longest lens you own.
  2. If your lens has Image Stabilization, turn it on and select the type for panning (IS 2 for Canon, Active for Nikon).
  3. Use the continuous focusing setting on your camera (your camera will keep focusing as long as you keep the shutter button half pressed) in AI Servo mode for Canon or AF-C for Nikon.
  4. If you have tracking settings, set a choice that will stay with the subject and not refocus on new subjects entering the frame.
  5. If you can pick how many focus selection points are used, try using 8.  If you can’t keep up with a bird in flight or if you’re on a boat that’s bouncing a lot, you might want to expand to more.
  6. If your camera allows you to manually select one focus point but still uses the additional points when tracking motion, manually select the center focus point.  In all cameras, the center selection point has the best focusing sensitivity (although in some cameras, other selection points do as well).  For most people, using the center focus selection point also makes panning more intuitive.
  7. Panning with birds takes eye-hand coordination and becomes more difficult for your brain to adjust to when you’re on a moving vehicle (like a boat), so start practicing as soon as anything flies your way even if it’s not exciting.  Better to get bad shots of crows than when the elusive Whooping Crane suddenly appears on the scene.

Your Assignment:  For iPhoneographers, I’d love to see your bird images!  If you’ve managed to get a bird photo you’re proud of with your iPhone, please post it on our Facebook page:  facebook.com/snapgreatphotos!

For other shooters, get out and try these settings on robins and pigeons before you go on a birding excursion.  Everyone has different preferences and different camera features, so you may find different settings work better for you.

Lesson 102: DSLR Macro Photography

Since I answered a question about macro photography with the iPhone on our Facebook page yesterday, thought I’d do a more detailed follow up on macro with a DSLR version–my apologies for using the iPhoneography blog for a DSLR example.  For the iPhone version, check out Lesson 37:  Small Subjects.

Macro (in Canon terminology; micro if you’re a Nikon shooter) photography is probably best understood as getting really close-up to small subjects.  So close that the subject is life-sized or larger on your camera’s sensor.  It allows us to capture details that are often surprising to those of us who can’t see that well without our reading glasses.

The challenge is that all lenses have something called a minimum focusing distance.  Macro (or micro) lenses have short enough minimum focusing distances to allow you to get up close and personal with a 1:1 ratio, meaning if the subject is 10mm wide, it occupies 10mm on your sensor.

If you don’t have a macro lens, you can use extension tubes to make your minimum focusing distance much smaller, allowing you to get much closer.  Extension tubes can also be used with a macro lens to get larger than a 1:1 ratio.  Extension tube sets run from about $20-200 with the low-end being full manual and the high-end supporting the lens electronics.  With the low end version, you are likely to be stuck with a wide open aperture as the camera and lens won’t be talking to each other.

Since this blog is normally used to post simple lessons on photography you can do with your iPhone, I’m going to try to minimize the tech talk here.  But, depth of field is important in macro photography.  Depth of field refers to how much of the image is acceptably sharp in the 3rd dimension of your image–that is, front to back of the scene.

Getting up close to a subject means your depth of field is minimal even with the aperture stopped all the way down.  Sometimes backing up a bit and going more for a “close-up” shot vs a true macro image yields a more pleasing image as a result.  I frequently use a very small aperture opening (f/22ish) and opt to go “close-up” rather than true macro to increase depth of field.

Your Assignment:  I’ve included some examples of my own experiments.  There are many better examples out there from serious macro photographers.  Google macro photography in Google images and see what you get–it’s like a whole new universe living right under our lenses.  Check it out and see if this is a form of photography you’d like to experiment with.  If so, for iPhone shooters, consider getting a macro attachment lens (see Lesson 37).  For DSLR shooters, check out extension tubes as a cheap way to turn a lens you already have into a macro lens.  If you have an advanced point-and-shoot, you may also want to check out whether a macro attachment is available for your camera.