Note for iPhoneographers: the SlowShutter app will allow you apply this information to the iPhone, although stabilizing the iPhone (even in an iPhone tripod) can be challenging. See Lesson 101.
When I teach beginning photography workshops, one of the things I spend a lot of time working with students on is the relationship between exposure and artistic expression. Shutter speed is one of the big ways in which we control both exposure and motion showing in our images.
Slow shutter speeds leave the shutter open for longer periods of time, allowing more light to reach our sensors for exposure. They also allow any motion in the subject to blur. Most of us strive for tack sharp images, so why would we ever use long shutter speeds?
First, sometimes you have to use a slow (long) shutter speed if you’re shooting in low-light conditions. Second, allowing motion to blur can create some cool artistic effects. And third, if you need lots of depth of field, you’re going to need a small aperture. The age-old analogy for the relationship between the shutter speed and the aperture size is to think of a water faucet. How long you turn the water on is like your shutter speed. How wide you open the valve is like your aperture. If you turn a water faucet on wide open for a split second, you can get the same amount of water as if you turn the water on at a trickle but let it run for a much longer time. That’s how aperture and shutter speed work together to control the total volume of light that will reach your sensor and why using a small aperture usually means a slower shutter.
Let’s start with an example that was both low-light and a small aperture, but with no motion:
This example was shot at twilight with a 1 second exposure at f/18. F/18 is a small aperture opening and 1 second is a slow shutter speed. By using a tripod and a 2-second delay on the shooting mode, I was able to keep the camera still and avoid introducing motion blur. I got the exposure I wanted and kept everything from the rail in the foreground to the building in the background sharp.
Now let’s take a look at what happens if you don’t keep your camera still:
In this example, I literally picked up my camera/tripod and moved it in about the last second of a 25 second exposure. Because the building in the background is so much dimmer than the lights going up the path, the building did not blur while the lights, being so bright, created trails across the image.
Now let’s talk about using long shutter speeds to show motion in the subject itself. Waterfalls are a popular subject for this technique. By putting the camera on a tripod again, everything in the image that is still remains sharp but the moving water blurs to a soft “flow” through the image, visually communicating the movement of the water.
Compare this image (shot at ⅙ of a second) to the one after it (shot at 1/320 of a second):
The fast (1/320) shutter speed freezes the splashes of water while the slower shutter speed (⅙) allows the water to blur into softness. Which one you prefer is a matter of taste (in this case, I like the faster shutter speed better, but that’s partly because it’s slightly less exposed and has less flare from the sun).
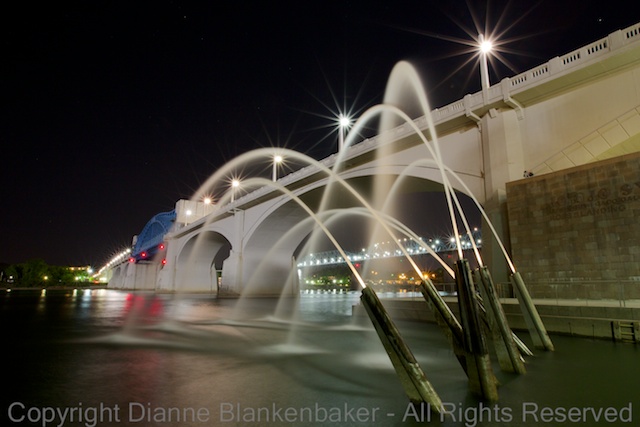
Now let’s look at an example of low-light, moving water, and lots of depth of field:
This was a 20 second exposure shot at f/16. The small aperture not only provides more depth of field, but it also turns the lights on the bridge into stars. The slow shutter allows the water coming out of the water cannons to blur into soft streams. Also notice the surface of the river–the splashes and ripples have also smoothed out into soft lines.
There are many more fun things you can do with a long exposure, but I’ll save those for future posts. 🙂


2 thoughts on “Lesson 108 (All Cameras): Long Exposures”