


For those of you who don’t have time to read a long post, here’s a summary so you can decide what’s relevant to you:
- Don’t clean your lens unless you’re actually seeing spots, areas of low contrast or fuzziness in your images. The first part of this post provides an example and links to other examples on what it looks like when stuff on your lens shows up in your images.
- If you do clean your lens, be gentle to avoid doing more harm than good. Take the time to go to the second part of this post and read the referenced article before you start cleaning.
- Before you have your sensor cleaned, make sure your problem really is dirt on your sensor. The last part of this post provides a tip and a link to step-by-step instructions on testing whether your sensor is dirty.
Recognizing When You Need to Clean the Lens
It always amazes me how much debate there can be over seemingly simple topics in photography. However, most experienced photographers tend to agree on this one: your lens doesn’t usually need to be all that clean.
I confess, I hate to clean a lens. I don’t do it unless I really have to. When it comes to my lenses, when I first started getting “serious” about photography, one of my mentors warned me that cleaning a lens too vigorously could damage the coatings on the lens and cause more problems than the dirt.
This made me so paranoid that I was afraid to clean my lenses. What I discovered was that the crud on my lens didn’t show up in my images, so I was convinced it really wasn’t worth risking damaging the lens to clean it.
Then, a few years ago, I found myself shooting outdoors in the middle of the day a lot more frequently than I would prefer. When this led to experimenting with more shots that include a lot of bright sunlight, I suddenly started getting images with blurry flare spots all over the place. Advised that I had a dirty sensor, I took my camera in and had the sensor cleaned. But that didn’t solve the problem. My problem was the dust on my lens.
Since then, I’ve learned a few things about troubleshooting spots in your images. First, there’s lens flare, which can occur regardless of how clean your equipment is. But, when you have dust on your lens, if light strikes the front lens at the wrong angle, the dust can also contribute to seeing lots of flare spots in your image.
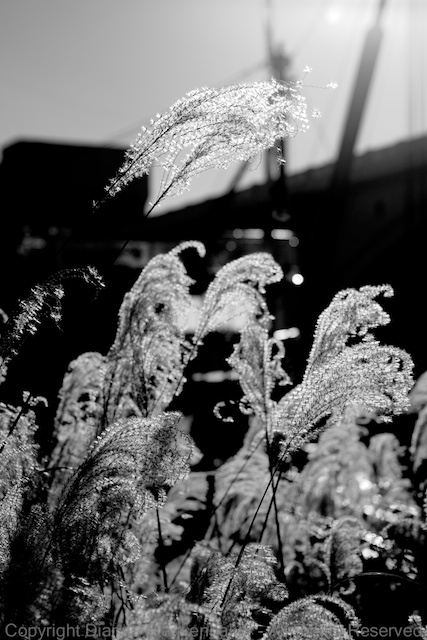
In the following example, some of the flare is not attributable to dust, but the large number of large, bright blurry spots indicate there was dust on my lens and the sun was hitting them just right:

One of the challenges of this problem is that it may occur quite infrequently. This was shot at 28mm and f/20–both the wide angle and the stopped down aperture make it more likely that flare will turn up in the image. The inclusion of the sun in the image also meant my lens hood wasn’t going to block direct light from hitting the front lens element, which is the root of flare problems. However, in this case, I wanted lens flare to show in the image. I wasn’t, however, bargaining for an entire sky full of blurry bright spots!
Since cleaning the lens, the problem has been reduced to “normal” lens flare.
But the caution I received so many years ago remains true–over cleaning your lens is more damaging than under cleaning–you really only need to clean the lens if your images are affected.
Here is an amazing article that shows just how little stuff on your lens may show up in your images–it’s definitely worth the read: Dirty Lens Article.
In spite of what the Dirty Lens Article demonstrates, this is not a justification for abusing your lens.
First, just like the dust on my lens did not show in my images the vast majority of the time, damage to the lens will also show up under different circumstances. Note that Munger’s examples with named aperture settings were all at f/5.6. As mentioned earlier, flares are more likely to show up when you’re stopped down.
Second, even if you don’t care if your lens is in pristine condition, should you ever want to sell your lens, your buyer probably will.
How to Clean the Lens
When you do clean your lens, remember that less is more. You don’t want to rub at the lens like you’re cleaning a window. Instead, try starting with a fun little toy called a blower. I particularly like the Giottos Rocket Air Blaster. It doubles as a fascinating conversation piece should you decide to keep it on display in your living room.
By using a blower, you can shoot dry air (unlike when you blow with your mouth) across the lens to blow away any loose dust on the lens. Dry air does a better job lifting away dust than moist air. Plus, do you really want to know how much spit you spray when you blow on something?
Some people like to use a very soft brush after the blower to brush away more stubborn dust. The idea is to remove anything that might be abrasive gently so that it doesn’t scratch the lens or the coatings on the lens. When you start rubbing at the lens with a cloth, you can effectively turn dust particles into sand paper, abrading those special coating that do things like reduce flare.
I skip the brush step and do the next step very, very gently.
When I first attempted lens cleaning, I bought fancy lens cleaning fluid and cleaning papers. I put a few drops of cleaning fluid on the paper and gently wiped the lens. Later, I adopted Ken Rockwell’s approach of breathing on the lens to fog it up instead of using cleaning fluid. (That article is still available and includes additional tips for using methyl alcohol to clean stubborn spots: How to Clean Lenses, Monitors, Filters and CCDs.) I also switched from using cleaning papers to microfiber chamois clothes–the main problem with the paper for me was gently getting rid of streaks without having my fingers slip off the paper and create new fingerprints. But then, I have below-average coordination.
If you are going to go to the trouble of cleaning your lens, clean the back element as well as the front (at the end that attaches to the camera). According to Nasim Mansurov, rear element dust shows up as dark specks in the out-of-focus portions of the image. He shows an example in this article.
Dust on the Rear Element vs Dust on the Sensor
Since dust on the sensor also shows up as dark spots on images, it’s probably worth cleaning the rear element before having your sensor cleaned (or cleaning it yourself). If you want to be positive whether it’s the lens or the sensor, take test shots using two different lenses based on the instructions in this article from Jeff Guyer, Got Sensor Dust? Check. See if the spots show in the same places even when you switch lenses. This will guarantee there’s no confusion between lens dust and sensor dust.
